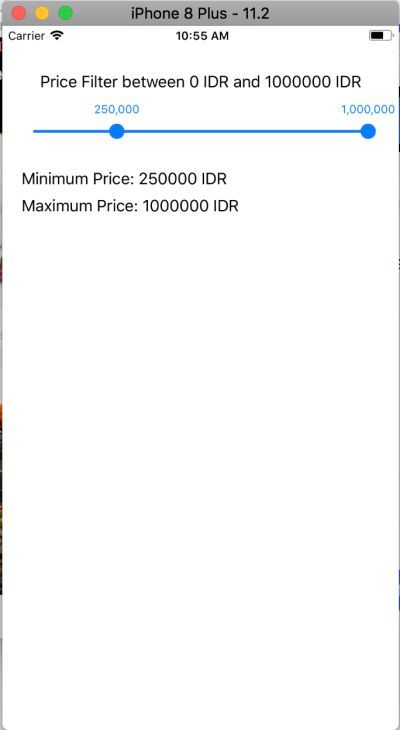
In this chance, i want to share how to implement TTRangeSlider in iOS development so that we can filter specific things like price, distance, etc. Developers often need to use slider to filter their app need. It is the helpful component that not only help the developers to make the app but also the user so that the user can filter things what they want specifically. So, this is how to use the TTRangeSlider library in iOS development. In this tutorial, i will show with the price filter.
What is slider?
Slider is a horizontal track with a control called a thumb, which you can slide with your finger to move between a minimum and maximum value. We can also use to set the brightness level or position during playing music.

TTRangeSlider.
How to include the library in the project?
Installing Cocoapods.
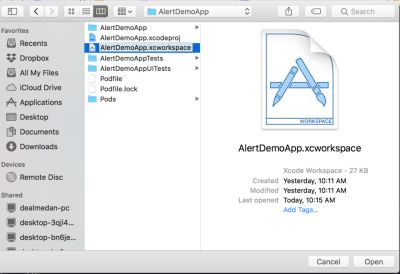
Once you're ready, close the project and always remember to open with the .xcworkspace, the white one so that you can properly using the Pod.

Then, go to the Podfile and add this line The most important things to do before including library in iOS development is we must install the Cocoapods. Cocoapods is a dependency manager that will handle various library for iOS apps. You can visit this link to view official installation https://guides.cocoapods.org/using/getting-started.html or read my previous post https://utopian.io/utopian-io/@andrixyz/how-to-implementing-alert-in-ios-using-ehplainalert and look at
# Uncomment the next line to define a global platform for your project
# platform :ios, '9.0'

target 'PriceFilterApp' do
  # Uncomment the next line if you're using Swift or would like to use dynamic frameworks
  # use_frameworks!

  # Pods for PriceFilterApp
  pod 'EHPlainAlert'
  pod 'Masonry'
  pod 'TTRangeSlider'
  target 'PriceFilterAppTests' do
    inherit! :search_paths
    # Pods for testing
  end

  target 'PriceFilterAppUITests' do
    inherit! :search_paths
    # Pods for testing
  end

end
Then don't forget to run pod install command to analyze and install the TTRangeSlider. Clean and build the project so everything will refresh to work better :). Then, let's work on.
Declare in the .h file
In objective c ios development, there is always to file. The .h and .m file. The .h file is the header which usually we import and declares variable or library that needs the delegate in the .m. Meanwhile, the .m file is the implementation of the .h file. This is how we declare the TTRangeSlider in our PriceViewController.h file
//
//  PriceViewController.h
//  AlertDemoApp
//
//  Created by Andri on 1/8/18.
//  Copyright © 2018 Andri. All rights reserved.
//

#import <UIKit/UIKit.h>
#import <TTRangeSlider.h>
#import <Masonry.h>

@interface PriceViewController : UIViewController <TTRangeSliderDelegate>{
    TTRangeSlider *priceSlider;
    UILabel *minPriceLabel;
    UILabel *maxPriceLabel;
}

@end
Look at the TTRangeSlider *priceSlider`` code. That is we declare the variable first. Don't forget to notice the```. It means we are assigning the protocol to the PriceViewController class so we can delegate the method. Then, we're going to use that in PriceViewController.m file.
Go to our PriceViewController.m in this context. And write down this code.
priceSlider = [TTRangeSlider new];
//    priceSlider.hideLabels = YES;
    priceSlider.delegate = self;
    priceSlider.lineHeight = 3;
    priceSlider.minValue = 0;
    priceSlider.maxValue = 1000000;
    priceSlider.minDistance = 50000;
    priceSlider.enableStep = YES;
    priceSlider.step = 50000;
    priceSlider.selectedMinimum = 0;
    priceSlider.selectedMaximum = 1000000;
    [self.view addSubview:priceSlider];
    [priceSlider mas_makeConstraints:^(MASConstraintMaker *make) {
        make.left.equalTo(self.view).offset(16);
        make.right.equalTo(self.view).offset(-16);
        make.top.equalTo(priceLabel.mas_bottom).offset(8);
    }];
The priceSlider.delegate = self line means that we delegate it to the view controller so the view controller can override the method so we can manipulate with the results.
The priceSlider.lineHeight = 3; line means that we just set the line height of the slider
The priceSlider.minValue = 0; line describes that the minimum value that the user can slide on the slider or we can say it is the limit of minimum
The priceSlider.maxValue = 0; line describes that the maximum value that the user can slide on the slider or we can say it is the limit of maximum
The priceSlider.minDistance = 50000; line describes the minimum distance between minimum and maximum value
The priceSlider.enableStep = YES; line indicates that we enable the step so user can snap at specific value using step property
The priceSlider.step = 50000 line describes that each step will increase 50000 value
The priceSlider.selectedMinimum = 0 line means the current selected minimum value of the slider ball
The priceSlider.selectedMaximum = 1000000 line means the current selected maximum value of the slider ball
The [self.view addSubview:priceSlider]; line means we add the view to our self.view
And the [priceSlider mas_makeConstraints:^(MASConstraintMaker *make) { make.left.equalTo(self.view).offset(16); make.right.equalTo(self.view).offset(-16); make.top.equalTo(priceLabel.mas_bottom).offset(8); }];
line is just as usual we set constraint to the left and right with offset 18 and the top below the priceLabel with offset 8.
That are all the explanation of the declaration codes. Then, we must implement the delegate method of the slider. Write down this code.
#pragma mark - TTRangeSliderDelegate
-(void)rangeSlider:(TTRangeSlider *)sender didChangeSelectedMinimumValue:(float)selectedMinimum andMaximumValue:(float)selectedMaximum{
    NSString *min = [NSString stringWithFormat:@"%.0f",selectedMinimum];
    NSString *max = [NSString stringWithFormat:@"%.0f",selectedMaximum];
    minPriceLabel.text = [NSString stringWithFormat:@"Minimum Price: %@ IDR", min];
    maxPriceLabel.text = [NSString stringWithFormat:@"Maximum Price: %@ IDR", max];
}
Notice the (void)rangeSlider:(TTRangeSlider *)sender didChangeSelectedMinimumValue:(float)selectedMinimum andMaximumValue:(float)selectedMaximum{ line.
It means we are override the method so we can modify interactions when the user is dragging the slider. In our above code, it assigns the min and max value to the string value and then show it to the label so user can see what is the specific value they choose.
You can copy this entire PriceViewController.m file though.
//
//  PriceViewController.m
//  PriceDemoApp
//
//  Created by Andri on 1/8/18.
//  Copyright © 2018 Andri. All rights reserved.
//

#import "PriceViewController.h"

@interface PriceViewController ()

@end

@implementation PriceViewController

- (void)viewDidLoad {
    [super viewDidLoad];
    self.view.backgroundColor = [UIColor whiteColor];

    UILabel *priceLabel = [UILabel new];
    priceLabel.text = @"Price Filter between 0 IDR and 1000000 IDR";
    [self.view addSubview:priceLabel];
    [priceLabel mas_makeConstraints:^(MASConstraintMaker *make) {
        make.centerX.equalTo(self.view);
        make.top.equalTo(self.view).offset(48);
    }];

    priceSlider = [TTRangeSlider new];
//    priceSlider.hideLabels = YES;
    priceSlider.delegate = self;
    priceSlider.lineHeight = 3;
    priceSlider.minValue = 0;
    priceSlider.maxValue = 1000000;
    priceSlider.minDistance = 50000;
    priceSlider.enableStep = YES;
    priceSlider.step = 50000;
    priceSlider.selectedMinimum = 0;
    priceSlider.selectedMaximum = 1000000;
    [self.view addSubview:priceSlider];
    [priceSlider mas_makeConstraints:^(MASConstraintMaker *make) {
        make.left.equalTo(self.view).offset(16);
        make.right.equalTo(self.view).offset(-16);
        make.top.equalTo(priceLabel.mas_bottom).offset(8);
    }];

    minPriceLabel = [UILabel new];
    minPriceLabel.text = @"Minimum Price:";
    [self.view addSubview:minPriceLabel];
    [minPriceLabel mas_makeConstraints:^(MASConstraintMaker *make) {
        make.top.equalTo(priceSlider.mas_bottom).offset(8);
        make.left.equalTo(priceSlider).offset(4);
    }];

    maxPriceLabel = [UILabel new];
    maxPriceLabel.text = @"Maximum Price:";
    [self.view addSubview:maxPriceLabel];
    [maxPriceLabel mas_makeConstraints:^(MASConstraintMaker *make) {
        make.top.equalTo(minPriceLabel.mas_bottom).offset(8);
        make.left.equalTo(minPriceLabel);
    }];
}

- (void)didReceiveMemoryWarning {
    [super didReceiveMemoryWarning];
    // Dispose of any resources that can be recreated.
}

#pragma mark - TTRangeSliderDelegate
-(void)rangeSlider:(TTRangeSlider *)sender didChangeSelectedMinimumValue:(float)selectedMinimum andMaximumValue:(float)selectedMaximum{
    NSString *min = [NSString stringWithFormat:@"%.0f",selectedMinimum];
    NSString *max = [NSString stringWithFormat:@"%.0f",selectedMaximum];
    minPriceLabel.text = [NSString stringWithFormat:@"Minimum Price: %@ IDR", min];
    maxPriceLabel.text = [NSString stringWithFormat:@"Maximum Price: %@ IDR", max];
}

/*
#pragma mark - Navigation

// In a storyboard-based application, you will often want to do a little preparation before navigation
- (void)prepareForSegue:(UIStoryboardSegue *)segue sender:(id)sender {
    // Get the new view controller using [segue destinationViewController].
    // Pass the selected object to the new view controller.
}
*/

@end
Okay, that's all i want to share about how to implement TTRangeSlider in iOS development. You can modify or add another label to filter distance. It's important just to understand the concepts and each property and the library. Thank you for reading this guide.
Posted on Utopian.io - Rewarding Open Source Contributors
.
Thank you for the contribution. It has been approved.
You can contact us on Discord.
[utopian-moderator]
You're welcome.
Hey @andrixyz I am @utopian-io. I have just upvoted you!
Achievements
Suggestions
Get Noticed!
Community-Driven Witness!
I am the first and only Steem Community-Driven Witness. Participate on Discord. Lets GROW TOGETHER!
Up-vote this comment to grow my power and help Open Source contributions like this one. Want to chat? Join me on Discord https://discord.gg/Pc8HG9x