
Introduction
Hello Anidel here for another simple tutorial. In this tutorial we will discuss how to operate the Raiblock Desktop Wallet. This tutorial is divided into 6 sections:
1. How to secure our Raiblock Desktop wallet
2. How to send MRAI's (Raiblocks)
3. How to Generate Raiblock wallet addresses (accounts)
4. How to Backup our Raiblock Desktop Wallet
5. How to restore or export our Raiblock Desktop Wallet
6. How to inspect our transactions (MRAI blockchain explorer)
Note: To learn more about Raiblocks please read this informative article written by a fellow steemian @chesatochi
Requirements
- Installed Raiblock Desktop wallet (If you have not done so you can find a tutorial on how to install the wallet here.)
- Web Browser
- Windows OS 64-Bit
- Internet connection
Procedures
Section 1: How to secure our Raiblock Desktop Wallet
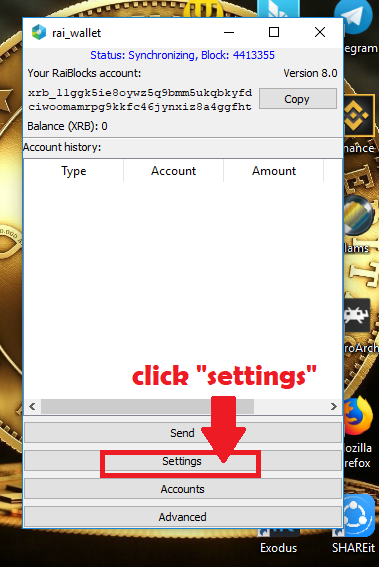
The first thing we would like to do when getting a new cryptocurrency wallet is to secure them. One of the simplest on doing this is to "set" the wallet password. We can do this by clicking on the "settings button" in the main dashboard of the Raiblock wallet as shown below.
After clicking the "settings button" we will be brought to the "Settings page" where we can set the password of our Raiblock wallet. Since we don't have the Password yet just leave the the unlock /lock password field empty. Then enter the desired password for our wallet. Click on the "Set/change password button" to save the password entered. We are done in setting the password.
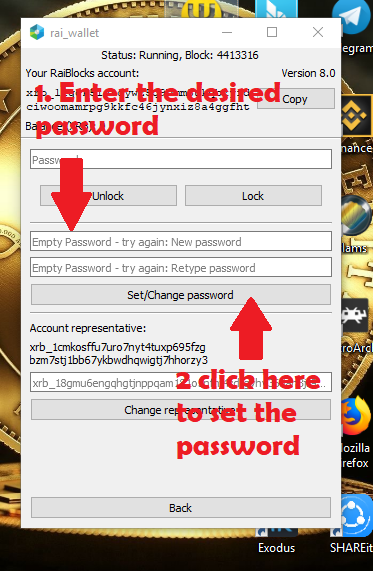
We can also change the password in this page. All we have to do is input the current password in the First "password input field" then input the new password in the field below it. We input it twice for confirmation. A sample on how to do it is shown below.

Section 2: How to send MRAI (Raiblocks) to other Raiblock wallets
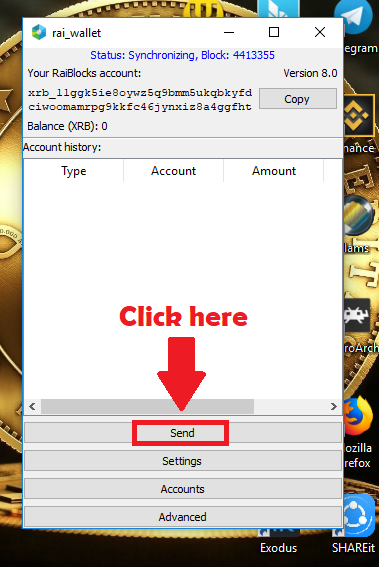
To send MRAI's (Raiblocks) is pretty straight forward. In the main page of the wallet click on the "send button" as shown below then follow the steps as shown in the next page. Please do note that MRAI and XRB are used interchangeably (They both refer to the cryptocurrency of Raiblock).
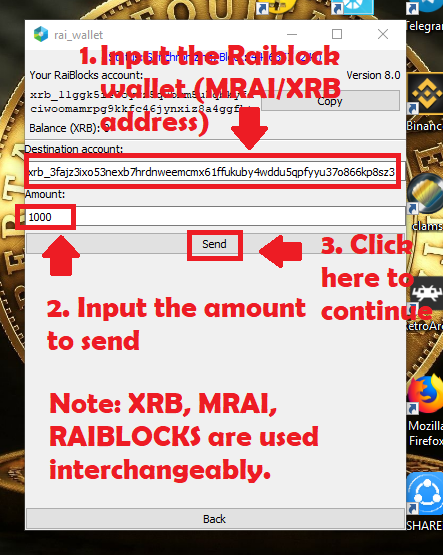
Note:There is no acknowledgement that the MRAI'/XRB/RAIBLOCKS have been sent. We can just confirm that it has been sent. We can just check the transaction in the account explorer site here. The link will show us a page with an invalid account message in the middle if you don't add the Raiblock wallet address. We need to add our wallet address/Account after the "=". **For more information on this please refer to Section 6 of this tutorial.
Section 3: How to Generate Raiblock wallet addresses (accounts)
To generate a wallet address or "accounts" in the Raiblock wallet we click on the "Accounts button" in the main wallet page. We will be brought to the account creation page. To create the address or account we have to click on the "Create account button" as shown in the screen capture below. Once clicked there will be a new address in the window in the "Address box." This is where all generated addresses/accounts will be shown. To access the account we will just have to click on the address/account that we want to use then click on the "Use Account button." This should switch to the account. We can see the address on top of the page.

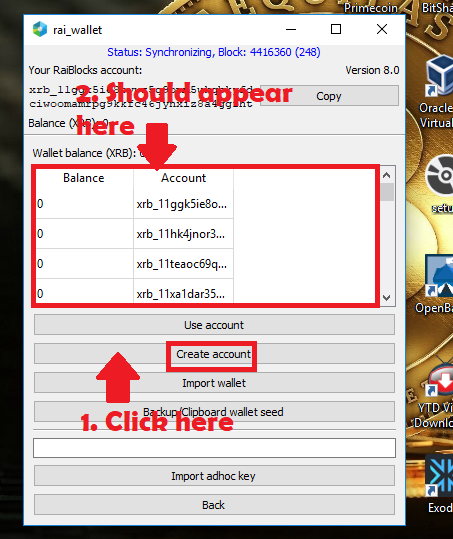
This is how to access the wallet address/account we have just created

Section 4: How to Backup our Raiblock wallet
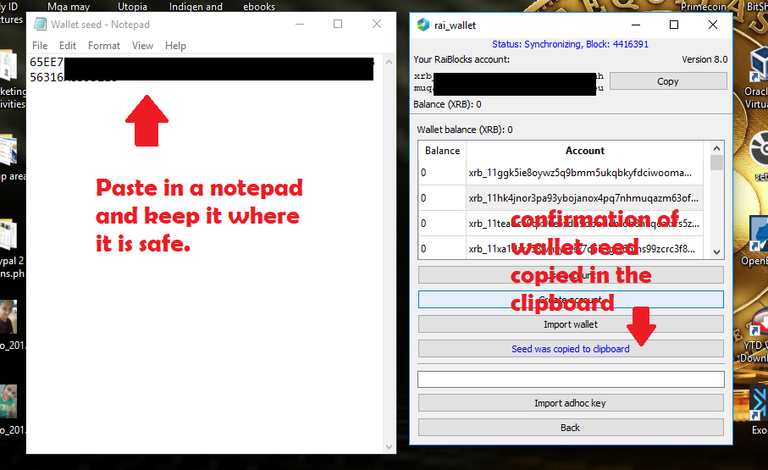
Another important step is backing up our wallet. We can do this by getting the seed from the wallet. Please note that this seed is the backup of the WHOLE WALLET. Meaning all the generated addresses/accounts are backed using this one seed.
First we click on the "Accounts button" at the main page of the Raiblock wallet. Then it will bring us to the accounts page where we can click the "Backup/Clipboard wallet seed button" This will copy to our clipboard the wallet seed, then we have to cut and paste the wallet seed to a notepad file (Please be careful with this key as it can be use to regenerate our WHOLE WALLET).


Secton 5: How to restore or import our Raiblock wallet
In this section we will discuss how to import our Raiblock wallet from the seed we have just created. To do this first we need to go to the account page as shown below.

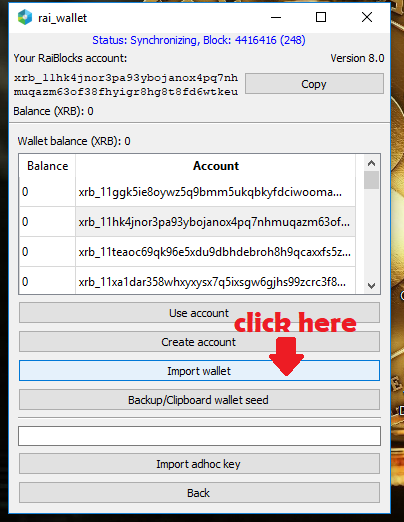
Clicking the "Import wallet button" will bring us to the wallet import page where we can do the importation process. First we cut and paste the wallet seed from the notepad to the seed field in the import page as show below. Then we type in "clear key" in the field just below where we pasted our our seed.

It may take awhile to finish the importion seed. Just wait until the program respond again.

When the importation of seed is finished you will get a " Successful import of Seed" message.
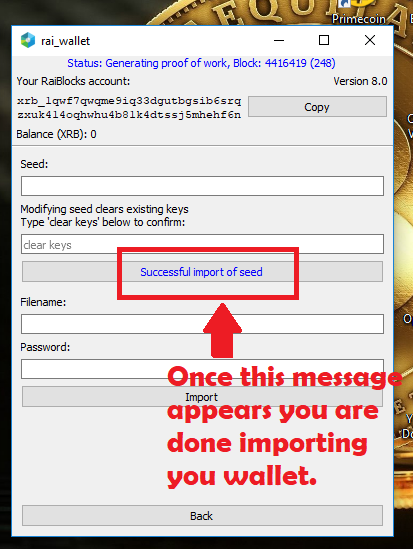
Done. We have now successfully imported the seed (recovered the wallet from back-up seed). Now let us now proceed to the next and last section of my tutorial.
Section 6: How to inspect our transactions (MRAI/Account explorer)
If you want to check the your transaction you can go to Raiblock's Transaction Explorer page here. Please do not forget to add your address the format should be:
https://raiblocks.net/account/index.php?acc=< YOUR RAIBLOCK ADDRESS>

Just scroll down to check the transactions.

That is it for now. I hope you found this tutorial easy to understand and useful. Until next time Goodbye!
Posted on Utopian.io - Rewarding Open Source Contributors
Nice post very heplful to very body
Thanks for stopping by I hope you find the tutorial helpful
Thank you for the contribution. It has been approved.
You can contact us on Discord.
[utopian-moderator]
Thank you sir :)
Hey @ankarlie I am @utopian-io. I have just upvoted you!
Achievements
Suggestions
Get Noticed!
Community-Driven Witness!
I am the first and only Steem Community-Driven Witness. Participate on Discord. Lets GROW TOGETHER!
Up-vote this comment to grow my power and help Open Source contributions like this one. Want to chat? Join me on Discord https://discord.gg/Pc8HG9x
Thank you for your upvote :)
Really great post my friend!
Thanks for reading my post :) Hope you find this one useful friend :)
wow awesome post & good work friend
Thanks. I always try to do my best when I do this tutorials :) I hope you find them useful.
Congratulations! This post has been upvoted from the communal account, @minnowsupport, by ankarlie from the Minnow Support Project. It's a witness project run by aggroed, ausbitbank, teamsteem, theprophet0, someguy123, neoxian, followbtcnews/crimsonclad, and netuoso. The goal is to help Steemit grow by supporting Minnows and creating a social network. Please find us in the Peace, Abundance, and Liberty Network (PALnet) Discord Channel. It's a completely public and open space to all members of the Steemit community who voluntarily choose to be there.
If you would like to delegate to the Minnow Support Project you can do so by clicking on the following links: 50SP, 100SP, 250SP, 500SP, 1000SP, 5000SP. Be sure to leave at least 50SP undelegated on your account.
nice post @alaminbappy
Thanks for stopping by sir :)