What Will I Learn?
In this tutorial;
- You will learn what Borders does.
- You will learn how to use Empty Border.
- You will learn how to use Line Border.
- You will learn how to use Etched Border.
- You will learn how to use Bevel Border.
- You will learn how to use Titled Border.
- You will learn how to use Compound Border.
- You will learn how to use Matte Border.
Requirements
-Java SE Development Kit (Not necessarily the last version) is required.
-Eclipse IDE or any similar Interated Development Enviroment (IDE) that is designed for Java programming language is required.
Difficulty
- Intermediate
Tutorial Contents
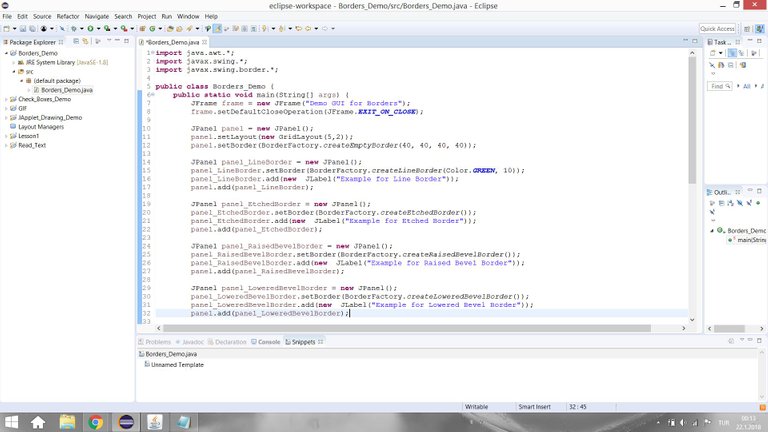
The purpose of this tutorial is showing the use of the borders in a Java GUI. In this example, we have single java file (Borders_Demo.java). The following figures contains the code of this java file.
Borders
The borders in Java can be put border around any Swing component objects. In order to use them, we need to import the following package.
import javax.swing.border.*;
To add border in a panel basically the following code structure is used;
PANEL.setBorder(BorderFactory.BORDERTYPE);
In this program, a Java GUI that contains borders examples is created. For this GUI, 9 different JPanel are created. One is the main panel that contains the all example panels. The other panels are added to the main panel and they are the panels for the example borders. Firstly, the main frame is created;
public class Borders_Demo {
    public static void main(String[] args) {
        JFrame frame = new JFrame("Demo GUI for Borders");
        frame.setDefaultCloseOperation(JFrame.EXIT_ON_CLOSE);
Then the main panel is created with Grid Layout (with parameters 5 rows and 2 columns) which was explained at the previous tutorial.
        JPanel panel = new JPanel();
        panel.setLayout(new GridLayout(5,2));
Empty Border
The empty border puts empty space around the edges (top, bottom, right and left) of the component. The parameters for the edges are in the form of pixels. In this program, we added 40 pixels empty border to the all edges in the main panel so that the other added panels could be 40 pixel far away from the borders of the main frame window that open when you run the program. To achieve this the following code must be used;
        //BorderFactory.createEmptyBorder(top, left, bottom, right)
        panel.setBorder(BorderFactory.createEmptyBorder(40, 40, 40, 40));
Line Border
The line border creates a line surrounding the component. The thickness in the form of pixels and the color of the line can be determined by user. To understand the line border, a new panel with green and 3 pixels in thickness line border was created and added to the main panel with the following code;
        //BorderFactory.createLineBorder(Color, int thickness)
        JPanel panel_LineBorder = new JPanel();
        panel_LineBorder.setBorder(BorderFactory.createLineBorder(Color.GREEN, 10));
        panel_LineBorder.add(new  JLabel("Example for Line Border"));
        panel.add(panel_LineBorder);
Etched Border
The etched border creates an effect of an etched groove around a component. It does not take any parameters .To understand the etched border, a new panel with etched border was created and added to the main panel with the following code;
        //BorderFactory.createEtchedBorder()
        JPanel panel_EtchedBorder = new JPanel();
        panel_EtchedBorder.setBorder(BorderFactory.createEtchedBorder());
        panel_EtchedBorder.add(new  JLabel("Example for Etched Border"));
        panel.add(panel_EtchedBorder);
Bevel Border
The bevel border adds an raised or lowered effect to the component . So, there are two types of bevel border.
Raised Bevel Border
It does not take any parameters. To understand the etched border, a new panel with raised bevel border was created and added to the main panel with the following code;
        //BorderFactory.createRaisedBevelBorder()
        JPanel panel_RaisedBevelBorder = new JPanel();
        panel_RaisedBevelBorder.setBorder(BorderFactory.createRaisedBevelBorder());
        panel_RaisedBevelBorder.add(new  JLabel("Example for Raised Bevel Border"));
        panel.add(panel_RaisedBevelBorder);
Lowered Bevel Border
It does not take any parameters. To understand the etched border, a new panel with lowered bevel border was created and added to the main panel with the following code;
        //BorderFactory.createLoweredBevelBorder()
        JPanel panel_LoweredBevelBorder = new JPanel();
        panel_LoweredBevelBorder.setBorder(BorderFactory.createLoweredBevelBorder());
        panel_LoweredBevelBorder.add(new  JLabel("Example for Lowered Bevel Border"));
        panel.add(panel_LoweredBevelBorder);
Titled Border
The title border creates a border with title. It takes title as parameter. To understand the etched border, a new panel with titled border was created and added to the main panel with the following code;
        //BorderFactory.createTitledBorder(String title)
        JPanel panel_TitledBorder = new JPanel();
        panel_TitledBorder.setBorder(BorderFactory.createTitledBorder("Titled Border"));
        panel_TitledBorder.add(new  JLabel("Example for Titled Bevel Border"));
        panel.add(panel_TitledBorder);
The title position can also be changed. To achive this first define TitledBorder object and then choose position like in the comment in the below code box. A new panel was also prepared for this.
        //object.setTitleJustification(TitledBorder.POSITION)
        JPanel panel_TitledBorder_Right = new JPanel();
        TitledBorder title = BorderFactory.createTitledBorder("Titled Border");
        title.setTitleJustification(TitledBorder.RIGHT);
        panel_TitledBorder_Right.setBorder(title);
        panel_TitledBorder_Right.add(new  JLabel("Example for Right Titled Bevel Border"));
        panel.add(panel_TitledBorder_Right);
Compound Border
By using the compuond border, two borders can be combined. To achive this, you need to define two different border objects. Then by using the code structure in the coment in the below box you can add the combination of two borders. A new panel was also prepared to see this;
        //PANEL.setBorder(BorderFactory.createCompoundBorder(Border b1, Border b2))
        JPanel panel_CompoundBorder = new JPanel();
        Border first_border_to_compound = BorderFactory.createLineBorder(Color.BLACK, 2);
        Border second_border_to_compound = BorderFactory.createEtchedBorder();
        panel_CompoundBorder.setBorder(BorderFactory.createCompoundBorder(first_border_to_compound, second_border_to_compound));
        panel_CompoundBorder.add(new  JLabel("Example for Compound Border"));
        panel.add(panel_CompoundBorder);
Matte Border
By using the matte border, the border size of each edge can specified with any color. To achive this, you need to define the specific matte border and then you need to set you border to this specified matte border. A new panel was also prepared to see this;
        JPanel panel_MatteBorder = new JPanel();
        Border matte = BorderFactory.createMatteBorder(1, 5, 10, 1, Color.YELLOW);
        panel_MatteBorder.setBorder(matte);
        panel_MatteBorder.add(new JLabel("Example For Matte Border"));
        panel.add(panel_MatteBorder);
Result
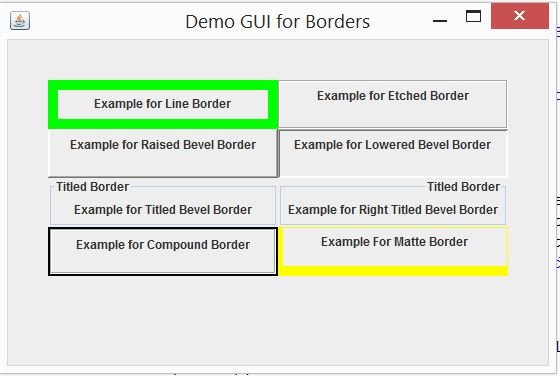
When you run this program, the following frame opens.
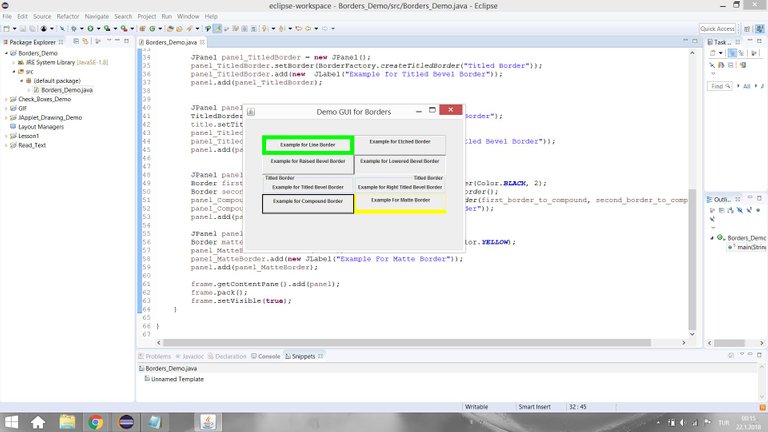
You can compare and see the difference of the borders from this frame.
Github
You can get this program from Github.
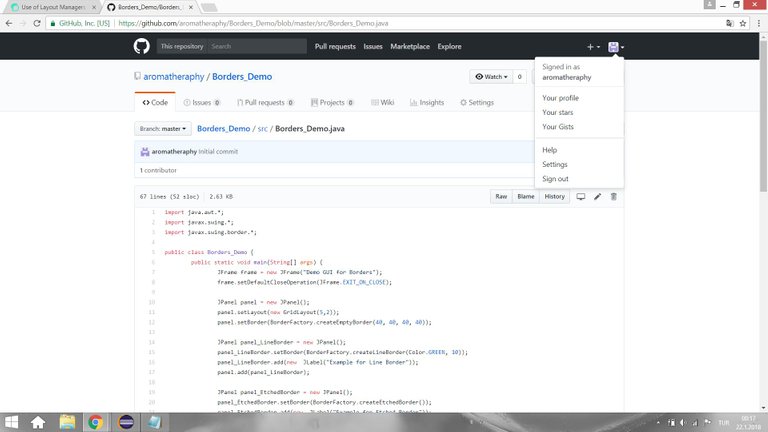
Code of The Program
import java.awt.*;
import javax.swing.*;
import javax.swing.border.*;
public class Borders_Demo {
    public static void main(String[] args) {
        JFrame frame = new JFrame("Demo GUI for Borders");
        frame.setDefaultCloseOperation(JFrame.EXIT_ON_CLOSE);
        JPanel panel = new JPanel();
        panel.setLayout(new GridLayout(5,2));
        panel.setBorder(BorderFactory.createEmptyBorder(40, 40, 40, 40));
        JPanel panel_LineBorder = new JPanel();
        panel_LineBorder.setBorder(BorderFactory.createLineBorder(Color.GREEN, 10));
        panel_LineBorder.add(new  JLabel("Example for Line Border"));
        panel.add(panel_LineBorder);
        JPanel panel_EtchedBorder = new JPanel();
        panel_EtchedBorder.setBorder(BorderFactory.createEtchedBorder());
        panel_EtchedBorder.add(new  JLabel("Example for Etched Border"));
        panel.add(panel_EtchedBorder);
        JPanel panel_RaisedBevelBorder = new JPanel();
        panel_RaisedBevelBorder.setBorder(BorderFactory.createRaisedBevelBorder());
        panel_RaisedBevelBorder.add(new  JLabel("Example for Raised Bevel Border"));
        panel.add(panel_RaisedBevelBorder);
        JPanel panel_LoweredBevelBorder = new JPanel();
        panel_LoweredBevelBorder.setBorder(BorderFactory.createLoweredBevelBorder());
        panel_LoweredBevelBorder.add(new  JLabel("Example for Lowered Bevel Border"));
        panel.add(panel_LoweredBevelBorder);
        JPanel panel_TitledBorder = new JPanel();
        panel_TitledBorder.setBorder(BorderFactory.createTitledBorder("Titled Border"));
        panel_TitledBorder.add(new  JLabel("Example for Titled Bevel Border"));
        panel.add(panel_TitledBorder);
        JPanel panel_TitledBorder_Right = new JPanel();
        TitledBorder title = BorderFactory.createTitledBorder("Titled Border");
        title.setTitleJustification(TitledBorder.RIGHT);
        panel_TitledBorder_Right.setBorder(title);
        panel_TitledBorder_Right.add(new  JLabel("Example for Right Titled Bevel Border"));
        panel.add(panel_TitledBorder_Right);
        JPanel panel_CompoundBorder = new JPanel();
        Border first_border_to_compound = BorderFactory.createLineBorder(Color.BLACK, 2);
        Border second_border_to_compound = BorderFactory.createEtchedBorder();
        panel_CompoundBorder.setBorder(BorderFactory.createCompoundBorder(first_border_to_compound, second_border_to_compound));
        panel_CompoundBorder.add(new  JLabel("Example for Compound Border"));
        panel.add(panel_CompoundBorder);
        JPanel panel_MatteBorder = new JPanel();
        Border matte = BorderFactory.createMatteBorder(1, 5, 10, 1, Color.YELLOW);
        panel_MatteBorder.setBorder(matte);
        panel_MatteBorder.add(new JLabel("Example For Matte Border"));
        panel.add(panel_MatteBorder);
        frame.getContentPane().add(panel);
        frame.pack();
        frame.setVisible(true);
    }
}
Curriculum
You can find my other java related tutorials in below links.
- Adding JPEG or GIF image files into the GUI in Java using Eclipse IDE
- Reading Text Files and Parsing It Using Iterators and Delimiter in Java with Eclipse IDE
- Drawing Methods in Java Applet (JApplet) Using Eclipse IDE: Drawing a Snowman
- Check Boxes (JCheckBox) and Its Listeners in a Java GUI using Eclipse IDE
- Use of Layout Managers and Tabbed Pane in Java Using Eclipse IDE
Posted on Utopian.io - Rewarding Open Source Contributors
Thank you for the contribution. It has been approved.
You can contact us on Discord.
[utopian-moderator]
Hey @aromatheraphy I am @utopian-io. I have just upvoted you!
Achievements
Suggestions
Get Noticed!
Community-Driven Witness!
I am the first and only Steem Community-Driven Witness. Participate on Discord. Lets GROW TOGETHER!
Up-vote this comment to grow my power and help Open Source contributions like this one. Want to chat? Join me on Discord https://discord.gg/Pc8HG9x