
Repository
https://github.com/realm/realm-java
What Will I Learn?
- Notifications in Realm
- Object Notifications
Requirements
- An Integrated Development Environment(IDE) for building Android Application(e.g Android Studio, IntelliJ)
- Android Device/Virtual Device.
- Little Experience in working with Realm Java.
- Java Programming Experience.
- Of course, willingness to learn
Resources
- Retrofit Website. https://realm.io/
- Retrofit Github. - https://github.com/realm
- Retrofit License - Apache License
- Lombok Website - https://projectlombok.org
Difficulty
- Intermediate
Tutorial Duration - 30 - 35Mins
Tutorial Content
In today's tutorial, we are going to be looking at Notifications in Realm. In Realm, several levels of Notifications are supported, and for today's tutorial, we are going to be considering Object Notifications.
When a notification is added on a particular RealmObject, you can get notified if the object is deleted or if any of it's managed field is modified.
Changes on the RealmObject can be accessed via the ObjectChangeSet parameter passed to the change listener which holds information about which fields were changed and if the RealmObject was deleted.
While the ObjectChangeSet.isDeleted will return true if the object is deleted, the ObjectChangeSet.getChnagedFields will return the names of the changed fields if a Object that the listener is registered to is changed.
One can also use the ObjectChangeSet.isFieldChanged to test is a given field was just changed.
NB: : The listener will not be called again if the registered object is deleted.
In today's tutorial, we are going to be creating an Android application that the user will be expected to input a name and then we will search the realm database and upon finding an object that matches the user input, we are going to register an Object listener on it.
Outline
- Dependencies Used.
- Add EditText's and Buttons to activity_main.xml.
- Create a model class - Person.
- Realm Notification Illutstration.
Depenedencies used
- implementation 'com.jakewharton:butterknife:8.8.1'
annotationProcessor 'com.jakewharton:butterknife-compiler:8.8.1'
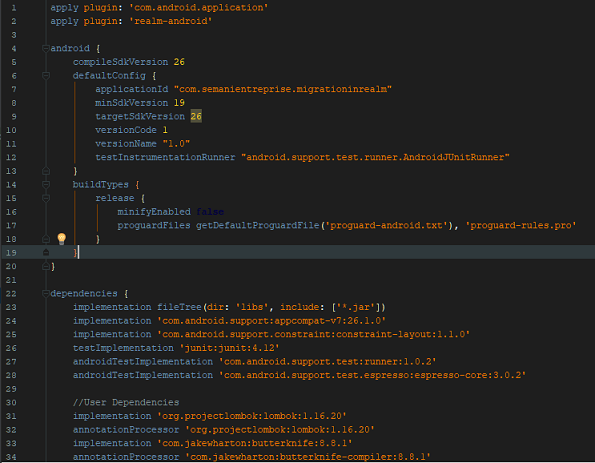
The ButterKnife dependency should be placed in your application level gradle file - "build.gradle" which will make the injection of views (e.g ImageView, TextView) as easy as possible which we will be seeing in this tutorial.
- implementation 'org.projectlombok:lombok:1.16.20'
annotationProcessor 'org.projectlombok:lombok:1.16.20'
The lombok dependency also is placed in the application level gradle file which makes the generator of getter and setter methods for our model classes by just adding the annotations @Getter for getters and @Setter for the setter methods.
Realm dependency
Steps
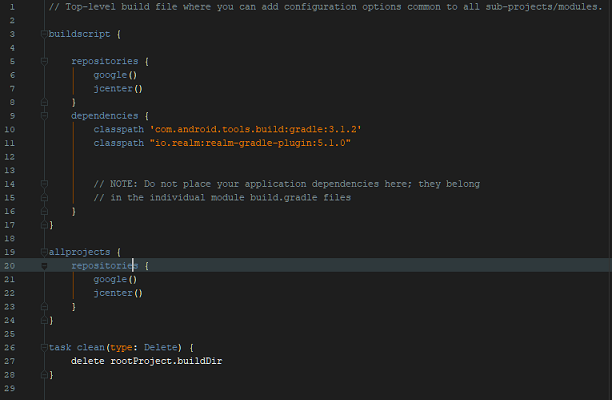
Head to your project level gradle file and add the classpath dependency:
classpath "io.realm:realm-gradle-plugin:5.1.0"Next, head to your application level Gradle file "build.gradle" and add the realm-android plugin to the top of the file.
apply plugin:'realm-android'
Finally, refresh your Gradle dependencies.
After you have added the necessary dependencies, your application level Gradle file should look like this :
And your project level Gradle file should look like this :
Add EditText's and Buttons to activity_main.xml
For accepting the input from the user, we are going to add a single EditText and a Button for the user to click and once we can find a matching Object, we will fill the remaining three EditText with the user info and make available an update button that when clicked, we are going to make a Toast showing which fields where changed.
activity_main.xml
//RootLayout - RelativeLayout
<EditText
    android:id="@+id/search_name"
    android:layout_width="match_parent"
    android:layout_height="wrap_content"
    android:hint="Enter Search Name" />

<Button
    android:id="@+id/search_btn"
    android:layout_width="wrap_content"
    android:layout_height="wrap_content"
    android:layout_below="@+id/search_name"
    android:layout_centerHorizontal="true"
    android:layout_marginTop="10dp"
    android:backgroundTint="#34f131"
    android:text="search" />

<LinearLayout
    android:id="@+id/update_person_layout"
    android:layout_width="match_parent"
    android:layout_height="wrap_content"
    android:layout_below="@+id/search_btn"
    android:layout_marginTop="10dp"
    android:orientation="vertical"
    android:visibility="gone"
    >

    <TextView
        android:layout_width="match_parent"
        android:layout_height="wrap_content"
        android:gravity="center_horizontal"
        android:padding="5dp"
        android:text="Update User Details"
        android:textColor="#000"
        android:textSize="17sp" />

    <EditText
        android:id="@+id/person_name"
        android:layout_width="match_parent"
        android:layout_height="wrap_content" />

    <EditText
        android:id="@+id/person_age"
        android:layout_width="match_parent"
        android:layout_height="wrap_content" />

    <EditText
        android:id="@+id/person_married"
        android:layout_width="match_parent"
        android:layout_height="wrap_content" />

    <Button
        android:id="@+id/update_btn"
        android:layout_width="wrap_content"
        android:layout_height="wrap_content"
        android:layout_gravity="center_horizontal"
        android:layout_marginTop="10dp"
        android:backgroundTint="#34f131"
        android:text="update Details" />

</LinearLayout>
Code Explanation
- EditText - For accepting the user's name that we will be using to query our realm database - id => search_name_
- Button - For initializing the search on the realm database, with id - search_btn and text - "search".
- LinearLayout with the orientation of veritcal, which houses the Three EditText that will be auto-filled with the details of the Object that matches our search on the realm database. The LinearLayout's visibility is set to gone as this layout will be invincible to the user and will only be made visible to the user if a match Object is found.
- TextView - This TextView is used just to display the text - "Update User Details"
- Three EditText's used to display the matching Object's name, age, and Married values with the id's - person_name, person_age, and person_married respectively.
- Button - To save the new details of the edited Object with id - update_btn and text - "update details"
Creating the Person model Class
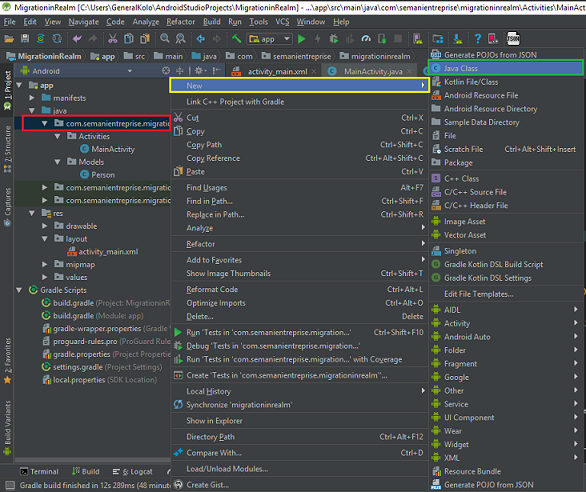
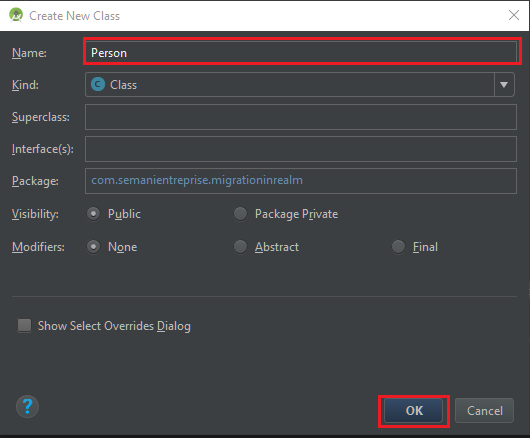
Next, we are going to create a new java class file which can be done by right-clicking on java folder => New => Java class and then input the name the class Person.
Step 1
Step 2
Next, let the Person class extend the RealmObject class and add the following fields - name (String) , age (int) , married (Boolean) and then we add the annotations @Getter and @Setter using lombok library in order to inject our getter and setter methods, this way boilerplate are removed.
@Getter
@Setter
public class Person extends RealmObject {
    private String name;
    private int age;
    private Boolean married;
}
Realm Notification Illutstration.
In our MainActivity.java class file, we are going to be doing the following:
- Injecting our Views Using ButterKnife.
- Create four
Personclass objects. - Perform a search on our database based on the user entry.
- Add an
RealmObjectChangeListeneron the matching Object - Perform an update on the
Objectand then show a Toast based on the changed fields.
MainActivity.java
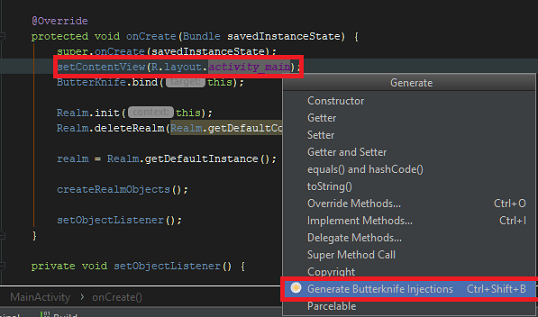
To inject the views using ButterKnife, place your cursor on the activity name on the setContent() line => alt + ins => Generate ButterKnife Injection as shown below :
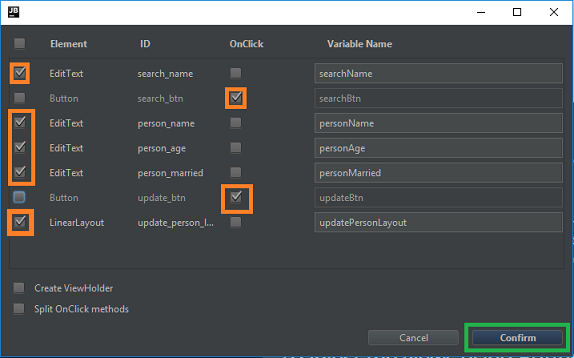
Select the respective fields as shown below:
The injected codes are as follows:
@BindView(R.id.search_name)
EditText searchName;
@BindView(R.id.person_name)
EditText personName;
@BindView(R.id.person_age)
EditText personAge;
@BindView(R.id.person_married)
EditText personMarried;
@BindView(R.id.update_person_layout)
LinearLayout updatePersonLayout;

//in OnCreate() Method
ButterKnife.bind(this);

//onClick methods
@OnClick({R.id.search_btn, R.id.update_btn})
public void onViewClicked(View view) {

    switch (view.getId()) {
        case R.id.search_btn:
         break;
        case R.id.update_btn:
         break;
Before our onCreate() method, we are going to add the below code to create an RealmObjectChangeListener listener:
private RealmObjectChangeListener<Person> listener = new RealmObjectChangeListener<Person>() {
    @Override
    public void onChange(Person person, @Nullable ObjectChangeSet changeSet) {
        for (String fieldName : changeSet.getChangedFields()) {
            showToast("Field " + fieldName + " was changed.");
        }
    }
};
Code Explanation
- We create a
RealmObjectChangeListenerlistener of thePersontype and we override theonChange()method which has a Person and an ObjectChangeSet parameter. - We then use a for each method to get the fields that have been changed and then make a Toast with the field's name that has been changed.
- We loop through the
changeSet.getChangedFields()method which returns the names of the changed field.
- We loop through the
Next, we declare a Realm variable and a Person model that will be used to save the details of the matching object when the query runs - private Realm realm; and Person singlePerson;.
In our onCreate() method, we add the following code -
Realm.init(this);

Realm.deleteRealm(Realm.getDefaultConfiguration());

realm = Realm.getDefaultInstance();

createRealmObjects();
Code Explanation
- We initialize Realm in our Acitivy class file -
Realm.init(this); - Next, we make our realm object use the default realm instance -
realm = Realm.getDefaultInstance();which means that it has access to all the model classes in our application if we had more than one. - Next, we make a call to the
createRealmObjects()method which creates as stated earlier 4Personrealm objects.
createRealmObjects()
private void createRealmObjects() {
realm.executeTransaction(new Realm.Transaction() {
        @Override
        public void execute(Realm realm) {
            Person Eben = realm.createObject(Person.class);
            Eben.setName("Edet Ebenezer");
            Eben.setAge(17);
            Eben.setMarried(false);

            Person Joe = realm.createObject(Person.class);
            Joe.setName("Joseph Ikenna");
            Joe.setAge(15);
            Joe.setMarried(false);

            Person Yomi = realm.createObject(Person.class);
            Yomi.setName("Yomi Banks");
            Yomi.setAge(20);
            Yomi.setMarried(false);

            Person Lizzy = realm.createObject(Person.class);
            Lizzy.setName("Elizabeth Ignore");
            Lizzy.setAge(37);
            Lizzy.setMarried(true);
        }
    });
}
Code Explanation
- We start an
executeTransaction()on our realm variable and then we override theexecute()method where we create six newPersonobjects with the details- Object 1 (Eben) => name = Edet Ebenezer , age = 17 , married = false
- Object 2 (Joe) => name = Joseph Ikenna , age = 15 , married = false
- Object 3 (Yomi) => name = Yomi Banks , age = 20 , married = false
- Object 4 (Lizzy) => name = Elizabeth Ignore , age = 37 , married = true
Next, in our injected onClick method for the search button, we have to accept the search query from the EditText and then use it to query the database and if a matching Object is found, we populate the LinearLayout's EditText with the Object's details and then set the visibility of the LinearLayout to visible.
case R.id.search_btn:
    String search_name = searchName.getText().toString();
    if (!search_name.isEmpty()){
        singlePerson = realm.where(Person.class).equalTo("name", search_name).findFirst();

        if (!(singlePerson == null)){
            singlePerson.addChangeListener(listener);
            personName.setText(singlePerson.getName());
            personAge.setText(String.valueOf(singlePerson.getAge()));
            personMarried.setText(String.valueOf(singlePerson.getMarried()));

            updatePersonLayout.setVisibility(View.VISIBLE);
        }
        else
            showToast("No Such person with that name in the database");
    }
    else
        showToast("Name Field cannot be empty");
    break;
Code Explanation
- We get the search query from the user and store in a String variable - search_name.
- We then check to ensure that the query entered is not empty and if empty, we call the
showToast()method passing the parameter - "Name Field cannot be empty". - If the query string is not empty, we make a search on the realm database to get the specific user matching the exact name with this query -
singlePerson = realm.where(Person.class).equalTo("name", search_name).findFirst();and store it in thesinglePersonobject declare before theonCreate()method. - We add a changeListener on the returned Object in order to listen for changes made to the Object -
singlePerson.addChangeListener(listener);. - Next, we check to ensure that the returned object is not null, if its not null, we populate the respective EditText with the details of the returned object (name, age, married details of the Object )and then we set the visibility of the LinearLayout to visible -
updatePersonLayout.setVisibility(View.VISIBLE);, if the returned Object is null, we make a Toast message - "No Such person with that name in the database".
Next, in our update_btn injected onClick() method, we have to get the new details of the Object as edited by the user and then update the Object appropriately.
case R.id.update_btn:
String update_name = personName.getText().toString();
String update_age = personAge.getText().toString();
String update_married = personMarried.getText().toString();
if (!(update_age.isEmpty() || update_name.isEmpty() || update_married.isEmpty())){
    realm.beginTransaction();
    singlePerson.setName(update_name);
    singlePerson.setAge(Integer.valueOf(update_age));
    singlePerson.setMarried(Boolean.valueOf(update_married));
    realm.commitTransaction();
    updatePersonLayout.setVisibility(View.GONE);
}
else
    showToast("No Update Fields can be Empty");
break;
Code Explanation
- We get the name, age and married edited by the user and store in the String variables - update_name, update_age and update_married respectively.
- Next, we ensure that none of the string variables are empty, and if any is empty, we make a simple Toast - "No Update Fields can be Empty"
- If none of the string variables are empty, we begin a transaction on our realm variable -
realm.beginTransaction()and then update the details of the Object setting its details to the newly entered one from the user and finally we commit the transaction with -realm.commitTransaction();and set the visibility of the LinearLayout to gone -updatePersonLayout.setVisibility(View.GONE);.
showToast()
private void showToast(String message) {
    Toast.makeText(this, message, Toast.LENGTH_LONG).show();
}
The above method makes a Toast with the parameter - message sent to the method.
Lastly, we have to cancel any realm Transaction in our onStop() method
@Override
protected void onStop() {
    super.onStop();
    realm.cancelTransaction();
}
__Application Execution __
Curriculum
- Understanding Queries in Realm Java using Android Studio (PART 1)
- Understanding Queries in Realm Java using Android Studio (PART 2)
- Understanding Queries in Realm Java using Android Studio (PART 3)
- Understanding Queries in Realm Java using Android Studio (PART 4)
- Understanding Queries in Realm Java using Android Studio (PART 5)
- Understanding Queries in Realm Java using Android Studio (PART 6)
- Understanding Migrations in Realm Java using Android Studio
- Understanding Migrations in Aggregation Java using Android Studio
- Understanding Iterations and Snapshots in Realm Java using Android Studio
Proof of Work
https://github.com/generalkolo/Realm-Examples/tree/master/RealmNotifications
Hey @edetebenezer
Thanks for contributing on Utopian.
We’re already looking forward to your next contribution!
Contributing on Utopian
Learn how to contribute on our website or by watching this tutorial on Youtube.
Want to chat? Join us on Discord https://discord.gg/h52nFrV.
Vote for Utopian Witness!
Thank you for your contribution.
While I liked the content of your contribution, I would still like to extend one advice for your upcoming contributions:
Your contribution has been evaluated according to Utopian policies and guidelines, as well as a predefined set of questions pertaining to the category.
To view those questions and the relevant answers related to your post, click here.
Need help? Write a ticket on https://support.utopian.io/.
Chat with us on Discord.
[utopian-moderator]
Thanks @portugalcoin.
Subsequent contributions will be improved.