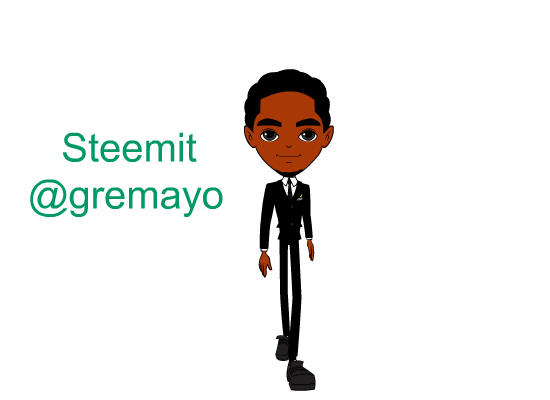
HELLO!!!
It's me again!!
your friend, your buddy, your bro...
How are you? Well, I hope your doing good. I'm back again for another tutorial about animation and today I'm going to teach you every detail on how I do my animation in a step- by- step process. I want to share it with you guys so you have the idea of what our fellow animators do on their projects and shows. Like I said, I worked before in a cartoon Industry as a Digital Animator and I want to Inspire and somehow help people who really want to learn especially all kids and teens out there.
**IF YOU WOULD LIKE TO SEE MY 1st ANIMATION ON ´" FIRE" EFFECTS, YOU CAN VISIT MY BLOG ON THAT HERE:
https://steemit.com/utopian-io/@gremayo/tutorial-basic-guide-on-how-to-animate-part-1-effects-fire
So, lets start!! We will be discussing today about how to animate a walking character or the best term would be is called The Walk Cycle. I do not have my character yet... I have decided to make a new one and also teach you how I do it.
If you have read my part 1 tutorial on how to animate, I already posted about the softwares that you need to use. Well to those who are new, you can use Flash softwares like, Adobe Flash, Macromedia Flash, Adobe Animate CC. Those are the most common softwares that a lot of animation studios and animators prefer to use. ToonBoom is also good for animation although it has a little bit of different approach compared to flash which is more technical while Toonboom is traditional.
First, I'm going to open my Flash and Design our character .
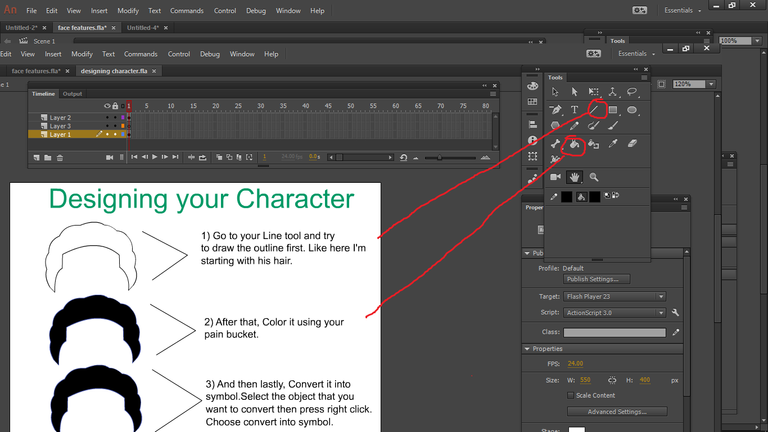
So right here, I' m trying to design his hair.
1 )First, select your Line Tool and create your outline.
2 ) And then,Color it up by picking Paint bucket tool.
3 ) lastly, Dont forget to convert it into symbol. Converting into symbol will allow you to unlock many features including motion tween, Gradient, opacity , and many more.
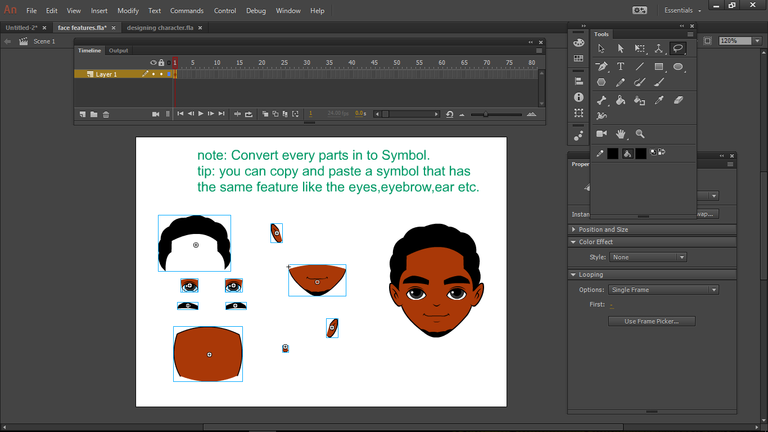
To convert a symbol, select an object or drawing and then right click choose Convert into Symbol. There will be a blue outline that will appear from each side meaning you already converted it. Also, you can copy and paste some symbols if you think you can re-use them. Like me, I just copied and pasted the eye and flip it over horizontally.
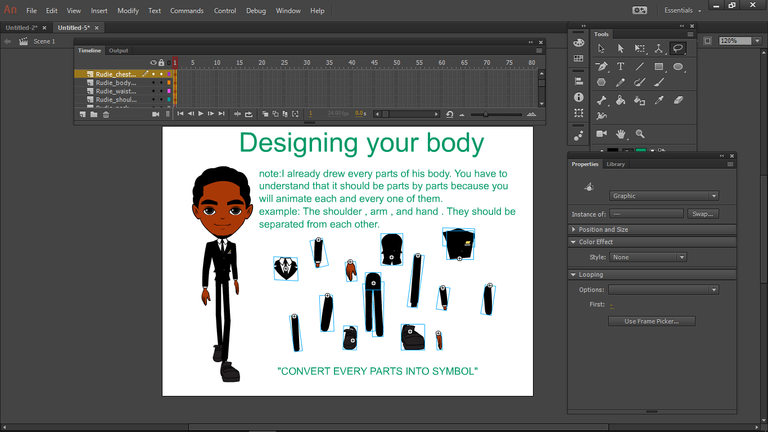
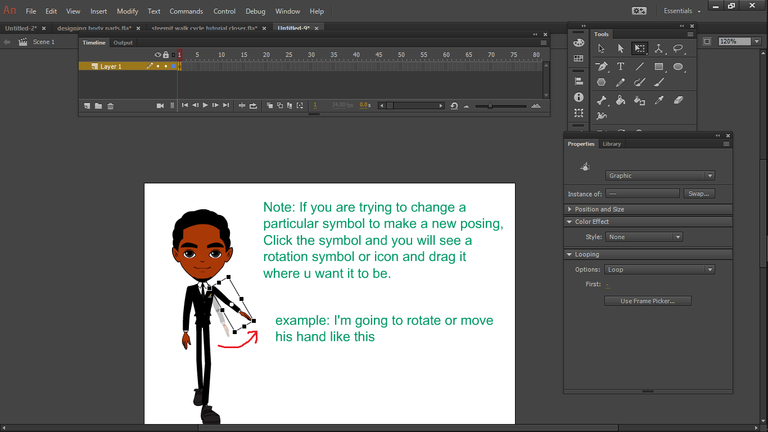
And now, when making his body parts, always remember to do them parts by parts separately. This will allow you to bend them over where you wanted. Example, if you make his whole arm in 1 drawing and 1 symbol, you cannot bend his arm from his shoulder because it is considered as one whole image ...unlike if you do them per parts, you can select transform tool and rotate them where you want it to be. And again, don´t forget to convert each and every part into a symbol.
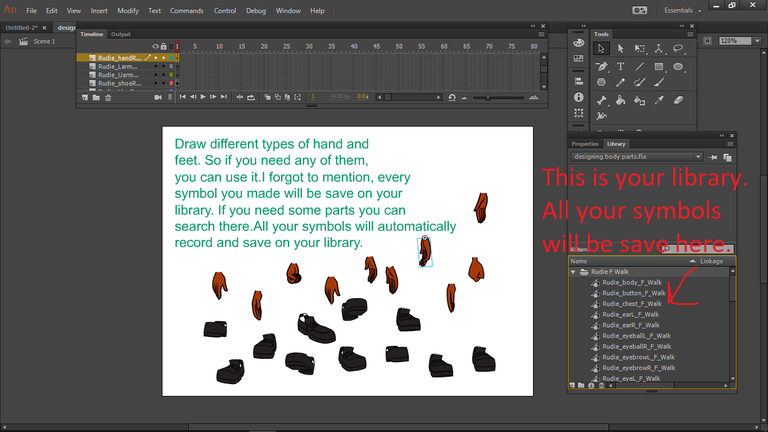
Start doing variety of hands with different gestures. Also with his feet. After that. convert into symbol. One more thing, In flash There is a "Library". What´s in the library are collections of all your symbols that you converted. Once you convert a new symbol, it will automatically be saved in your library. So if you need more hand gestures and other parts you can search there. I recommend you to make a lot of different symbols so you have many options.
To use a symbol on your library, just drag the file or symbol from your library toolbar to your canvass.
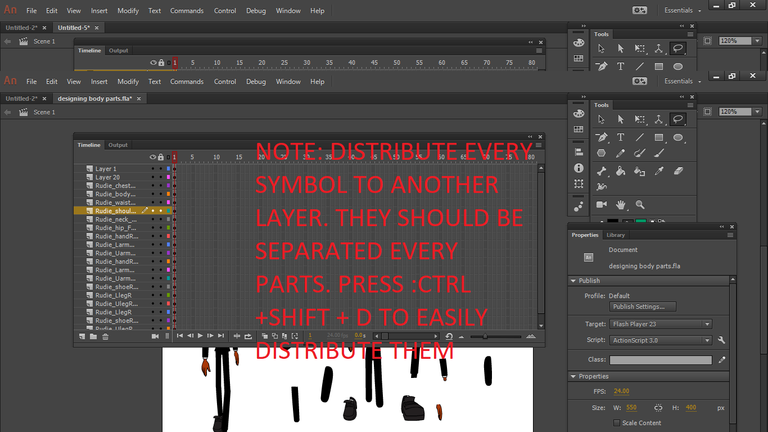
Clean your canvass and remove all the unecessary symbols. Make sure you end up only your character. Then next part, Select all your symbols and distribute it in different layer. The shortcut for "distribute into layer" is
" CTRL+ SHIFT +D
This will separate all your symbols to different layers. See the above image.

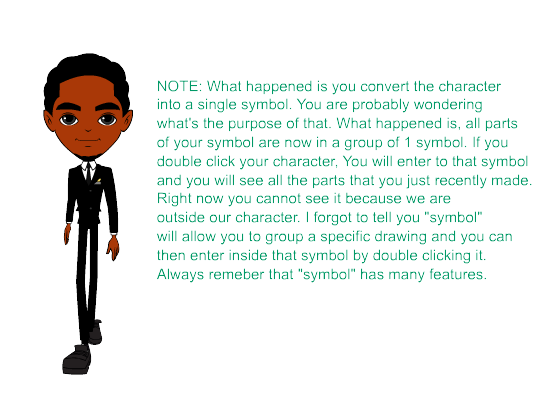
Now that you have completed all your parts with different layers, all you have to do is to make your character into a single symbol. Select all parts, all symbols and convert it again into a new symbol. What will happen is, it will become a single group of symbol. All your parts will be inside of that particular symbol. Look at the above image, It's really hard to explain but you will get it.. hehehe.
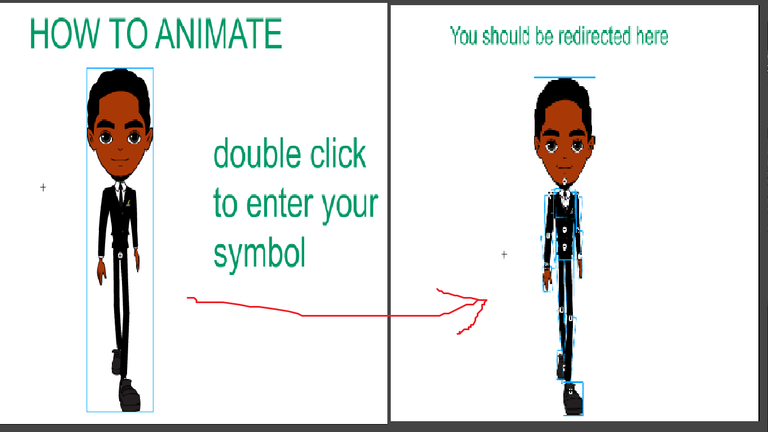
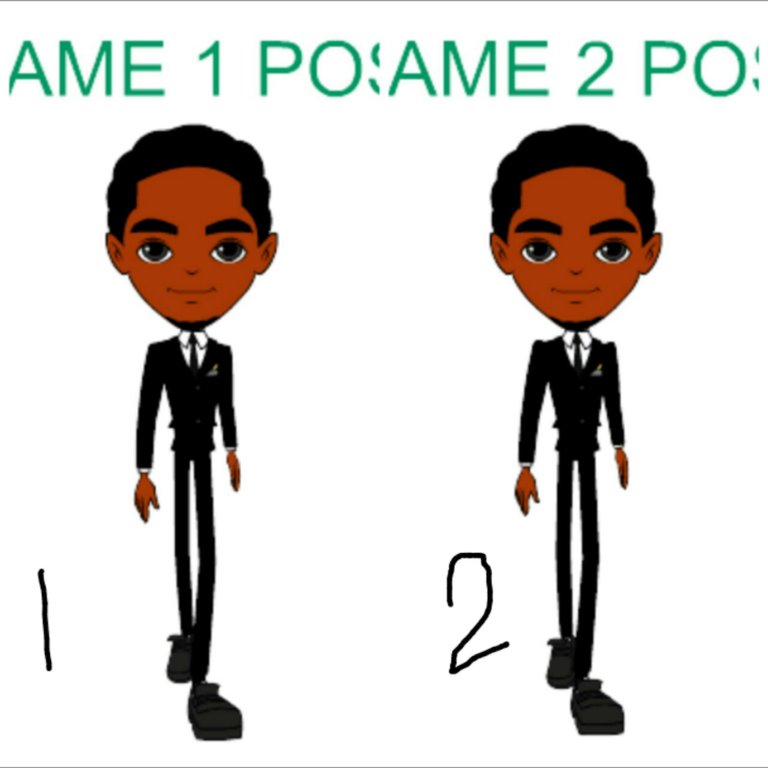
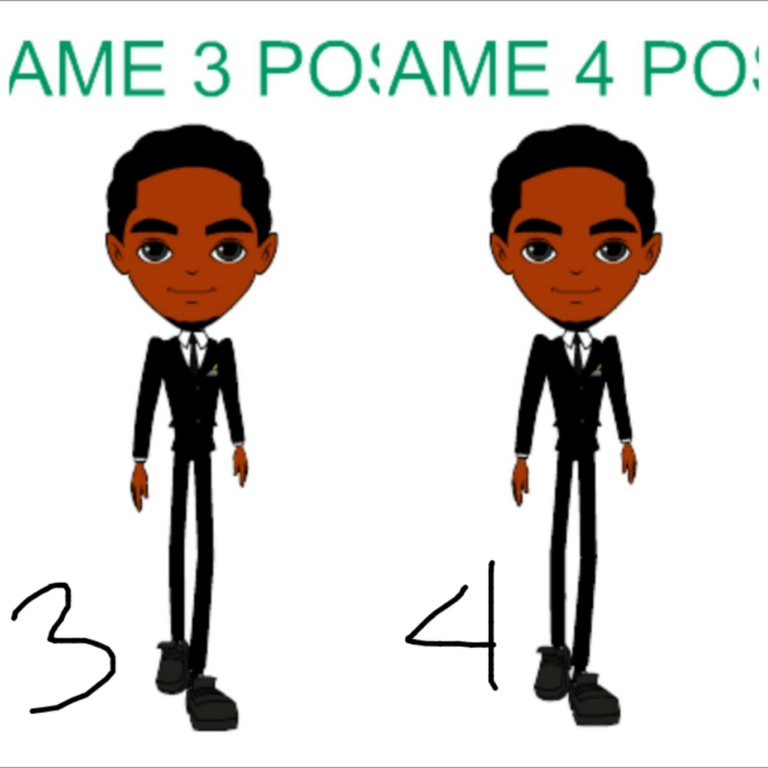
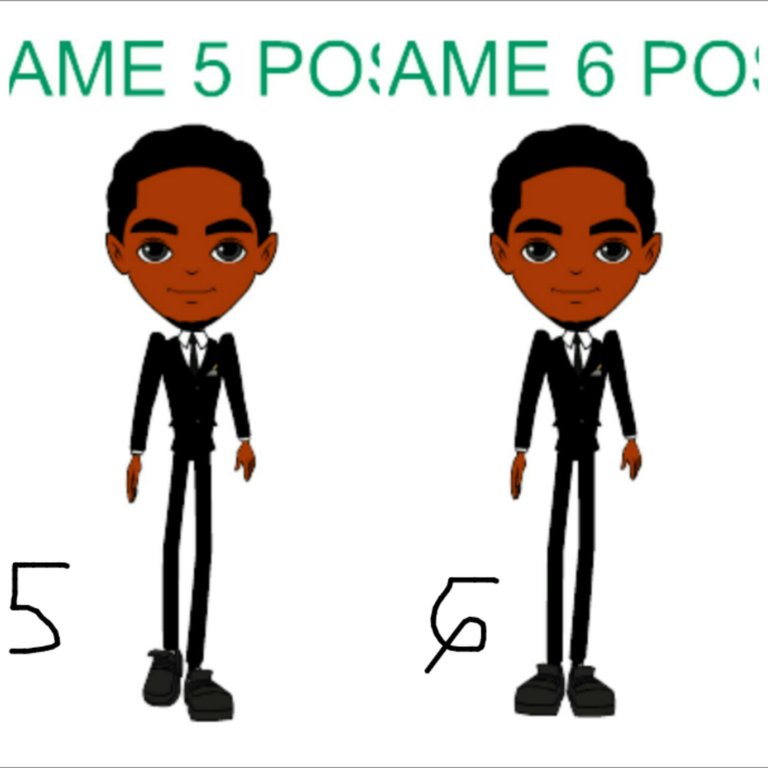
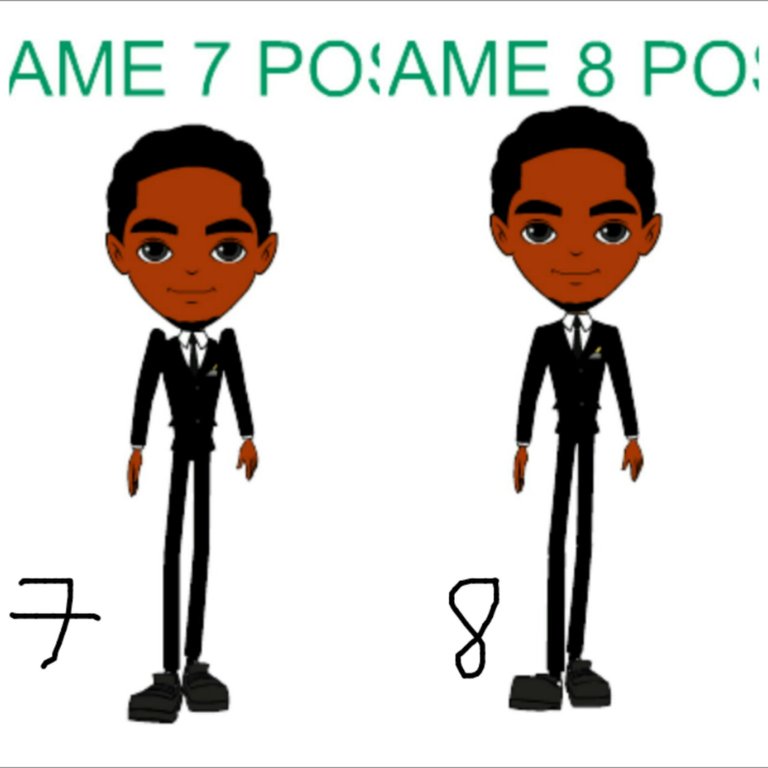
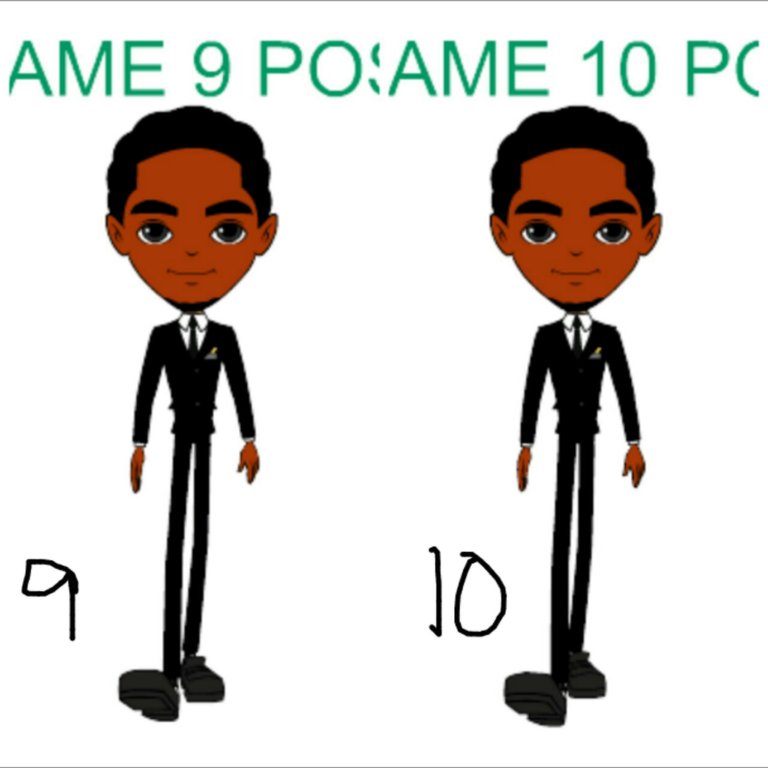
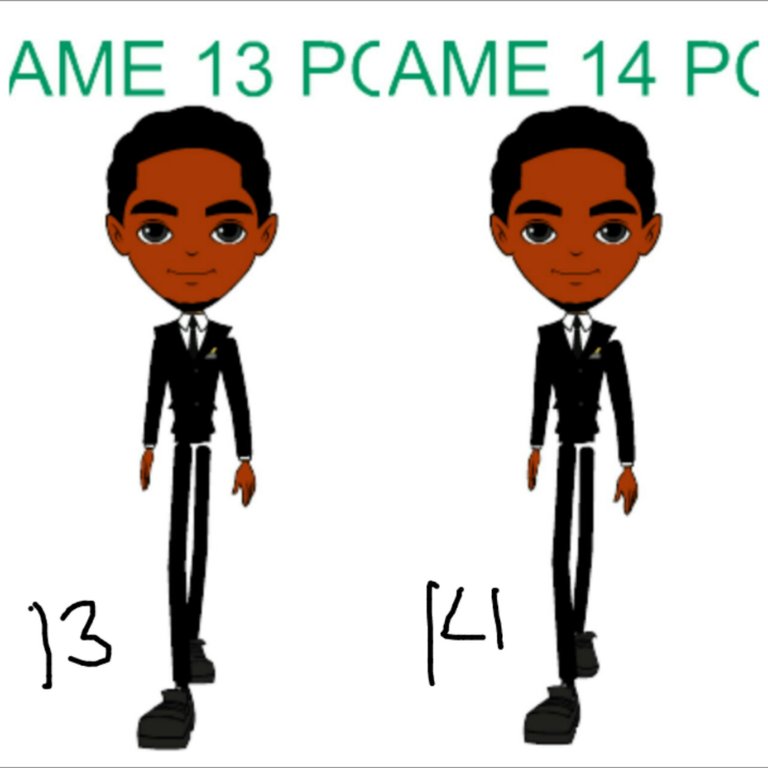
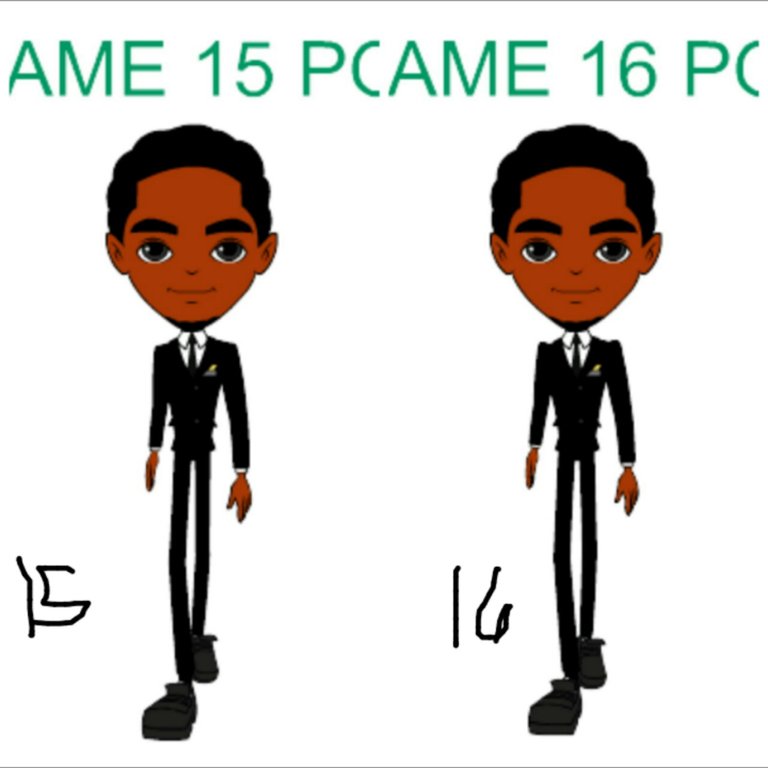
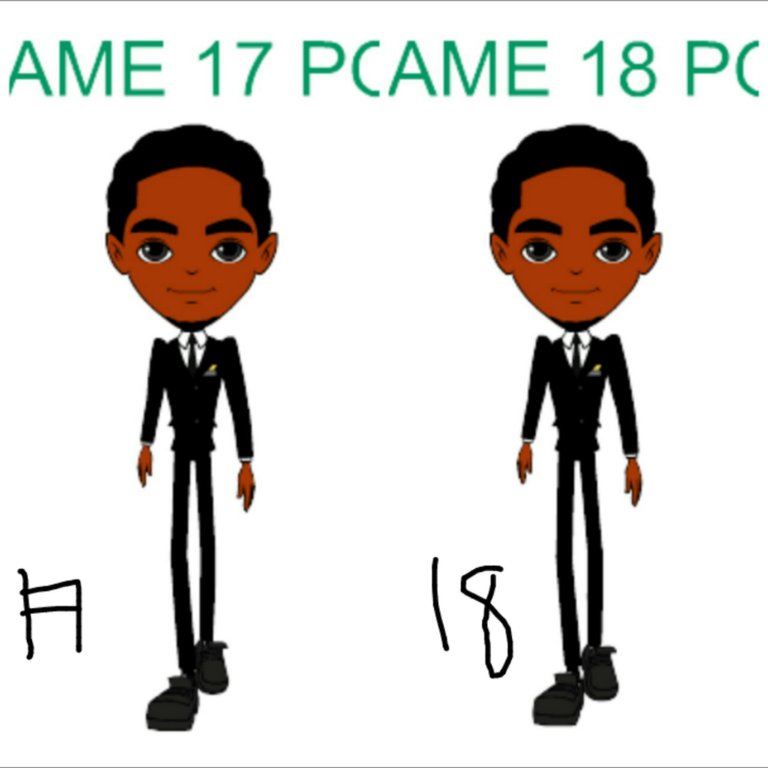
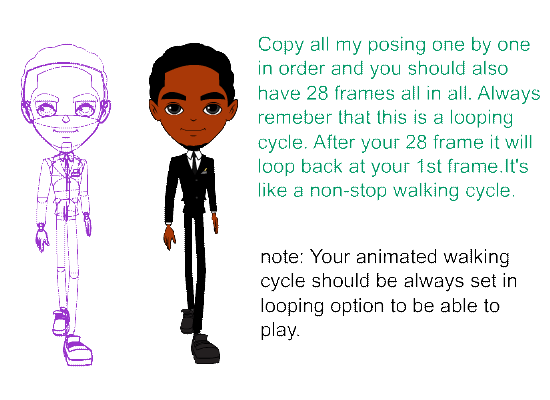
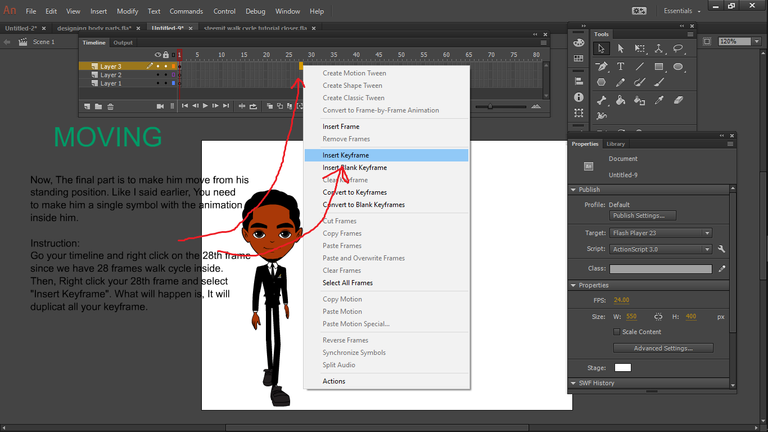
I guess, you are now ready to animate. Now, go inside your character by double clicking it. Walk cycle consists of 28 frames with different poses. I will upload a step by step images and poses that you need. It is orderly animated already. All you need to do is copy my posing for each keyframe. Rotate every parts of your symbol and try to imitate each and every pose. You can make a ruff drawing if you want. nI will put an orderly image so you won´t get confused.

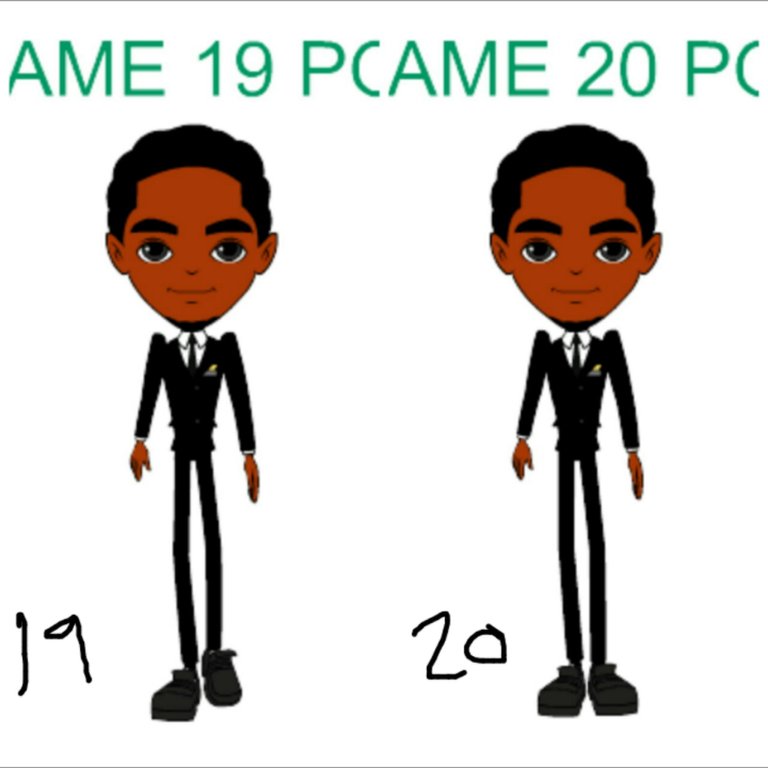
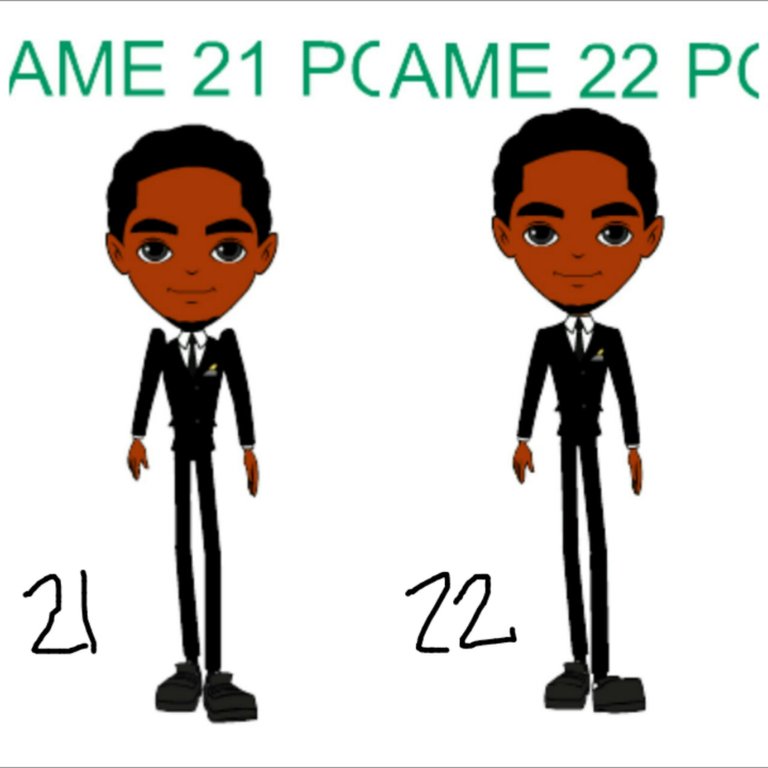
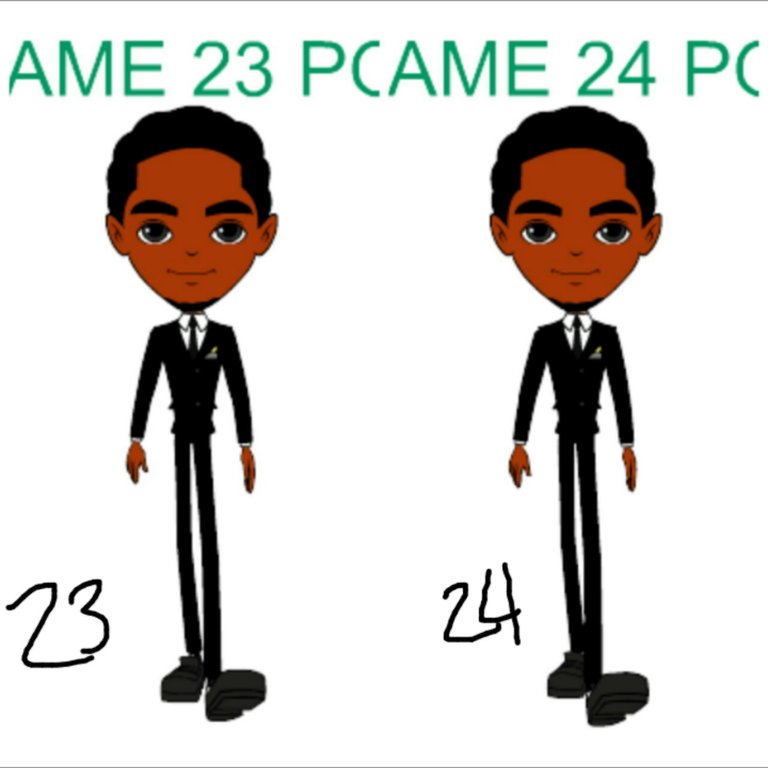
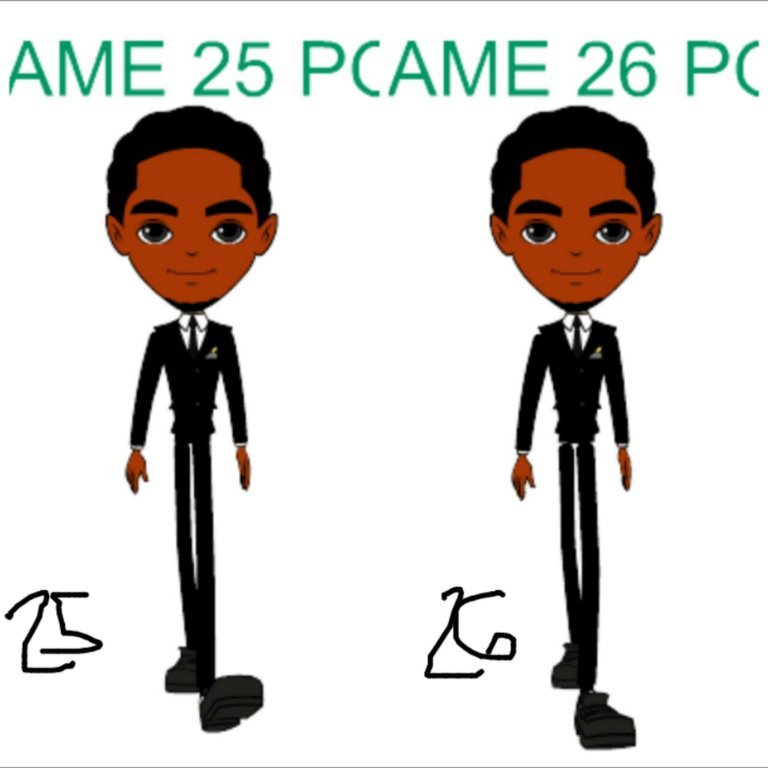
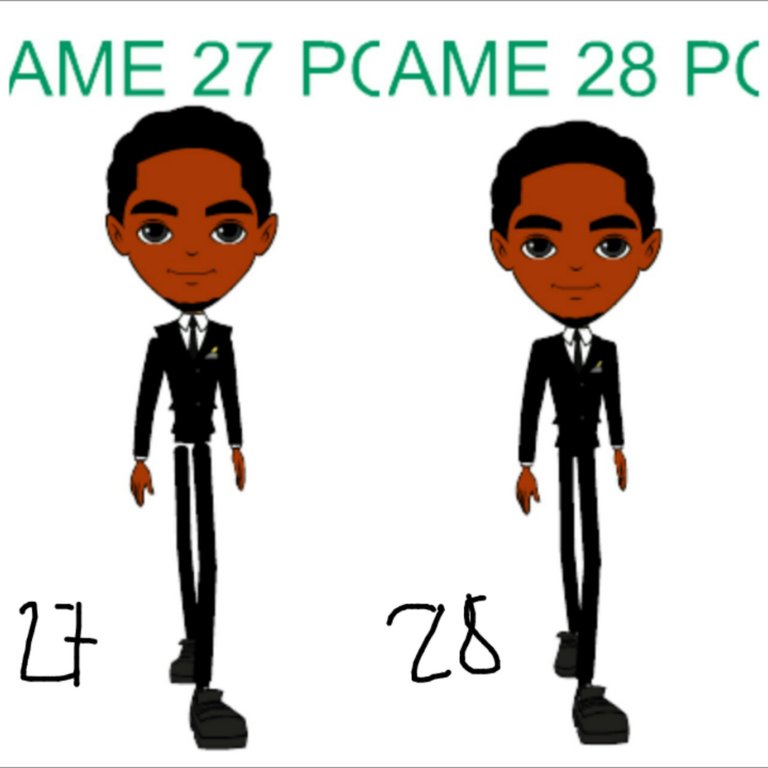
Now that you have all the posing, you almost have completed your walk cycle. You should have a cycle like this.
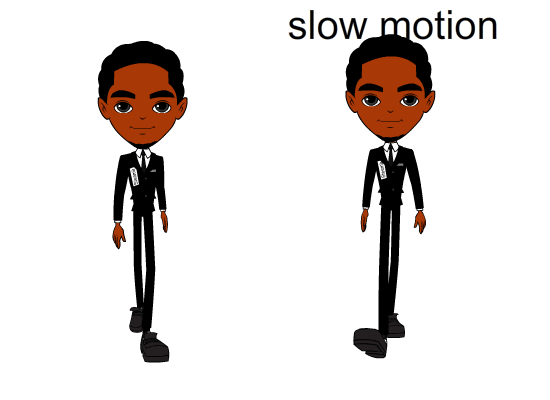
This is the last and the easiest part of all which is moving him from his standing position. Now take a look at the image below. I have some instructions there. Mainly, you have your walk cycle already inside the character symbol. All we need to do is create a motion tween from pose to pose outside your symbol not inside your walk cycle. duplicate your keyframe into a 28 frame.
After you duplicated all 28 frame , It should be look like the image below.
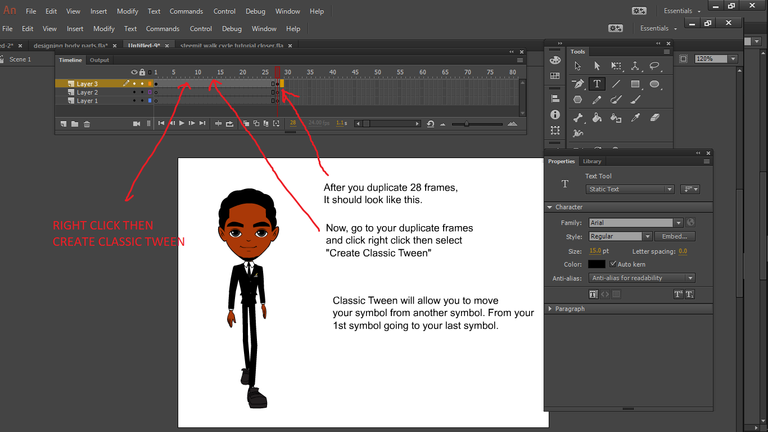
If you take a look more closely, we have two posings already. First is on the 1st frame and 2nd posing is located at the last frame which is frame 28. Now we will apply "Classic Motion Tween" between frame 1 and frame 28. The idea is in your 1st posing , symbol will travel going to your last posing which is frame 28. So if you move frame 28 posing from a distance, from frame 1, It will travel all the way until it reaches frame 28.
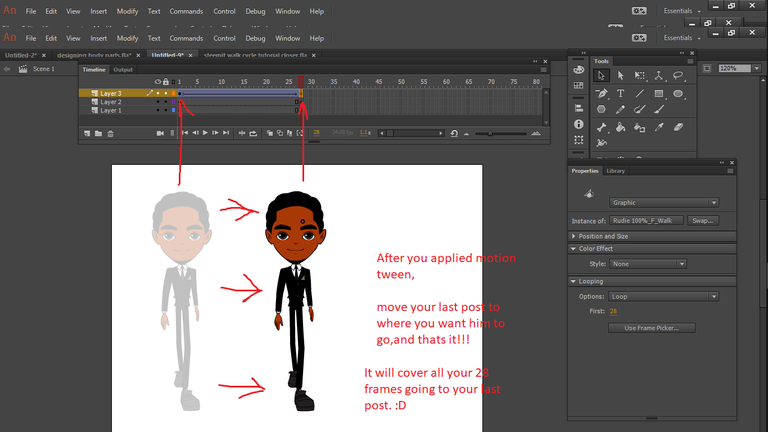
One more thing about "Classic Motion Tween, you can also change your symbol with much more bigger size or smaller and tween them. It will automatically transform from large to small or small to large. Like what I did on my preview, I changed the size of my last pose and make him more bigger to make that illusion walking towards us, since we have a front walking cycle.
So that´s it guys!! It took me 2 days to finish the animation including the character design. Always remember to be patient all the time. If you put a lot of efforts and dedication... it will bring you good results.
If you have questions, just ask me, it´s for free 😀
Bye and see you!!!
Tim @gremayo
Amazing work sir. Let me guess who you used as the model for this tutorial is it sir Terry :)
Yes, hehe galing ah thanks for dropping by :D
@gremayo, I like your contribution to open source project, so I upvote to support you.
really,.Thank you so much for your support. It's an honor.
Hahahaha.... i like it @gremayo. Nice kaayo.
Tnx po hehehe lami kaayo , follow kta
Another great tutorial ! I´m sure many would like to learn animation... Keep it up, you´re educating the kids... Cheers!
@originalworks
It's an honor for me. I'm happy to help them.
Good job sir....
Keep it up
Thank you for your motivation :)