What Will I Learn?
- You will learn How to program in swift programming language.
- You will learn How to use cocoapods in swift project.
- You will learn How to use cocoapods files and their delegates in swift project.
- You will learn How to create 3D carousel using TGLParallaxCarousel.
Requirements
- Mac OS
- Xcode
- Basic knowledge of programming in Xcode and swift language
- Basic knowledge of using of cocoapods
Difficulty
- Basic
Tutorial Contents
Hello and welcome to all. Today we will explore a swift library TGLParallaxCarousel. By using this library in our swift project we will make a image carousel with 3d effect. So let's start our tutorial.
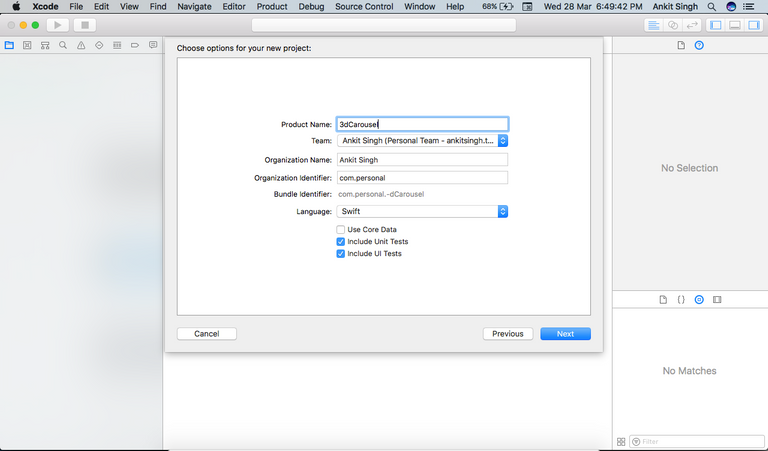
First of all create a new project in your Xcode.

Now we need to install 'TGLParallaxCarousel pod' in our project, so that we can use pod supporting files to create our carousel. But we can't install pod directly in our project, first we need to create a
podfilein our project, so that we can writepodname in that file to install pod.To create
podfilein our project, we use commandpod init. So, Open Terminal and navigate to the directory that contains your project by using the cd command like this:
cd /some drive/Folder/your project folder
- Now after reaching to root directory of the project, write the
pod initcommand in your terminal and press enter. This command creates apodfile.rbfile in your project directory.
pod init
- Now, we need to add our pod in
podfile.rbfile. We can do this by two ways first is by terminal and second by editing file manually from finder. We will use the second one method. So go to your project directory using finder and openpodfile.rbfile in any editor. Now addpod 'TGLParallaxCarousel'in your podfile like and save the file :-
# Uncomment the next line to define a global platform for your project
# platform :ios, '9.0'

target '3dCarousel' do
  # Comment the next line if you're not using Swift and don't want to use dynamic frameworks
  use_frameworks!

  # Pods for 3dCarousel

   pod 'TGLParallaxCarousel'

end
- Now we need to run command
pod installto install dependencies of pod in our project. So head back to our project root directory in terminal and run the command :-
pod install
- After some time the pod will install in your project and you will see some text in green colour in your terminal like this :-
[!] Please close any current Xcode sessions and use `your project name.xcworkspace` for this project from now on.
So close the xcode and open .xcworkspace file to start programming for our project.
- Now we successfully added cocoapod in our project and now we need to start making carousel. So head to
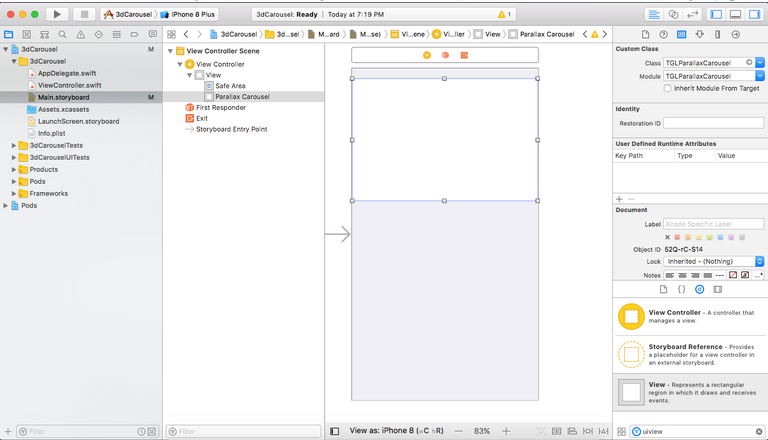
main.storyboardand place aUIViewobject in your view controller and set it as subclass ofTGLParallaxCarousellike this :-

- Now we will create a IBoutlet of this view in our view controller file like this :-
import UIKit

class ViewController: UIViewController {

    @IBOutlet var carouselView: TGLParallaxCarousel!

    override func viewDidLoad() {
        super.viewDidLoad()
        // Do any additional setup after loading the view, typically from a nib.
    }

    override func didReceiveMemoryWarning() {
        super.didReceiveMemoryWarning()
        // Dispose of any resources that can be recreated.
    }
}
After making outlet you will get error saying use of unresolved identifier. You are getting this error because we didn't import
TGLParallaxCarouselclass in our view controller file. So addimport TGLParallaxCarouselunderimport UIKitin your view controller file.Now we will set some properties and delegates of carousel in our view controller
viewDidLoadmethod. As we are making 3d carousel, so we will set carousel type to three dimensional and also give some margin to carousel items to give a feel of 3d effect. So write this code in your view controllerviewDidLoadmethod :-
override func viewDidLoad() {
super.viewDidLoad()
     self.carouselView.delegate = self
     self.carouselView.margin = 10
     self.carouselView.type = .threeDimensional
}
Now we will use TGLParallaxCarousel delegate methods to set number of items in carousel, item for row at index. There are also other methods with different functionality but i am using only two delegate methods for now to not make tutorial too lengthy. To use delegate methods, first add TGLParallaxCarouselDelegate in your view controller class like this :-
import UIKit
import TGLParallaxCarousel

class ViewController: UIViewController, TGLParallaxCarouselDelegate {

    @IBOutlet var carouselView: TGLParallaxCarousel!
    override func viewDidLoad() {
        super.viewDidLoad()
        self.carouselView.delegate = self
        self.carouselView.margin = 10
        self.carouselView.type = .threeDimensional
    }

    override func didReceiveMemoryWarning() {
        super.didReceiveMemoryWarning()
        // Dispose of any resources that can be recreated.
    }
}
- Now finally, we can use delegate methods of TGLParallaxCarousel in our code. So add the two methods in your view controller like this :-
class ViewController: UIViewController, TGLParallaxCarouselDelegate {

    @IBOutlet var carouselView: TGLParallaxCarousel!
    override func viewDidLoad() {
        super.viewDidLoad()
        self.carouselView.delegate = self
        self.carouselView.margin = 10
        self.carouselView.type = .threeDimensional
    }

    func numberOfItemsInCarouselView(_ carouselView: TGLParallaxCarousel) -> Int {
        return 10
    }

    func carouselView(_ carouselView: TGLParallaxCarousel, itemForRowAtIndex index: Int) -> TGLParallaxCarouselItem {
        let demoView = UIView
        demoView.frame = CGRect(x: 0, y: 0, width: 200, height: 180)
       demoView.backgroundColor = UIcolor.black
        return demoView, number: index)
    }
}
What we did in above code is we add 10 items in our carousel in numberOfItemsInCarouselView method and we also set a uiview with some height and width for every item in itemForRowAtIndex.
- Now run your app and you will see a beautiful carousel with 3d effect.
Thanks for reading the tutorial, if you had any doubt regarding this comment in post. I will help you.
Posted on Utopian.io - Rewarding Open Source Contributors
Your contribution cannot be approved because it does not follow the Utopian Rules.
Thank you for your contribution. But the last commit history in the github repo which is linked in posting was created in 2016. Also, the demo code is very similar to that of repo's README. Here is the related rule:
Contributions on repositories that have not received any program code updates for longer than 6 months, will be automatically rejected.
The contribution must add value to the Open Source project. Moderators may reject (at their discretion) submissions that offer little to no added value to the project.
You can contact us on Discord.
[utopian-moderator]