Repository
https://github.com/iamank1t/Steemit-IDCard
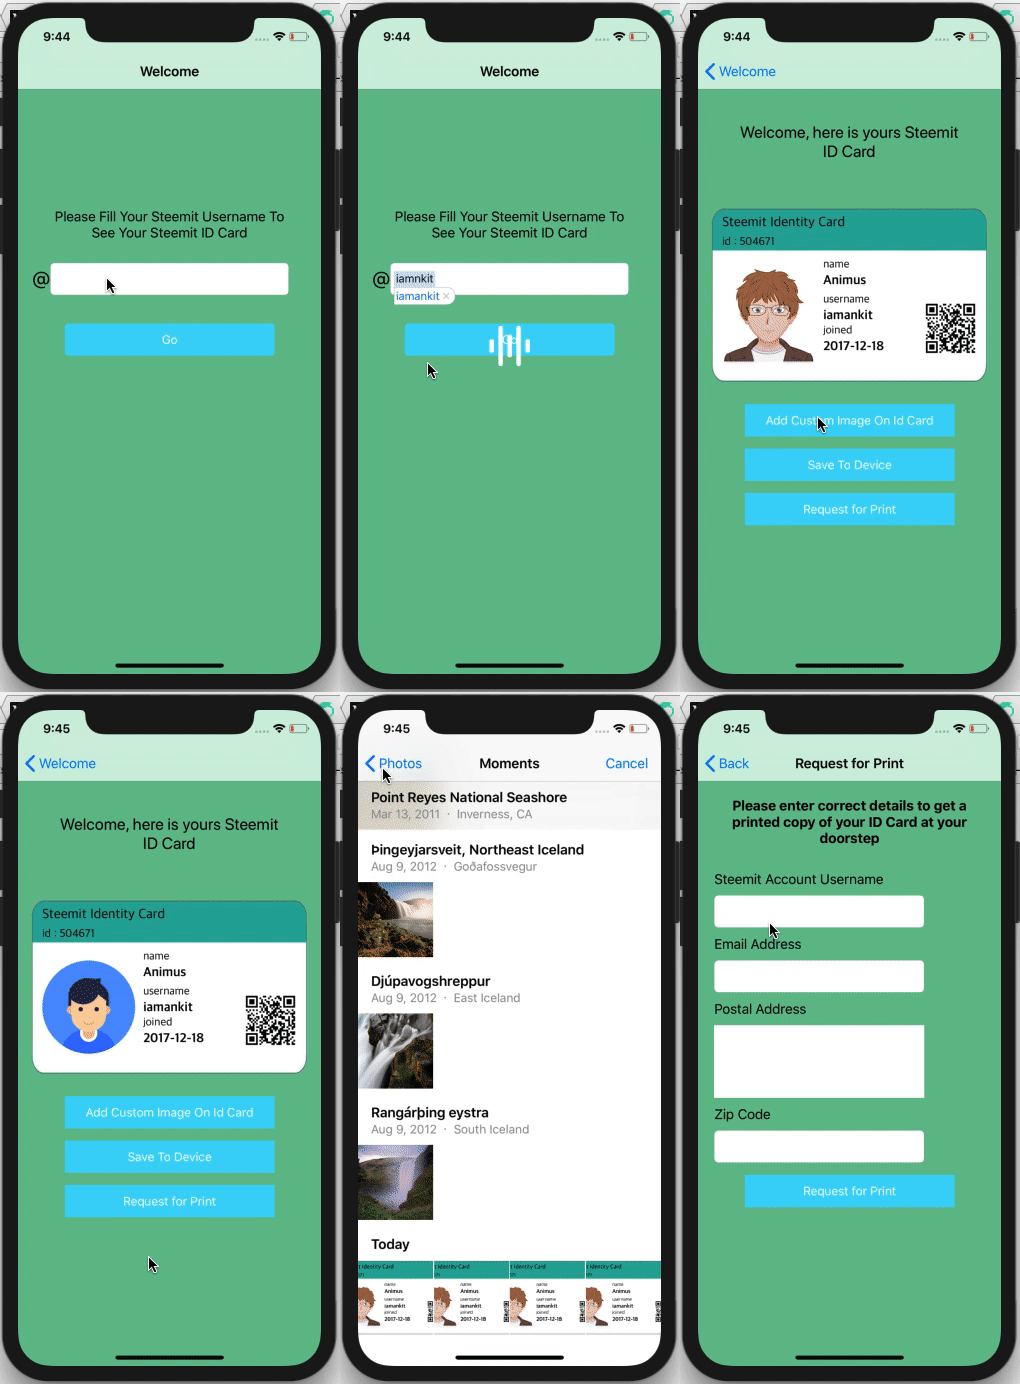
What is Steemit-ID Card App
Steemit-IDCard is an open source revolutionary iOS app made for Steemit Users. This app will creates you your own Steem Identity Card from your Steemit account details. The app is currently under development process and i continuously adding features in it. The latest feature i added in app is now users can order for printed version of their ID Card at their doorstep. I talked with a printing agency and they are ready to send printed ID Cards to user's doorstep. I am not taking any fees from users for providing them their printed ID Cards. Another feature i added in app is now users can update ID Card image with any image from their device camera or device photo library.
New features added in app
The new feature added in the app are following with commit history :
- Added feature to order for printed plastic ID Card
in this commit i added a new feature in app, in which users can now make order for their printed plastic card at their doorstep. By this feature now users can get their printed plastic ID Card at their doorstep without paying any amount. To make a order, users need to go to make order screen by clicking on "Request for print" button. When users click on "Request for print" button they will be redirected to a screen, where they needs to fill all there details with the address they want to get their printed plastic ID Card. Screenshots of new feature are below :-
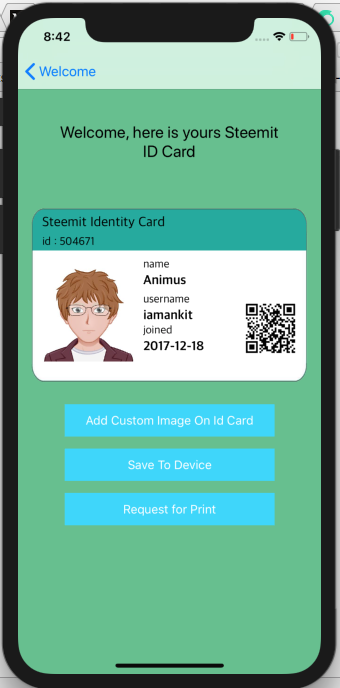
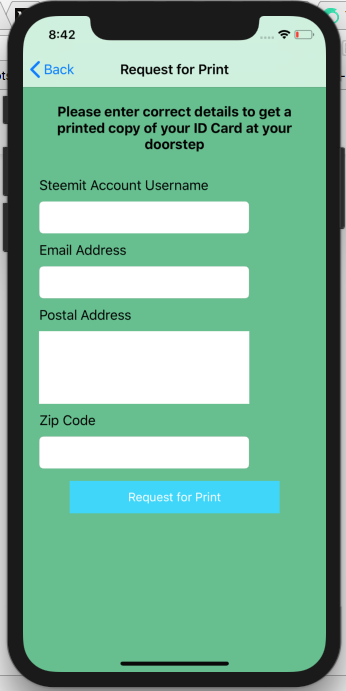
How this feature works :-
When users fills all the details on the from successfully and submit the form. All of their details will be send to backend server and a new order will be created. After this the order will be processed from backend to a printing press with all details. After printing press will send printed plastic card to users on their provided address. A mail also send to user time to time regarding status of their order. The code which will send users order information is below :-
import UIKit
import SwiftyJSON

class PrintRequestVC: UIViewController {
    @IBOutlet var nameTextField: UITextField!
    @IBOutlet var emailTextField: UITextField!
    @IBOutlet var postalAddressTextField: UITextView!
    @IBOutlet var zipCodeTextField: UITextField!
    override func viewDidLoad() {
        super.viewDidLoad()

        // Do any additional setup after loading the view.
    }

    // function to check if any field is empty or not
    @IBAction func printButtonClicked(_ sender: Any) {
        if (self.nameTextField.text?.isEmpty)! || (self.emailTextField.text?.isEmpty)! || (self.postalAddressTextField.text.isEmpty) || (self.zipCodeTextField.text?.isEmpty)! {
            let ac = UIAlertController(title: "Error", message: "Please fill all fields!", preferredStyle: .alert)
            ac.addAction(UIAlertAction(title: "OK", style: .default))
            present(ac, animated: true)
        }
        else {
            self.submitUserAddressDetails()
        }
    }

    func createRequestObject(_ urlString: String, requestType: String) -> URLRequest {
        var request = URLRequest(url: URL(string: urlString)!)
        request.httpMethod = requestType
        request.setValue("application/json", forHTTPHeaderField: "Content-Type")
        return request
    }

   //function to process user request to backend server

    func submitUserAddressDetails() {
        let NameText = self.nameTextField.text
        let emailText = self.emailTextField.text
        let postalAddressText = self.postalAddressTextField.text
        let zipcodeText = self.zipCodeTextField.text
        var dataDictionary = [String: AnyObject]()
        if let NameText = NameText {
            dataDictionary["userName"] = NameText as AnyObject?
        }
        if let emailText = emailText {
            dataDictionary["userEmail"] = emailText as AnyObject?
        }
        if let postalAddressText = postalAddressText  {
            dataDictionary["userAddress"] = postalAddressText as AnyObject?
        }
        if let zipcodeText = zipcodeText  {
            dataDictionary["zipcode"] = zipcodeText as AnyObject?
        }

        var userDetails = ["user": dataDictionary as AnyObject]
        var request = self.createRequestObject("http://192.168.1.203:3000/userDetails", requestType: "POST")
        do {
            request.httpBody = try JSONSerialization.data(withJSONObject: userDetails, options:[])
        } catch _{}

        let session = URLSession.shared
        let task = session.dataTask(with: request, completionHandler: {data, response, error in
            guard let _ = data else {

                let networkAlert = self.showNetworkAlert()

                DispatchQueue.main.async(execute: {
                    self.present(networkAlert, animated: true, completion: nil)
                })
                return
            }
            let res = response as? HTTPURLResponse
            if(res?.statusCode == 201) {
                let alert = UIAlertController(
                    title: "Congrats",
                    message: "You will get your ID Card Soon",
                    preferredStyle: UIAlertControllerStyle.alert)

                alert.addAction(UIAlertAction(
                    title: NSLocalizedString("Ok", comment: "Ok"),
                    style: UIAlertActionStyle.default,
                    handler: nil))
                DispatchQueue.main.async(execute: {
                    self.present(alert, animated: true, completion: nil)
                })

            } else if(res?.statusCode == 422) {
                let alert = UIAlertController(
                    title: "Error",
                    message: "Something Went Wrong",
                    preferredStyle: UIAlertControllerStyle.alert)
                alert.addAction(UIAlertAction(
                    title: NSLocalizedString("Ok", comment: "Ok"),
                    style: UIAlertActionStyle.default,
                    handler: nil))
                DispatchQueue.main.async(execute: {
                    self.present(alert, animated: true, completion: nil)
                })
            }
        })
        task.resume()
    }

    //MARK: Alerts
    func showNetworkAlert() -> UIAlertController {
        let networkAlert = UIAlertController(
            title: NSLocalizedString("Network-Error-Title", comment: "Network-Error-Title"),
            message: NSLocalizedString("Network-Error-Message", comment: "Network-Error-Message"),
            preferredStyle: UIAlertControllerStyle.alert)
        networkAlert.addAction(UIAlertAction(
            title: NSLocalizedString("Ok-Title", comment: "Ok-Title"),
            style: UIAlertActionStyle.default,
            handler: nil)
        )
        return networkAlert
    }
}
Why the printed plastic ID Card feature is valuable to app ?
I think this feature helps peoples who are looking to setup their business on steemit. Because this ID card works as their business card and looks attractive too because many people have been looking for an easy way to design and print steemit business cards. I think this is remarkable and fun. This feature also helps another users too because a printed plastic id card gaves them a unique value among their friends or another users. Users can also use printed plastic card in verification of other steemit services, now they don't need to write their name on a white paper to verify their identity what they need is just post a pic with their printed plastic id card.
- feature to add image on ID Card from device photo library or device camera
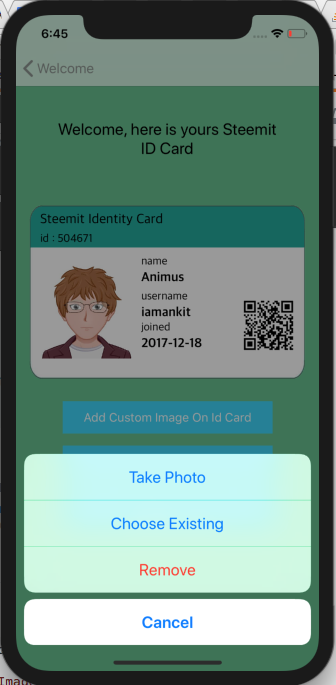
In this commit i added a feature in which now users can change their steemit id card picture with any other picture they want. To do this they just need to click a button below their steemit id card and then they can choose any picture from their device photo library or they can click a new one from their device camera. This feature helps users if they want their original picture on the ID Card because now days due to privacy many users can't show their original face on internet so instead of getting id card with dummy picture now users can get their id card with any picture they want. Screenshots of this feature are below :-
How this feature works ?
To change picture on id card, users need to click on "Add custom image to id card" button. Then a popup came with some actions. Now users can select from actions and change their id card picture from camera or photo library. The code of this feature is below :-
 // function to open device camera or photo gallery
    @IBAction func addCustomImageButtonClicked(_ sender: Any) {
        let alert = UIAlertController(title: nil, message: nil, preferredStyle: .actionSheet)
        let cancelButton = UIAlertAction(title: "Cancel", style: .cancel, handler: {(action: UIAlertAction) -> Void in
        })

        let takePhotoButton = UIAlertAction(title: "Take Photo", style: .default, handler: {(action: UIAlertAction) -> Void in
            let authorizationStatus = AVCaptureDevice.authorizationStatus(for: AVMediaType.video)
            switch authorizationStatus {
            case .notDetermined:
                // permission dialog not yet presented, request authorization
                AVCaptureDevice.requestAccess(for: AVMediaType.video,
                                              completionHandler: { (granted:Bool) -> Void in
                                                if granted {
                                                    DispatchQueue.main.async(execute: {
                                                        if UIImagePickerController.isSourceTypeAvailable(.camera)
                                                        {
                                                            print("access granted", terminator: "")
                                                            self.imagePickerController.sourceType = .camera
                                                            self.imagePickerController.delegate = self
                                                            self.present(self.imagePickerController, animated: true, completion: {() -> Void in })
                                                        }
                                                        else
                                                        {
                                                            print("Camera not available")
                                                        }
                                                    })
                                                }
                                                else {
                                                    print("access denied", terminator: "")
                                                }
                })
            case .authorized:
                if UIImagePickerController.isSourceTypeAvailable(.camera) {
                    self.imagePickerController.sourceType = .camera
                    self.imagePickerController.delegate = self
                    self.present(self.imagePickerController, animated: true, completion: {() -> Void in })
                } else {
                    print("Camera not available")
                }
                break
            case .denied, .restricted:
                self.alertToEncourageCameraAccessWhenApplicationStarts()
            }
        })


        let chooseExistingButton = UIAlertAction(title: "Choose Existing", style: .default, handler: { (action: UIAlertAction) -> Void in
            if PHPhotoLibrary.authorizationStatus() == PHAuthorizationStatus.authorized
            {
                UINavigationBar.appearance().titleTextAttributes = [
                    NSAttributedStringKey.font : UIFont(name: "Ubuntu", size: 16)!,
                    NSAttributedStringKey.foregroundColor : UIColor.black
                ]
                self.imagePickerController.sourceType = .photoLibrary
                self.imagePickerController.delegate = self
                self.present(self.imagePickerController, animated: true, completion: {() -> Void in
                })

            }
            else if PHPhotoLibrary.authorizationStatus() == PHAuthorizationStatus.notDetermined {
                PHPhotoLibrary.requestAuthorization({(_ status: PHAuthorizationStatus) -> Void in
                    if status == .authorized {
                        DispatchQueue.main.async(execute: {

                            // Access has been granted.
                            self.imagePickerController.sourceType = .photoLibrary
                            self.imagePickerController.delegate = self
                            UINavigationBar.appearance().titleTextAttributes = [
                                NSAttributedStringKey.font : UIFont(name: "Ubuntu", size: 16)!,
                                NSAttributedStringKey.foregroundColor : UIColor.black
                            ]
                            self.present(self.imagePickerController, animated: true, completion: {() -> Void in
                            })
                        })
                    }
                    else {
                        // Access has been denied.
                    }
                })
            } else {
                self.alertToEncouragePhotoLibraryAccessWhenApplicationStarts()
            }

        })

        let removeButton = UIAlertAction(title: "Remove", style: .destructive, handler: { (action: UIAlertAction) -> Void in
            self.removeProfileImage()
            //backend request to remove image
        })

        alert.addAction(cancelButton)
        alert.addAction(takePhotoButton)
        alert.addAction(chooseExistingButton)
        if self.profileImage.image != #imageLiteral(resourceName: "defaultImage")
        {
            alert.addAction(removeButton)
        }
        self.present(alert, animated: true, completion: {})
    }

    //removing image from id card
    func removeProfileImage(){
        self.profileImage.image = #imageLiteral(resourceName: "defaultImage")
    }

    func alertToEncouragePhotoLibraryAccessWhenApplicationStarts()
    {
        //Photo Library not available - Alert
        let cameraUnavailableAlertController = UIAlertController (title: "Photo Library Unavailable", message: "Please check to see if device settings doesn't allow photo library access", preferredStyle: .alert)

        let settingsAction = UIAlertAction(title: "Settings", style: .destructive) { (_) -> Void in
            let settingsUrl = URL(string:UIApplicationOpenSettingsURLString)
            if let url = settingsUrl {
                UIApplication.shared.open(url, options: [:], completionHandler: nil)
            }
        }
        let cancelAction = UIAlertAction(title: "Okay", style: .default, handler: nil)
        cameraUnavailableAlertController .addAction(settingsAction)
        cameraUnavailableAlertController .addAction(cancelAction)
        self.present(cameraUnavailableAlertController , animated: true, completion: nil)
    }

    func alertToEncourageCameraAccessWhenApplicationStarts()
    {
        //Camera not available - Alert
        let internetUnavailableAlertController = UIAlertController (title: "Camera Unavailable", message: "Please check to see if it is disconnected or in use by another application", preferredStyle: .alert)
        let settingsAction = UIAlertAction(title: "Settings", style: .destructive) { (_) -> Void in
            let settingsUrl = URL(string:UIApplicationOpenSettingsURLString)
            if let url = settingsUrl {
                DispatchQueue.main.async {
                    UIApplication.shared.open(url, options: [:], completionHandler: nil)
                }
            }
        }
        let cancelAction = UIAlertAction(title: "Okay", style: .default, handler: nil)
        internetUnavailableAlertController .addAction(settingsAction)
        internetUnavailableAlertController .addAction(cancelAction)
        self.present(internetUnavailableAlertController , animated: true, completion: nil)
    }
Bug Fixes
What was the issue(s)?
In recent version of app, when user enter wrong username or blank username the app crash because no data came from the steemit api for wrong username.What was the solution?
To fix this crash i applied validation check on steemit username field. Now if user writes wrong username or write nothing in the field and try to get id card, app gives prompt to user like this :-
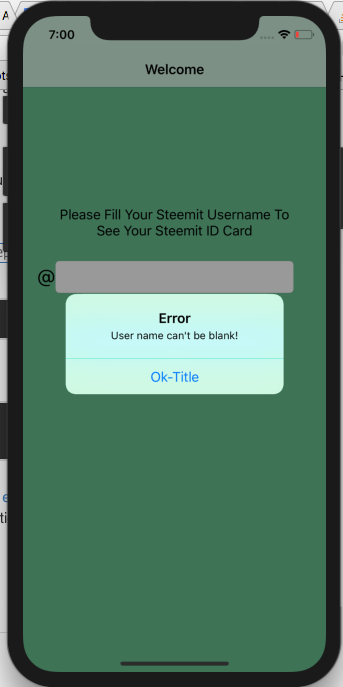
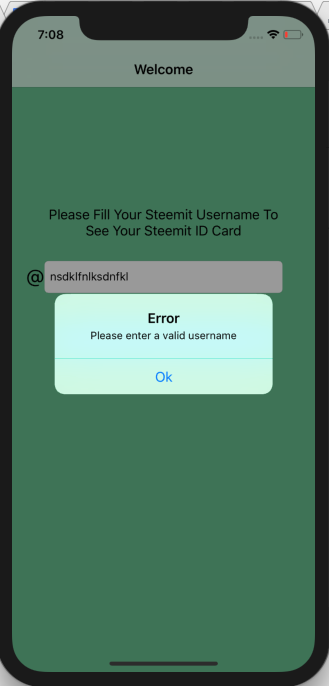
To fix this i write a function which checks value of the username field and proceed only if the values are correct. The code is below :-
Code to check if username field is blank
 @IBAction func goButtonClicked(_ sender: Any) {
        if (self.usernameTextfield.text?.isEmpty)! {
            let alert = UIAlertController(
                title: "Error",
                message: "User name can't be blank!",
                preferredStyle: UIAlertControllerStyle.alert)

            alert.addAction(UIAlertAction(
                title: NSLocalizedString("Ok", comment: "Ok"),
                style: UIAlertActionStyle.default,
                handler: nil))
            DispatchQueue.main.async(execute: {
                self.present(alert, animated: true, completion: nil)
            })
        }
        else {
            self.getUserData(userName: self.usernameTextfield.text!)
        }
    }
Code to check if username is correct or not
 func getUserData(userName: String) {
        showLoadingIndicator()
        var statusCode: String?
        let url = URL(string: "https://steemit.com/@" + userName + ".json")!
        URLSession.shared.dataTask(with: url, completionHandler: {
            (data, response, error) in
            if(error != nil){
                print("error")
            }else{
                do{
                    var json = try JSONSerialization.jsonObject(with: data!, options: []) as! [String: AnyObject]
                    if let status = json["status"] as? String {
                        statusCode = status
                        if statusCode != "404" {
                             statusCode = ""
                        }
                    }
                    if (statusCode?.isEmpty)! {
                    if let userDetailData = json["user"]!["json_metadata"] as? [String: AnyObject] {
                        DispatchQueue.main.async {
                            self.finalUserData = userDetailData["profile"] as? [String: AnyObject]
                        }
                    }
                    DispatchQueue.main.async {
                       self.userName = json["user"]!["name"] as? String
                        self.joinDate = json["user"]!["created"] as? String
                        self.id = json["user"]!["id"] as? Int
                        self.sendToDetailVC()
                    }
                    }
                    else {
                        let alert = UIAlertController(
                            title: "Error",
                            message: "Please enter a valid username",
                            preferredStyle: UIAlertControllerStyle.alert)

                        alert.addAction(UIAlertAction(
                            title: NSLocalizedString("Ok", comment: "Ok"),
                            style: UIAlertActionStyle.default,
                            handler: nil))
                        DispatchQueue.main.async(execute: {
                            self.stopLoadingIndicator()
                            statusCode = ""
                            self.present(alert, animated: true, completion: nil)
                        })
                    }
                }catch let error as NSError{
                    print(error)
                }
            }
        }).resume()
    }
RoadMap of Steem ID Card App
- Make app live on app store
- Create android version of app
- More identity card designs so that users can keep experimenting with their identity cards.
- Option to share identity card on social platforms
- Option to share identity cards with friends with messaging apps.
- More information like reputation, followers and other on the back side of identity card.
- Steemconnect Login for users, so that users don't need to enter their usernames every time.
- Users can see which design of identity card is popular, so that they never feel out of trend.
- Add other platforms like dlive, dtube identity cards also.
- Add card designs for utopian moderators, supervisors.
- And much more!
How to run app
The app is currently not available on app store but still you can install it on your iPhone. For this you need to have following things :-
- Mac
- Xcode
- Apple developer account
- If you had all of this, then download the updated repository to your system, open xcworkspace file in Xcode.
- Now go to project directory from your terminal and run pod install to install all the dependencies for app.
- That's it now connect your device to system, go to Xcode and build the app on your device and enjoy the app.
####Technology Stack
- Swift 4 Programming Language
How to contribute?
https://github.com/iamank1t/Steemit-IDCard
Fork it!
Create your feature branch: git checkout -b my-new-feature
Commit your changes: git commit -m 'Add some feature'
Push to the branch: git push origin my-new-feature
Submit a pull request.
In which countries delivery of cards are available now?
Currently delivery available in India, U.K, U.S.A. I will add delivery to more countries later.
What lib are you using to access the Steem blockchain? Is there an iOS-specific lib?
no there is no iOS-specific library for this... to access blockchain, i am using steemit api's. I make nsurl requests to fetch data from steem blockchain.
Thanks for the quick response. And thanks for your contribution to the Steem platform.
Yeah, i love steem platform so i am continuously making projects on steem platform. I am working on a new project too, soon i will update it on steem platform. If you need any type of help in steem blockchain development i will be there for you. Have a nice day!
Thanks, mate. I might come back to your offer to help me :)
You too have a great day.
cool
Thanks for the contribution!
It seems to me that the "printed plastic card" feature is simply just a form that validates the user's input, but doesn't actually do anything - it's a bit disingenuous to say users will get a card sent to them when they won't (I could be wrong, but it just seems like you are sending a POST request to http://192.168.1.203:3000/userDetails and that's it? Who do you have a deal with that will send out free cards?). The application isn't even available on the app store!
The other feature you added seems okay, but I would recommend upping the quality of your future contributions.
Click here to see how your contribution was evaluated.
Need help? Write a ticket on https://support.utopian.io/.
Chat with us on Discord.
[utopian-moderator]
yeah, http://192.168.1.203:3000/userDetails is my local IP for now because as you see the app is not live on app store. I used this ip to store user data in my database. I checked it and user address details are saving fine in my database. I am talking with a printing press and delivery company too for delivering cards to users and as they agree with me i will make app live for some countries. When i go live with app, i will replace my local ip with production server ip. And surely for future i will take care of my code quality and surely i will contribute quality contributions to community.
Hey @iamankit
Thanks for contributing on Utopian.
We’re already looking forward to your next contribution!
Contributing on Utopian
Learn how to contribute on our website or by watching this tutorial on Youtube.
Want to chat? Join us on Discord https://discord.gg/h52nFrV.
Vote for Utopian Witness!