Repository
https://github.com/jcodec/jcodec
What Will I Learn?
- How to make a screen recording program using java
- How to capture a PC Screen with Java
- How to Encode the image frames to a video file
Requirements
- System Requirements: Java JDK, Eclipse IDE or Netbeans IDE
- OS Support for Java:Windows, macOS, Linux
- Required Knowledge A fair knowlege of java
Resources for Java and this tutorial:
- Oracle Website: https://www.oracle.com/index.html
- Java Docs:http://www.oracle.com/technetwork/java/javase/documentation/api-jsp-136079.html
- JCodec Library : http://jcodec.org/
Difficulty
- Intermediate
Tutorial Duration 25- 30 Minutes
TUTORIAL CONTENT
In this Tutorial, we are going to learn how to create a simple program to implement screen recording with Java programming language. To achieve this functionality, we are going to make use of JCodec Library.
What is JCodec ?
JCodec is a pure java implementation of video/audio codecs. JCodec is a library implementing a set of popular video and audio codecs. source. To get Started, we are going to download the libraries then dive straight into NetBeans or Eclipes, depending on your preference.
STEP 1 : Download JCodec libraries
Download the two libraries (.JAR) found on JCodec site or alternatively from the direct links below
STEP 2 : Create a New Java Project
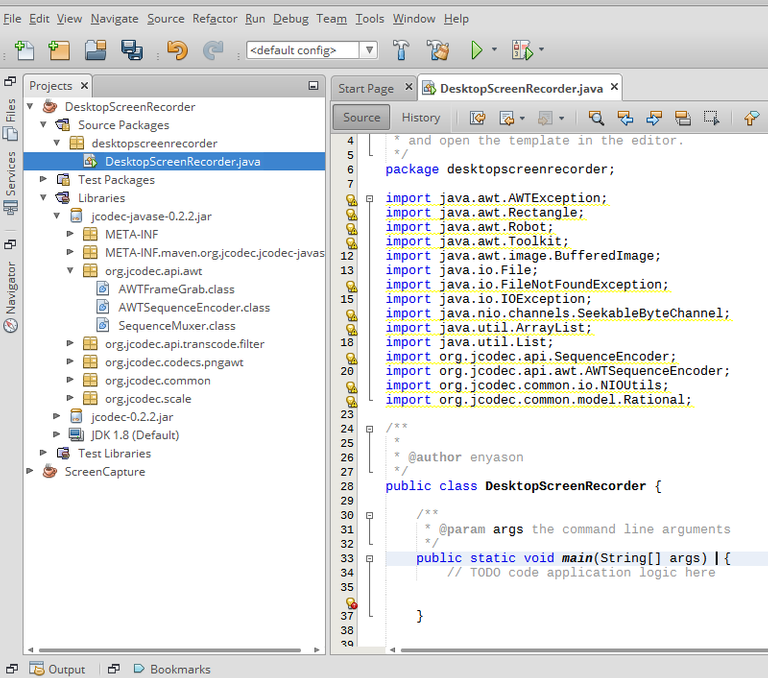
After Creating a new project (with your preferred project name) in Java, you should have something like this;

STEP 3 : Add the JAR files to your project
To add these JAR files to our project, we will follow these steps
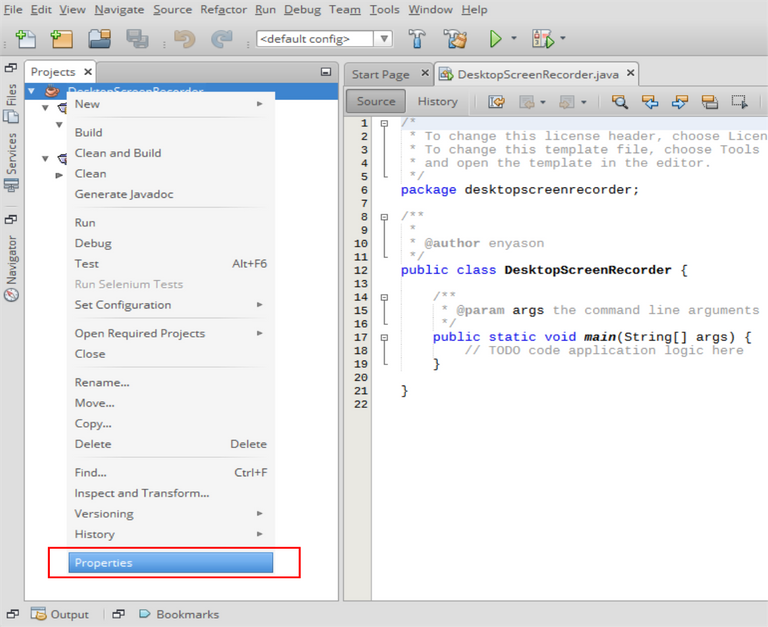
- On the left panel of the editor, right click on the project created and select properties

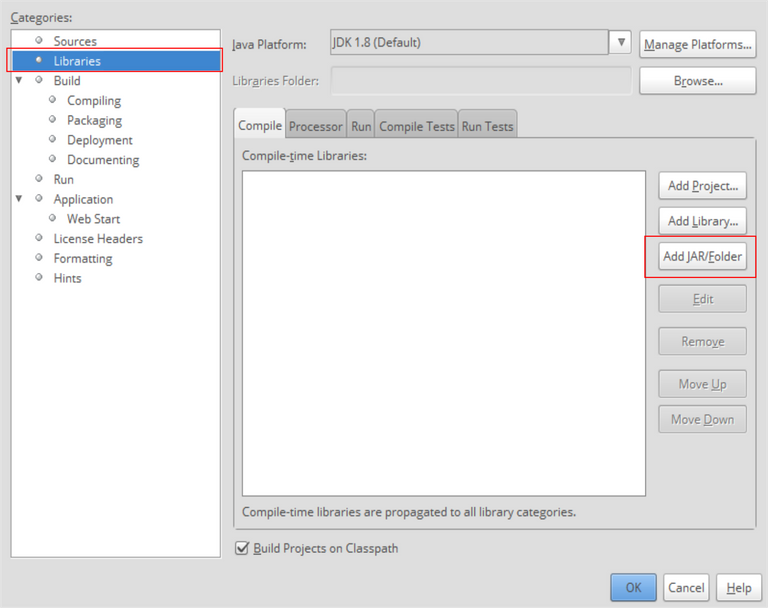
- From the pop up window, click on Libraries under Categories
- Then Click on Add JAR/Folder

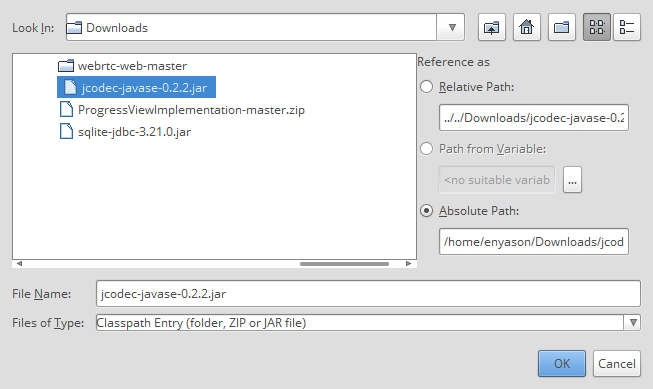
- Browse to the folder you saved the JAR files to and then add it to the project

STEP 4 : Capture PC Screen
To capture the PC Screen, we are going to use the Java Robot class. Add the code block below to to your main method of your class
public static void main(String[] args) throws AWTException, IOException {
List<BufferedImage> imageList = new ArrayList<>();
Rectangle screenRect = new Rectangle(Toolkit.getDefaultToolkit().getScreenSize());
Robot robot = new Robot();
File file = new File("outputVideo.mp4");
System.out.println("getting screen images...");
 int count = 0;
        while (count < 100) {
            BufferedImage image = robot.createScreenCapture(screenRect);
            imageList.add(image);
            count++;
        }
        makeVideoFromImages(imageList,file);
    }
Code explanation
- First we declare a List of Type BufferedImage. The generic type of the list is set to BufferedImage because the captured images will be buffered images. The List will hold the images in run time.
- The Rectangle is used to get the dimension of the screen to be recorded.
- Next we create the Robot object that will assist us capture our screen.
- We create a File of MP4 format which the images will be encoded into.
- Since we want to record the PC screen, we make a while loop that constantly gets screen capture till count > 100 . This was done for simplicity sake.
- While the condition is true, the BufferedImage is stored in the List
STEP 5 : Generate a Video File From The Images(Frames)
At this step, what we will do is take the lists of frames and encode it into the video file we created in Step 4 ."outputVideo.mp4"
Now our imported libraries becomes useful. Lets create a method that handles the conversion. See the code block below;
public static void makeVideoFromImages(List<BufferedImage> imageList, File file) throws IOException {
        AWTSequenceEncoder sequenceEncoder = AWTSequenceEncoder.createSequenceEncoder(file, 25);
        for (int i = 0; i < imageList.size(); i++) {
           sequenceEncoder.encodeImage(imageList.get(i));
            System.out.println("list encode " + i);
        }
     sequenceEncoder.finish();
}Code explanation
- Our method takes two parameters which are the image list and the output file that was created in Step 4
- We initialize the AWTSequenceEncoder object with the static method createSequenceEncoder which takes two parameters, that is the file output and frames per second in integer. AWTSequenceEncoder extends(inherit) the sequence encoder class. This class takes the sequence of images and convert them into a video file.
- We loop through the List of BufferedImages and then encode it into the output file withe the sequenceEncoder object.
- finish() method is called to clear the buffers thus finalize the recording.
STEP 6 : Test The Java Program
With Steps 1 to 5 completed, our screen recording program is now ready for use. Below is a video showing the program output.
Proof of Work
The complete source code can be found on gitHub
https://github.com/enyason/DesktopScreenRecorder
Thank you for your contribution.
Your contribution has been evaluated according to Utopian policies and guidelines, as well as a predefined set of questions pertaining to the category.
To view those questions and the relevant answers related to your post, click here.
Chat with us on Discord.
[utopian-moderator]Need help? Write a ticket on https://support.utopian.io/.
Thanks @portugalcoin for moderating my contribution and your suggestion. i will see to improving on them in the next post.
Thank you for your review, @portugalcoin!
So far this week you've reviewed 1 contributions. Keep up the good work!
Thanks for contributing on Utopian.
We’re already looking forward to your next contribution!Hey @ideba
Want to chat? Join us on Discord https://discord.gg/h52nFrV.
Vote for Utopian Witness!