What will you learn?
- how OAuth2 authorization code grant works
- how to use steemconnect-firebase-functions library to set up user authentication via SteemConnect in the Firebase Cloud Functions
- how to build simple frontend with Angular and AngularFire2 to complete OAuth2 code flow and make operations on the Firebase Cloud Firestore database
Requirements
- TypeScript knowledge
- some experience with Angular
- Angular CLI installed
Difficulty
- basic
How to authenticate users via SteemConnect on the Firebase?
After introducing steemconnect-firebase-functions library, obvious next step is a tutorial how to use it. The process of building the app we are going to work on today will give you the necessary knowledge to start building your own Steem-related projects on the Firebase. And you will understand OAuth2!

What is Firebase?
Firebase is a platform which gives you the ability to create applications that use database or authentication without writing any backend code...
Well, this is true as long as we don't want to implement an auth system based on SteemConnect :) Firebase Authentication comes with a few auth providers built-in, such as Facebook or Twitter, but if we want to use SteemConnect we will have to write some backend code.
The backend code runs on the Cloud Functions triggerable by events such as HTTP requests.
Important note: if you want to use Firebase on production (it's about deploying Cloud Functions), you will have to choose a paid pricing plan. Why? Our Cloud Functions are going to make requests to external API (SteemConnect) and this kind of operations are not included in the free (Spark) plan. Fortunately, we still can run Functions locally, so to follow this tutorial you won't have to pay anything. For more information check pricing.
What is OAuth2?
Have you ever signed into any app using your external account, maybe the one you have on Google or Facebook? You click 'Login with Facebook' and then the popup window is being opened. You see Facebook which asks you if you want to give this third-party app access to the listed resources. You probably accept it and then magically you become logged in to the app.
You are the resource owner, you operate via user-agent (in this case a browser) and the application that wants you to give it an access to resources is the client.
This process is possible thanks to OAuth2 - an authorization framework which enables third-party applications to get limited access to the service.
It's all about the access tokens. These strings are used to access resources protected by the service and the entire OAuth2 flow is oriented on getting them. The protected resource can be almost anything, from user data to ability to broadcast operations such as publishing a post.
Even though there are a few OAuth2 flows, all of them are similar due to the fact that access token is the end goal.
Authorization Code Grant
The type of OAuth2 flow we will use in this tutorial is authorization code grant. This flow is split into two parts:
- authentication of the resource owner - purple arrows on the diagram below
- getting access token - blue arrows
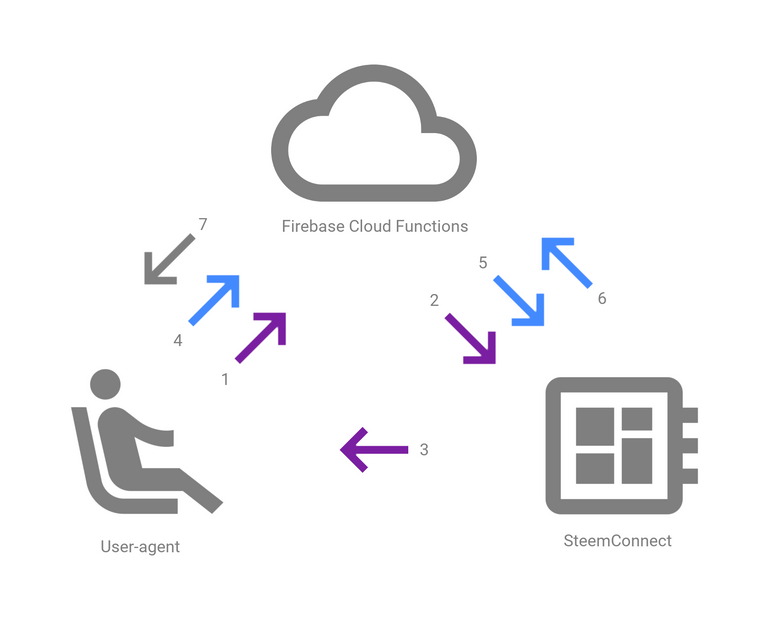
This process can be tricky, so let me explain each step:
- Resource owner (via user-agent) opens a popup window which redirects him to the Firebase Cloud Function.
- The Firebase Cloud Function redirects to SteemConnect endpoint with the client (application) information along with the scope of resources client wants to gain access to, and URI which SteemConnect will redirect to after success. At this point, the user is asked to give the third-party app access to the requested resources.
- SteemConnect redirects to provided URI with code as a query parameter (for example,
http://localhost:4200/redirect?code=fdt453534fds). - User-agent on the resource owner behalf makes a request to the Firebase Cloud Function along with the code.
- Firebase Cloud Function makes a request to SteemConnect token endpoint with client information and the code.
- SteemConnect responses with an access token and some additional info such as the resource owner username.
- Based on the username Firebase mints a custom auth token and sends it back to the resource owner. This step is not really OAuth2 related, but important for the Firebase Authentication system.
Don't worry if you don't understand everything yet. It will become clear when we actually implement these steps in our app.
Creating Firebase project
The app we are going to create is gonna use Firebase Authentication, Firebase Cloud Functions and Firebase Cloud Firestore... so we have to create Firebase project.
This process is really simple, one just has to go to the Firebase Console and click Add project. You will see a modal, where you choose your project name and your country. The last step for now is to click Create project and wait a few seconds.
That's all for now, but we will come back here a few times later.
Creating SteemConnect project
My apps and click New app.Creating SteemConnect project is nothing fancy once again. To do so, one simply has to go to https://steemconnect.com/dashboard and navigate to
Warning: the username for your app you choose at this point is not changeable! So make sure you typed it correctly before clicking Create account.
In the next step, fill the form as you wish, but make sure to add http://localhost:4200/redirect to Redirect URI(s) section:
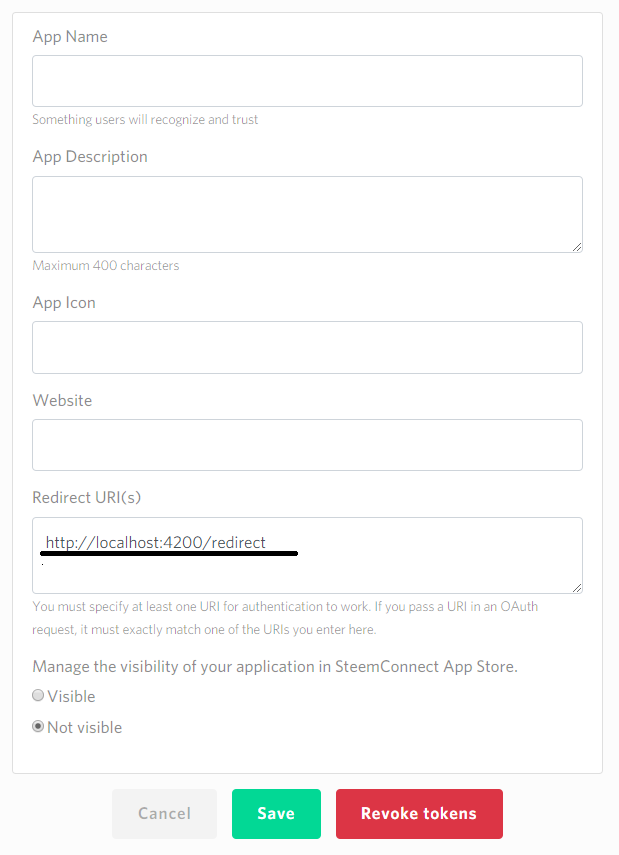
We will come back to the dashboard later for client id and client secret.
Creating Angular project
Although we won't write any code for the frontend yet, creating an Angular project using Angular CLI is always a good start. Let's do it then!
ng new your-project-name
cd your-project-name
Backend
The backend we are going to create is, of course, based on Firebase Cloud Functions. However, before we start coding, we have to install firebase-tools:
npm install firebase-tools -g
Once installed, initialize Firebase Cloud Functions project:
firebase init functions
During this process you will be asked for a default project for this directory, select project which you have created in the Creating Firebase project section. Later, when asked What language would you like to use to write Cloud Functions, pick TypeScript. Also, you want to both use TSLint to catch probable bugs and enforce style and install dependencies with npm now.
Our backend code is now in the functions directory, let's move there:
cd functions
We will need some dependencies, first of all steemconnect-firebase-functions:
npm install steemconnect-firebase-functions --save
and CORS:
npm install cors --save
npm install @types/cors --save-dev
Next, go back to Firebase Console. We are going to mint Custom Firebase Auth Tokens, so we need service account credentials:

and then click GENERATE NEW PRIVATE KEY.
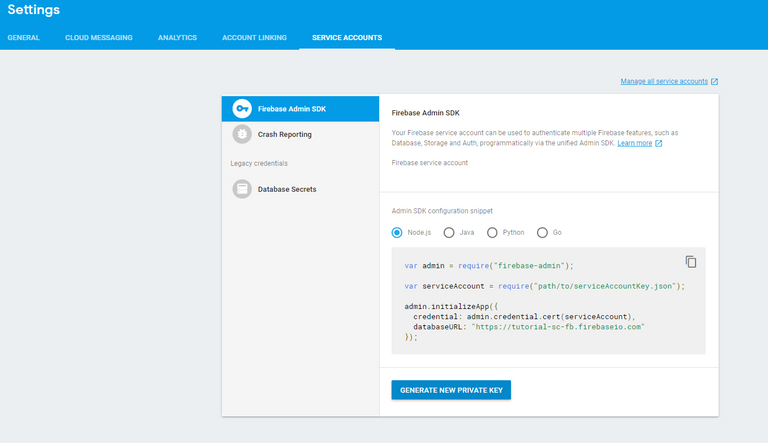
Move downloaded file to our backend root folder (functions) and rename it to serviceAccountKey.json. Also, make sure you don't expose it (add this file to .gitignore etc.).
Once done, open your favorite code editor and paste the code below to src/index.ts:
// IMPORTS

import {
  getAuthorizationUrl,
  getAccessToken,
  mintFirebaseToken
} from 'steemconnect-firebase-functions';

import * as functions from 'firebase-functions';
import * as admin from 'firebase-admin';

import * as CORS from 'cors';

const serviceAccount = require('../serviceAccountKey.json');

// CONFIGURATION

const cors = CORS({ origin: true });

admin.initializeApp({
  credential: admin.credential.cert(serviceAccount)
});

const redirectUri = 'http://localhost:4200/redirect';
const scope = ['login'];

const clientId = 'YOUR_CLIENT_ID';
const clientSecret = 'YOUR_CLIENT_SECRET';

// FUNCTIONS

export const redirect = functions.https.onRequest((req, res) => {
  const endpoint = getAuthorizationUrl(clientId, redirectUri, scope);
  res.redirect(endpoint);
});

export const callback = functions.https.onRequest((req, res) => {
  cors(req, res, () => {
    handleCallback(req)
      .then(token => res.status(200).send({ token }))
      .catch(err => res.status(400).send(err));
  });
});

// HELPER FUNCTION

async function handleCallback(req) {
  const code = req.query.code;

  const accessToken = await getAccessToken(
    clientId,
    clientSecret,
    redirectUri,
    code
  );
  const uid = `steemconnect:${accessToken.username}`;

  const firebaseToken = await mintFirebaseToken(admin, uid);

  return firebaseToken;
}
What's going on there?
Imports
Nothing fancy there, we are just importing modules we will need later in this file. The worth to mention is fact that we import only three functions from steemconnect-firebase-functions, but there are more of them, and will be even more ;)
We just don't need more for this app - we will only identify user identity and then mint custom auth token based on his username.
Configuration
In this section you have to paste your own clientId and clientSecret. To get them, go back to SteemConnect dashboard, then go to My apps and click on your app name. There you have both of these values.
Also, make sure you don't expose this file - client secret is a sensitive value! We paste them as they are only for the purpose of local running. If you decide to deploy your app you will have another way to insert them into your code. More information in the last section of this post.
Functions
This is the part of the file where magic happens. We have defined two Cloud Functions - redirect and callback. Both react to any http requests. It means that each time we make a request or simply navigate to URL dedicated to each function, the code inside it is gonna run.
The redirect function is responsible for handling the step 2 of OAuth2 Authorization Code Grant (see diagram above). It uses getAuthorizationUrl function from steemconnect-firebase-functions library.
On the other hand, the callback function doesn't handle just one step. It actually handles two - step 5 and 7. To do so, it uses a helper async function handleCallback.
Helper function
The handleCallback async function uses two functions from steemconnect-firebase-functions library - getAccessToken (step 5) and mintFirebaseToken (step 7).
It's quite obvious what they do, but fortunately you don't have to worry how to implement functionality they provide. Cool, isn't it?
Also, at this point, you have an access to access token. Based on the scope, access token enables client to do different operations on the behalf of the user.
So, in this helper function, we also could save this token in the Cloud Firestore for a later use - saveAccessToken function from steemconnect-firebase-functions would do the job, but make sure to deny access to each document of the steemconnectToken collection later with the Firestore security rules! More about them in a separate section and in the references.
We could also get more user details than just a username using the getUserData function, again from my library.
Broadcasting operations to the blockchain isn't anything fancy too - as we have access token at this point (remember it requires different scope than login) we could use the broadcastOperations function.
Running functions locally
We have almost everything set up to run our backend locally. There are actually two more commands you have to run in the backend root folder:
npm run build
and then:
firebase serve --only functions
Keep them running, because we will need them in the frontend app, which we are going to start building right now.
Frontend
Our frontend application has two important roles in the OAuth2 flow - handle step 1 and step 4. In addition, it has to make use of the token that callback Cloud Function responses with if minting custom auth token succeed. Quite a lot of work to do, so let's start!
If you are in the functions directory, go back to Angular project:
cd ../
but make sure functions are still running!
The first step in building Firebase frontend in Angular is usually configuring AngularFire2:
npm install angularfire2 firebase --save
once installed, go back to Firebase Console, choose your project and click Add Firebase to your web app. Copy all properties of config object and paste them inside src/environments/environment.ts file like that:
export const environment = {
  production: false,
  firebaseConfig: {
    apiKey: '<your-key>',
    authDomain: '<your-project-authdomain>',
    databaseURL: '<your-database-URL>',
    projectId: '<your-project-id>',
    storageBucket: '<your-storage-bucket>',
    messagingSenderId: '<your-messaging-sender-id>'
  }
};
We also have to import a few AngularFire2 modules. Our AppModule should look like that for now:
import { BrowserModule } from '@angular/platform-browser';
import { NgModule } from '@angular/core';

import { AngularFireModule } from 'angularfire2';
import { AngularFireAuthModule } from 'angularfire2/auth';
import { AngularFirestoreModule } from 'angularfire2/firestore';

import { AppComponent } from './app.component';

import { environment } from './../environments/environment';

@NgModule({
  declarations: [AppComponent],
  imports: [
    BrowserModule,
    AngularFireModule.initializeApp(environment.firebaseConfig),
    AngularFireAuthModule,
    AngularFirestoreModule
  ],
  providers: [],
  bootstrap: [AppComponent]
})
export class AppModule {}
Next let's create an AuthService, which will handle most of the user authentication:
ng g s auth -m app
now fill auth.service.ts with the following code:
import { Injectable } from '@angular/core';

import { Observable } from 'rxjs/Observable';
import { switchMap } from 'rxjs/operators';

import { AngularFireAuth } from 'angularfire2/auth';

@Injectable()
export class AuthService {
  user: Observable<any>;

  constructor(private afAuth: AngularFireAuth) {
    this.user = this.afAuth.authState;
  }

  login() {
    const popup = window.open(
      'redirect_function_url',
      '_blank',
      'height=700,width=800'
    );
  }

  signIn(token) {
    return this.afAuth.auth
      .signInWithCustomToken(token)
      .then(() => window.close());
  }

  signout() {
    this.afAuth.auth.signOut();
  }
}
and replace redirect_function_url in the login method with the actual URL to redirect Function.
Before we create components to complete our OAuth2 flow, let's ensure it will look pretty. Bootstrap seems like a good choice, let's add it to src/index.html:
<!doctype html>
<html lang="en">

<head>
  <meta charset="utf-8">
  <title>SteemconnectFirebaseFunctionsExample</title>
  <base href="/">

  <meta name="viewport" content="width=device-width, initial-scale=1">
  <link rel="icon" type="image/x-icon" href="favicon.ico">

  <link rel="stylesheet" href="https://maxcdn.bootstrapcdn.com/bootstrap/4.0.0/css/bootstrap.min.css" integrity="sha384-Gn5384xqQ1aoWXA+058RXPxPg6fy4IWvTNh0E263XmFcJlSAwiGgFAW/dAiS6JXm"
    crossorigin="anonymous">
</head>

<body>
  <app-root></app-root>
</body>

</html>
At this point, we need two more components - RedirectComponent and UserDetailsComponent. The first one will handle the step 4 and the second one will be responsible to provide the functionality of step 1.
RedirectComponent will be created each time user hit the http://localhost:4200/redirect URL. To be more precise - user won't navigate there, but SteemConnect will redirect there after successful login with the code as a query parameter, and the job of RedirectComponent will be to deliver this code to callback Cloud Function and make a use of its response - custom auth token.
On the other hand, UserDetailsComponent will display a Login with SteemConnect button for not logged in users, and uid along with Signout button for logged in users.
Let's generate them:
ng g c redirect
ng g c user-details
The redirect.component.ts should look like that:
import { Component, OnInit } from '@angular/core';
import { HttpClient } from '@angular/common/http';
import { Router, ActivatedRoute, Params } from '@angular/router';

import { switchMap } from 'rxjs/operators';
import { fromPromise } from 'rxjs/observable/fromPromise';

import { AuthService } from '../auth.service';

@Component({
  selector: 'app-redirect',
  templateUrl: './redirect.component.html',
  styleUrls: ['./redirect.component.css']
})
export class RedirectComponent implements OnInit {
  constructor(
    private http: HttpClient,
    private route: ActivatedRoute,
    private auth: AuthService
  ) {}

  ngOnInit() {
    const code = this.route.snapshot.queryParamMap.get('code');
    const url = `<CALLBACK-FUNCTION-URL>/callback?code=${code}`;

    if (code) {
      this.http
        .post<any>(url, {})
        .pipe(
          switchMap(res => {
            return fromPromise(this.auth.signIn(res.token));
          })
        )
        .subscribe();
    }
  }
}
Make sure to replace <CALLBACK-FUNCTION-URL> with the actual URL of the callback Function.
Both redirect.component.html and redirect.component.css are not that important, because this component will be displayed only for short period of time, so you can leave it as it is, change text in the HTML to something like Loading..., or even make a fancy loading spinner on your own :)
Now let's move to UserDetailsComponent; user-details.component.ts is simple:
import { Component } from '@angular/core';

import { AuthService } from './../auth.service';

@Component({
  selector: 'app-user-details',
  templateUrl: './user-details.component.html',
  styleUrls: ['./user-details.component.css']
})
export class UserDetailsComponent {
  constructor(public auth: AuthService) {}
}
the entire magic happens in its template user-details.component.html:
<div *ngIf="auth.user | async as user; else guest">
  <div class="card">
    <div class="card-body">
      <h5 class="card-title">Hello!</h5>
      <h6 class="card-subtitle mb-2 text-muted">You are logged into Firebase via SteemConnect!</h6>
      <p class="card-text">That's your uid:
        <b>{{ user.uid }}</b>
      </p>
      <button (click)="auth.signout()" class="btn btn-warning">Signout</button>
    </div>
  </div>
</div>

<ng-template #guest>
  <button (click)="auth.login()" class="btn btn-primary">Login with SteemConnect!</button>
</ng-template>
To make signing in feature work, we need to do one more thing - set up routing. Let's start with the app.component.html, where router-outlet is gonna be placed:
<nav class="navbar navbar-expand-lg navbar-light bg-light">
  <a class="navbar-brand" href="">steemconnect-firebase-functions</a>
  <div class="navbar-nav">
    <a class="nav-item nav-link" href="https://github.com/jakipatryk/steemconnect-firebase-functions-example">Github</a>
  </div>
</nav>

<div class="container">
  <div class="row">
    <div class="col-xs-12 col-md-4">
      <router-outlet></router-outlet>
    </div>

    <div class="col-xs-12 col-md-8">
      We will add messages here later on.
    </div>
  </div>
</div>
The last step for now is configuration of routes in app.module.ts, this file should look like following for now:
import { BrowserModule } from '@angular/platform-browser';
import { NgModule } from '@angular/core';
import { Routes, RouterModule } from '@angular/router';
import { HttpClientModule } from '@angular/common/http';

import { AngularFireModule } from 'angularfire2';
import { AngularFireAuthModule } from 'angularfire2/auth';
import { AngularFirestoreModule } from 'angularfire2/firestore';

import { AppComponent } from './app.component';
import { RedirectComponent } from './redirect/redirect.component';
import { UserDetailsComponent } from './user-details/user-details.component';

import { AuthService } from './auth.service';

import { environment } from './../environments/environment';

const routes: Routes = [
  { path: '', component: UserDetailsComponent },
  { path: 'redirect', component: RedirectComponent }
];

@NgModule({
  declarations: [AppComponent, RedirectComponent, UserDetailsComponent],
  imports: [
    BrowserModule,
    RouterModule.forRoot(routes),
    HttpClientModule,
    AngularFireModule.initializeApp(environment.firebaseConfig),
    AngularFireAuthModule,
    AngularFirestoreModule
  ],
  providers: [AuthService],
  bootstrap: [AppComponent]
})
export class AppModule {}
Aaaand... we have implemented the entire OAuth2 Authorization Code Grant and the signing in with the Firebase custom auth token! Don't you believe? Ok, let's test it then!
ng serve
now just open up your browser and navigate to http://localhost:4200, that's what you are gonna see after successful sign in:
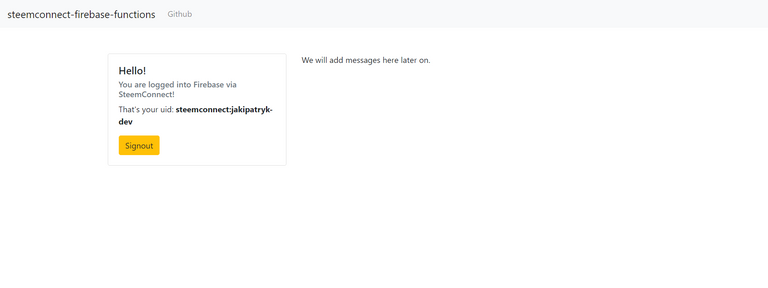
also, the Authentication page in the Firebase Console has changed ;)

I could have ended this tutorial here, but I want to show a really trivial example of what you can do now. Even though it is not gonna be complex, you will see that from this point making Steem-related apps that doesn't add anything to the blockchain is easy. Do you wonder why would anyone create an Steem-related app that don't publish anything to the blockchain? Check SteemProjects by @noisy.
Messages
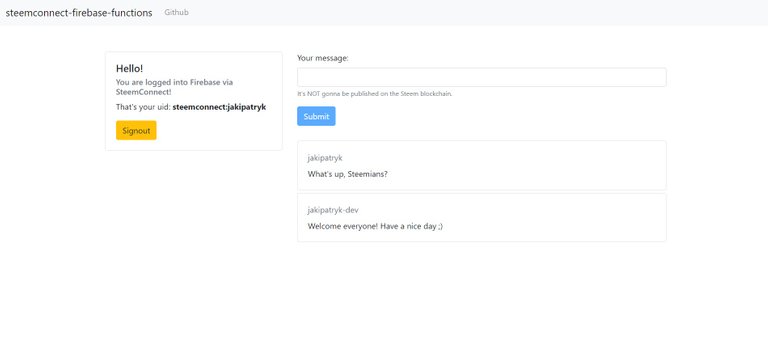
In this section we will add messages that any logged in user would be able to add. At the end our app will look like the example app.
Before we move to the code, you have to turn on Cloud Firestore. To do so, simply go to the Firebase Console, choose your project, go to Database page and click TRY FIRESTORE BETA (select Start in test mode when asked).
Let's start with generating two presentational components - MessageDetailsComponent and MessageFormComponent, one container component - MessageListComponent, a service to handle data flow between the Angular app and the Firestore - MessageService and the interface of Message:
ng g c messages/message-details
ng g c messages/message-form
ng g c messages/message-list
ng g s messages/message -m app
ng g i messages/models/message
Our Message interface should look like that:
export interface Message {
  author: string;
  text: string;
}
Now let's bring some life to our presentational components starting with MessageFormComponent. This kind of component shouldn't be aware of any data, so in message-form.component.ts we should use @Output decorator and EventEmmiter to emit values of our reactive form once submited:
import { Component, OnInit, EventEmitter, Output } from '@angular/core';
import { FormBuilder, FormGroup, Validators } from '@angular/forms';

import { Message } from '../models/message';

@Component({
  selector: 'app-message-form',
  templateUrl: './message-form.component.html',
  styleUrls: ['./message-form.component.css']
})
export class MessageFormComponent implements OnInit {
  @Output() messageEmitter: EventEmitter<Message> = new EventEmitter<Message>();

  messageForm: FormGroup;

  constructor(private formBuilder: FormBuilder) {}

  ngOnInit() {
    this.createMessageForm();
  }

  addMessage() {
    this.messageEmitter.emit({
      ...this.messageForm.value
    });
  }

  private createMessageForm() {
    this.messageForm = this.formBuilder.group({
      text: ['', Validators.required]
    });
  }
}
the template of this component is nothing fancy, just a simple form:
<form [formGroup]="messageForm" (ngSubmit)="addMessage()">
  <div class="form-group">
    <label for="textInput">Your message:</label>
    <input formControlName="text" id="textInput" class="form-control" aria-describedby="textHelper">
    <small id="textHelper" class="form-text text-muted">It's NOT gonna be published on the Steem blockchain.</small>
  </div>
  <button type="submit" class="btn btn-primary">Submit</button>
</form>
The second presentational component is going to be responsible to display the details of a message (text, author); message-details.component.ts:
import { Component, Input } from '@angular/core';
import { Message } from '../models/message';

@Component({
  selector: 'app-message-details',
  templateUrl: './message-details.component.html',
  styleUrls: ['./message-details.component.css']
})
export class MessageDetailsComponent {
  @Input() message: Message;
}
and message-details.component.html:
<div class="card">
  <div class="card-body">
    <div class="card-title mb-2 text-muted">{{ message.author | uidToUsername }}</div>
    <div class="card-text">{{ message.text }}</div>
  </div>
</div>
As you can see, we use uidToUsername pipe, which is a custom pipe, so we have to generate it:
ng g p messages/pipes/uid-to-username
It transforms uid to username, for example steemconnect:jakipatryk to jakipatryk:
import { Pipe, PipeTransform } from '@angular/core';

@Pipe({
  name: 'uidToUsername'
})
export class UidToUsernamePipe implements PipeTransform {
  transform(value: string, args?: any): string {
    const username = value.replace('steemconnect:', '');
    return username;
  }
}
We are almost ready to power up our presentational components with data. Yes, almost. We have to complete two more tasks. Updating MessageService is a perfect choice now:
import { Injectable } from '@angular/core';

import {
  AngularFirestore,
  AngularFirestoreDocument
} from 'angularfire2/firestore';

import { Observable } from 'rxjs/Observable';

import { Message } from './models/message';

@Injectable()
export class MessageService {
  constructor(private afs: AngularFirestore) {}

  addMessage(data: Message) {
    return this.afs.collection('messages').add({ ...data });
  }

  getMessages(): Observable<Message[]> {
    return this.afs.collection('messages').valueChanges() as Observable<Message[]>;
  }
}
Now we can use it in our container component - MessageListComponent:
message-list.component.ts:
import { Component, OnInit } from '@angular/core';

import { MessageService } from './../message.service';
import { AuthService } from '../../auth.service';

import { Message } from '../models/message';

import { Observable } from 'rxjs/Observable';

@Component({
  selector: 'app-message-list',
  templateUrl: './message-list.component.html',
  styleUrls: ['./message-list.component.css']
})
export class MessageListComponent implements OnInit {
  currentUser;
  messages: Observable<Message[]>;

  constructor(
    private messageService: MessageService,
    public auth: AuthService
  ) {}

  ngOnInit() {
    this.auth.user.subscribe(user => {
      this.currentUser = user;
    });
    this.messages = this.messageService.getMessages();
  }

  addMessage(data) {
    const dataWithAuthor = { ...data, author: this.currentUser.uid };
    this.messageService.addMessage(dataWithAuthor);
  }
}
message-list.component.html:
<div *ngIf="auth.user | async as user">
  <app-message-form (messageEmitter)="addMessage($event)"></app-message-form>
</div>


<div *ngIf="!(messages | async)">
  Loading messages...
</div>

<app-message-details *ngFor="let message of messages | async" [message]="message"></app-message-details>
We are almost done. Let's now add our container component to AppComponent, its template should have the following code:
<nav class="navbar navbar-expand-lg navbar-light bg-light">
  <a class="navbar-brand" href="">steemconnect-firebase-functions</a>
  <div class="navbar-nav">
    <a class="nav-item nav-link" href="https://github.com/jakipatryk/steemconnect-firebase-functions-example">Github</a>
  </div>
</nav>

<div class="container">
  <div class="row">
    <div class="col-xs-12 col-md-4">
      <router-outlet></router-outlet>
    </div>

    <div class="col-xs-12 col-md-8">
      <app-message-list></app-message-list>
    </div>
  </div>
</div>
The last step is to make sure we have included everything in the AppModule:
import { BrowserModule } from '@angular/platform-browser';
import { NgModule } from '@angular/core';
import { HttpClientModule } from '@angular/common/http';
import { Routes, RouterModule } from '@angular/router';
import { ReactiveFormsModule } from '@angular/forms';

import { AngularFireModule } from 'angularfire2';
import { AngularFireAuthModule } from 'angularfire2/auth';
import { AngularFirestoreModule } from 'angularfire2/firestore';

import { AppComponent } from './app.component';
import { RedirectComponent } from './redirect/redirect.component';
import { UserDetailsComponent } from './user-details/user-details.component';

import { AuthService } from './auth.service';
import { MessageService } from './messages/message.service';

import { environment } from './../environments/environment';
import { MessageListComponent } from './messages/message-list/message-list.component';
import { MessageDetailsComponent } from './messages/message-details/message-details.component';
import { MessageFormComponent } from './messages/message-form/message-form.component';
import { UidToUsernamePipe } from './messages/uid-to-username.pipe';

const routes: Routes = [
  { path: '', component: UserDetailsComponent },
  { path: 'redirect', component: RedirectComponent }
];

@NgModule({
  declarations: [
    AppComponent,
    RedirectComponent,
    UserDetailsComponent,
    MessageListComponent,
    MessageDetailsComponent,
    MessageFormComponent,
    UidToUsernamePipe
  ],
  imports: [
    BrowserModule,
    RouterModule.forRoot(routes),
    HttpClientModule,
    ReactiveFormsModule,
    AngularFireModule.initializeApp(environment.firebaseConfig),
    AngularFireAuthModule,
    AngularFirestoreModule
  ],
  providers: [AuthService, MessageService],
  bootstrap: [AppComponent]
})
export class AppModule {}
Now simply ng serve the app and enjoy your first Firebase and SteemConnect based application!
Backend once again (security)
We do already have a working app. Cool, but you might remember that you started the database in the test mode. While it is ok to use it during the development phase, it is completely wrong to use this mode on the production.
Why? Test mode allows anyone to read, create, update and delete any data in the Firestore. We don't want that.
We want to allow:
- anyone to read messages
- logged in users to create messages
- authors to update or delete their messages
To achieve this, one has to visit Firebase console once again, navigate to the project and then to Database page. Here, in the RULES section, we define our rules.
In case of our app, the rules should be following:
service cloud.firestore {
  match /databases/{database}/documents {
    match /messages/{message} {
      allow read: if true;
      allow update, delete: if request.auth.uid == resource.data.author;
      allow create: if request.auth.uid != null;
    }
  }
}
Deploying the app and Cloud Functions
NOTE: this section is for those who decided to choose paid pricing plan (Flame or Blaze).
Ok, we have everything set up. Now it's time for deployment. However, we have to do some configuration before we enter deploy command.
Let's start with the frontend. You might remember that we inserted the Firebase configuration in the environment.ts file. It worked well, but it won't work on the production. Angular CLI takes different file during the build for production - environment.prod.ts.
Basically, all you have to do is to copy firebaseConfig object from environment.ts to environment.prod.ts, but I highly recomment you create another Firebase project just for production. The setup process will be exactly the same as we did before.
Now let's move to backend Cloud Functions. We need to setup clientId and clientSecret as a Firebase variables, so in the terminal move to functions directory and type the following commands:
firebase functions:config:set steemconnect.id="YOUR_CLIENT_ID" steemconnect.secret="YOUR_CLIENT_SECRET"
Both id and secret are of course the same as before. Now let's change a bit our index.ts file, instead of:
const clientId = 'YOUR_CLIENT_ID';
const clientSecret = 'YOUR_CLIENT_SECRET';
use:
const clientId = functions.config().steemconnect.id;
const clientSecret = functions.config().steemconnect.secret;
We also have to change the redirectUri. To do so, you have to go to Firebase console once again and then to your project. This time hit the Hosting page, click GET STARTED, then CONTINUE and finally FINISH. Copy the domain and update redirectUri:
const redirectUri = 'https://<YOUR-DOMAIN>/redirect';
Remember to add this redirectUri to the Redirect URI(s) at the SteemConnect dashboard!
Now we can deploy our Cloud Functions!
firebase deploy --only functions
If you are getting an error here, try changing firebase.json file from:
{
  "functions": {
    "predeploy": [
      "npm --prefix $RESOURCE_DIR run lint",
      "npm --prefix $RESOURCE_DIR run build"
    ]
  }
}
to:
{
  "functions": {
    "predeploy": [
      "npm --prefix %RESOURCE_DIR% run lint",
      "npm --prefix %RESOURCE_DIR% run build"
    ]
  }
}
Once done, copy the URLs of the Cloud Functions and change the URLs in auth.service.ts and redirect.component.ts.
We could - and I would defienietly do so in a serious app - add additional property to environment files, something like functionsURL and add different URLs for production and development, so we could still test our functions and frontend locally. Then we could simply import environment file to both of these files and not change the URL directly, but use the environment variable functionsURL instead. Angular CLI would do its job then.
Anyway, whatever option you have chosen, the deployment of the Angular app will look exactly the same. First of all, we have to initialize the Firebase Hosting. To do so, move to the root folder of Angular app and type the command:
firebase init hosting
When asked:
- What do you want to use as your public directory? - type dist
- Configure as a single-page app (rewrite all urls to /index.html)? - type y
Once initialized, you have to build your app for production:
ng build --prod
The last step is to run:
firebase deploy --only hosting
Now you can enjoy your deployed app and Cloud Functions and share it with your friends!
Summary
Huh, it's been a long tutorial. We have created an app that implements OAuth2 Authorization Code Grant to enable users to authenticate via SteemConnect on the Firebase. To achieve this, we used steemconnect-firebase-functions library, which I had created to make developer's life easier. On the frontend we used Angular + AngularFire2 to build simple but powerful application.
References
- OAuth2:
- SteemConnect:
- Firebase Cloud Functions:
- Firebase Cloud Firestore and rules:
- AngularFire2:
- user agent
Github
The code of the app we have built in this tutorial is avaiable on the Github:
Also, the steemconnect-firebase-functions library is on the Github:
Posted on Utopian.io - Rewarding Open Source Contributors
Thank you for the contribution. It has been approved.
You can contact us on Discord.
[utopian-moderator]
Hey @sakibarifin, I just gave you a tip for your hard work on moderation. Upvote this comment to support the utopian moderators and increase your future rewards!
Being A SteemStem Member
Hey @jakipatryk I am @utopian-io. I have just upvoted you!
Achievements
Suggestions
Get Noticed!
Community-Driven Witness!
I am the first and only Steem Community-Driven Witness. Participate on Discord. Lets GROW TOGETHER!
Up-vote this comment to grow my power and help Open Source contributions like this one. Want to chat? Join me on Discord https://discord.gg/Pc8HG9x
You've got upvoted by
Utopian-1UP!You can give up to ten 1UPSteemAuto you support great Utopian authors and earn high curation rewards at the same time.'s to Utopian posts every day after they are accepted by a Utopian moderator and before they are upvoted by the official @utopian-io account. Install the @steem-plus browser extension to use 1UP. By following the 1UP-trail using
1UP is neither organized nor endorsed by Utopian.io!