Repository
https://github.com/dotnet/core
What Will I Learn?
- You will learn how to create the application logic for the RoomType Controller of our Hotel System.
- You will learn more about dependency injection with ASP.NET Core
- You will learn to perform controller CRUD operations in ASP.NET Core
- You will learn learn about Cross Site Request Forgery(CSRF) and how It is handled in ASP.NET Core using Anti Forgery Tokens.
Requirements
- Basic knowledge of C# programming language
- Visual Studio 2017/ VS code/ Any suitable code editor
- Previous Tutorial
Difficulty
Intermediate
Tutorial Contents

In the previous tutorial we created the service layer which handles all our interactions with the database. Now we will begin handling specific application logic beginning with the RoomTypeController . The reason we are beginning from this particular controller is because it has the least dependencies on other. By that I mean that the RoomType model has less connections with other models.
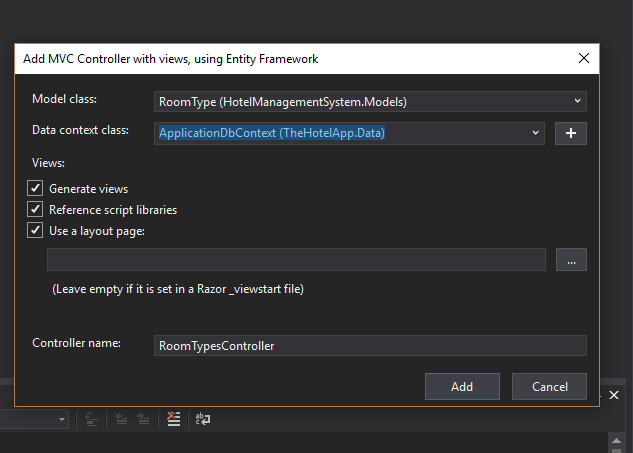
Right Click on your Controller folder and Add a new controller with the following selected
.png)
Select the model class as RoomType and the Data class as ApplicationDbContext

Injecting Our Service Class
Remember in the previous tutorial, we talked about dependency injection and why it was necessary to define an interface. Here in our controller class, we are going to make use of the interface's methods to handle our database interaction.
Delete the _context property and replace it with a _roomTypeService property like this:
private readonly IGenericHotelService<RoomType> _roomTypeService;
Now reimplement the constructor as follows:
public RoomTypesController(IGenericHotelService<RoomType> roomTypeService)
        {
            _roomTypeService = roomTypeService;
        }
- Notice how we have now replaced the "TEntity" class defined in our generic interface with "RoomType". Likewise, for other controllers that wish to fetch data from the database using this interface will replace
TEntitywith their characteristic model class.
Reimplementing Our Controller Methods
Index Action
Delete the default code in the index method and replace it with the following:
  public async Task<IActionResult> Index()
        {
            return View(await _roomTypeService.GetAllItemsAsync());
        }
- This action simply calls the GetAllItemsAsync() of our interface. Items now being RoomTypes.
Details Action
 public async Task<IActionResult> Details(Guid? id)
        {
            if (id == null)
            {
                return NotFound();
            }

            var roomType = await _roomTypeService.GetItemByIdAsync(id);

            if (roomType == null)
            {
                return NotFound();
            }
            return View(roomType);
        }
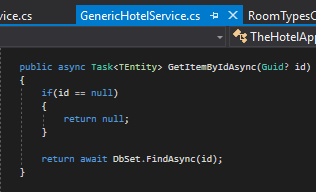
- This method is also like the index action. It calls the GetItemByIdAsync() method of the interface, in which our GenericHotelService implementation calls the Find() method. This method returns an entity if the
idprovided matches any in the database. Otherwise it returnsnull.
Create Action
Note that our create action has two implementations - GET and POST which corresponds to the action that serves the form(view) and the one that processes the form submission request.
- The GET overload simply returns the view:
public IActionResult Create()
        {
            return View();
        }
- POST
[HttpPost]
        [ValidateAntiForgeryToken]
        public async Task<IActionResult> Create([Bind("Name,BasePrice,Description,ImageUrl")] RoomType roomType)
        {
            if (ModelState.IsValid)
            {
                roomType.ID = Guid.NewGuid();
                await _roomTypeService.CreateItemAsync(roomType);
                return RedirectToAction(nameof(Index));
            }
            return View(roomType);
        }
Edit Action
The Edit action also has two overloads GET and POST just like the Create action.
- GET
 public async Task<IActionResult> Edit(Guid? id)
        {
            if (id == null)
            {
                return NotFound();
            }

            var roomType = await _roomTypeService.GetItemByIdAsync(id);
            if (roomType == null)
            {
                return NotFound();
            }
            return View(roomType);
        }
- POST
  [HttpPost]
        [ValidateAntiForgeryToken]
        public async Task<IActionResult> Edit(Guid id, [Bind("ID,Name,BasePrice,Description,ImageUrl")] RoomType roomType)
        {
            if (id != roomType.ID)
            {
                return NotFound();
            }

            if (ModelState.IsValid)
            {
                try
                {
                    await _roomTypeService.EditItemAsync(roomType);
                }
                catch (DbUpdateConcurrencyException)
                {
                    if (_roomTypeService.GetItemByIdAsync(id) == null)
                    {
                        return NotFound();
                    }
                    else
                    {
                        throw;
                    }
                }
                return RedirectToAction(nameof(Index));
            }
            return View(roomType);
        }
Delete Action
- GET
  public async Task<IActionResult> Delete(Guid? id)
        {
            if (id == null)
            {
                return NotFound();
            }

            var roomType = await _roomTypeService.GetItemByIdAsync(id);
            if (roomType == null)
            {
                return NotFound();
            }

            return View(roomType);
        }
- POST
 [HttpPost, ActionName("Delete")]
        [ValidateAntiForgeryToken]
        public async Task<IActionResult> DeleteConfirmed(Guid id)
        {
            var roomType = await _roomTypeService.GetItemByIdAsync(id);
            await _roomTypeService.DeleteItemAsync(roomType);
            return RedirectToAction(nameof(Index));
        }
CSRF and AntiForgery Token
As can be seen in the POST actions above, each of them are decorated with a [ValidateAntiForgeryToken]. This is a mechanism by which ASP.NET prevents Cross site Request Forgery(CSRF). CSRF is an attempt from a third party to post data to your site through a malicious form submitted on this third party site. It capitalizes on the fact that the user is already authenticated to your site, on their browser and it posts malicious scripts on behalf of the user, to your site.
ASP.NET prevents this by storing a value token as a session cookie on the user's browser. Each form to be submitted to our server must provide this token before the request is handled. By doing this, we ensure that every form submitted is a delibrate act of the logged in user.
To perform this in the previous .net framework version (ASP.NET MVC5), we would embed this token in a hidden field of our form by using the html tag helper.
@using (Html.BeginForm())
{
    @Html.AntiForgeryToken()
     .
     .
     .
}
and thereafter, authenticate this on our controller action using the attribute
[ValidateAntiForgeryToken]
- However, in ASP.NET core 2.0, simply using the
asp-*tag helper would add the antiForgeryToken to your form.
<form asp-action="Edit">
The hidden AntiForgeryToken input on our source code
Specifying the Service Implementation to Use
So far, we have injected the service interface into our controller and called methods of this interface. However, IGenericHotelService.cs is just an interface. The main code that does the actual database interaction is an implementation of the interface. We specify the implementation to be used in our Startup.cs class.
**Add this to the ConfigureServices method of your Startup.cs class
 public void ConfigureServices(IServiceCollection services)
        {
            .
            .

            services.AddScoped(typeof(IGenericHotelService<>), typeof(GenericHotelService<>));
        }
Results
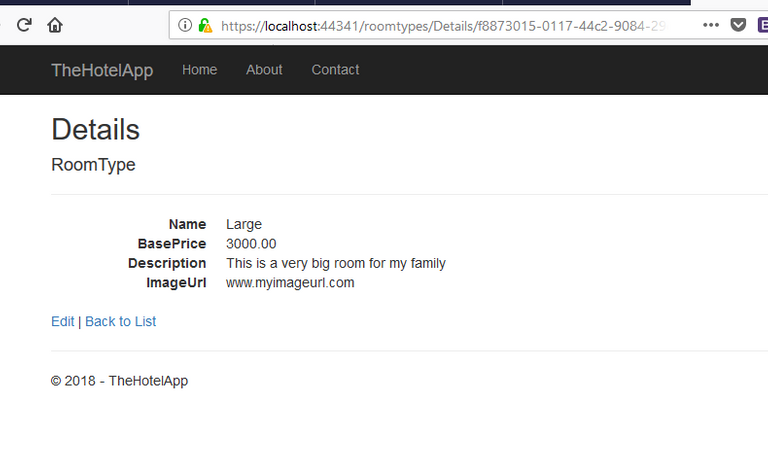
Because we selected MVC Controllers with views when creating our controller, Our CRUD views were scaffolded for us. They aren't the sleekest of all though, but they are enough to present what we intend to display.
Also, since this tutorial series is not primarily dedicated to the view appearance(at least not now), we would leave it as it is right now.
- Hit Ctrl F5 to build and run the project
- Navigate to
localhost:port/roomtypes/create) - Fill in the form to create a room type, and then view the index action to see the result
- Play around with the details and delete actions to appreciate the changes


Curriculum
- Building a Hotel Management System With ASP.NET Core(#1) - Introduction
- Building a Hotel Management System With ASP.NET Core(#2) - Building the Service Layer
Proof of Work Done
Github Repo for the tutorial solution:
https://github.com/Johnesan/TheHotelApplication


You have a minor misspelling in the following sentence:
It should be necessary instead of neccessary.Thank you for identifying that.
Thank you for your contribution.
While I liked the content of your contribution, I would still like to extend few advices for your upcoming contributions:
Looking forward to your upcoming tutorials.
Your contribution has been evaluated according to Utopian rules and guidelines, as well as a predefined set of questions pertaining to the category.
To view those questions and the relevant answers related to your post,Click here
Need help? Write a ticket on https://support.utopian.io/.
Chat with us on Discord.
[utopian-moderator]
Thanks for your review and recommendations. Some parts of the code have little explanation because of the assumption that my audience already has some knowledge of the language syntax and consequently should be able to infer the function of those blocks. However, in my next tutorial, I will make sure to explain carefully every important detail.
Hey @johnesan
Thanks for contributing on Utopian.
We’re already looking forward to your next contribution!
Contributing on Utopian
Learn how to contribute on our website or by watching this tutorial on Youtube.
Want to chat? Join us on Discord https://discord.gg/h52nFrV.
Vote for Utopian Witness!