.png)
Repository
https://github.com/playframework/playframework
What Will I Learn?
In this tutorial you will learn the following
- Linking Stylesheets inside play framework
- Linking Javascript files inside play framework
- importing assets like images into your application
- Formatting documents inside play framework using CSS classes
- How to render web pages using controller actions
Requirements
The following are required in order to properly follow along this tutorial.
- Intellij IDEA
- sbt
- playframework with slick installed
- Web browser
- Basic knowledge of Scala programming language
- Basic knowledge of HTML and CSS
Resources
- Gimp website:- https://www.gimp.org
- Gimp repository:- https://github.com/GNOME/gimp
- Gimp License:- GNU license
Difficulty
- Intermediate
Tutorial Contents
Welcome to today's tutorial on how to build custom websites using play 2.6.x(Scala), In this tutorial series we will be going in depth on how to build web template using scala. I plan to make this tutorial as easy enough to understand as possible. This tutorial will explore play's views capabilities, where will be extending the view template to create websites.
So let's begin by opening up IntelliJ IDEA, and navigate to the following package public, inside the package you will find the following folders ,images and javascripts, create another folder called stylesheet`` this would hold thecss``` files.
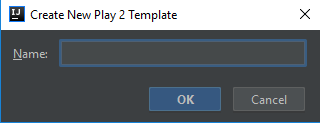
The next thing we need to do is to Navigate to our views and this can be found in app/views , inside this package we will create a file known as main, we can do this by:
- Right clicking
views - Select New
- Select Play 2 template
- Type in the name of the template
- Click okay
After that is done we will import our CSS stylsheets, Javascripts and even links to images by typing he following code:
@(title: String)(content: Html)

<!DOCTYPE html>

<html>
    <head>
        <title>@title</title>
        <link rel="shortcut icon" type="image/png" href="@routes.Assets.versioned("images/favicon.png")"/>
        <link rel="stylesheet" media="screen" href="@routes.Assets.versioned("css/stylesheet.css")"/>
    </head>
    <body>
        @content
        <script src="@routes.Assets.versioned("javascripts/jquery-2.2.0.min.js")" type="text/javascript"></script>
    </body>
</html>
Code Explanation
First we define the
titleandcontentof the page using the @ symbol. This symbol indicates dynamic content. Thetitleis defined as aString, while thecontentis defined asHTML.We place the
@titlein between the<title>tag. This serves as an instance variable, but will later contain a value in another point in the program.Still inside the
<head>tag we will insert our external stylesheet by typing the following<link rel="stylesheet" media="screen" href="@routes.Assets.versioned("css/stylesheet.css")"/>. External stylesheets can be inserted by specifyingstylesheetas the attribute of thelink relWe will then specify the source of the stylesheet by specifying
@routes.Assets.versoned("css/stylesheet.css")as the value of thehref. Thecss/stylesheetindicates the path of the stylesheet document, wherecssandstylesheet.cssare the folder and file respectively.Inside the
<body>tag we will put in our@contentwhich represents the content that will be displayed to users.Still inside our
bodytag, we will insert an external javascript file. We define this
<script src="@routes.Assets.versioned("javascripts/jquery-2.2.0.min.js")" type="text/javascript"></script>. The@routes.Assets.versioned("javascripts/jquery-2.2.0.min.js")traces the location of the external javascript, andjavascripts/jquery-2.2.0.min.jsrepresents the folder and file respectively.
The next thing we need to is to create another file known as index inside our views folder, and to do that we will do the following:
- Right clicking
views - Select New
- Select Play 2 template
- Type in the name of the template which is
index - Click okay
The index view is automatically called once the application loads, so it's whatever is contained in this file that will be displayed to the user. Inside this we will instantiate the title and content and content which have been defined inside in main view. The basic structure of the file looks something like this:
@main("Title of our website") {
    Content of website goes in here
}
Code Explanation
mainview we created earlier, and not to forget, we defined 2 parameters earlier, which are thetitleandcontent.The @main is a reference to theThe title of the website is typed inside the bracket that follows the
@main, whatever is typed here will be displayed in the title bar of the website.Inside the brace is our HTML content, this is where we will place all he HTML tags for our web page, as well as forms.
Now let's start typing some HTML inside our views, we will create a menu bar with links as well as some text:
@main("Welcome to our website") {
    <div class="header">

        <div class="main-nav">
            <ul>
                <li><a href="#">Home</a></li>
                <li><a href="#">About</a></li>
                <li><a href="#">Services</a></li>
                <li><a href="#">Contact</a></li>
            </ul>
        </div>
    </div>

        <div class="banner-section">
                    <div class="generic-content">
                        <h2>Page Elements</h2>
                        <p>There are many variations of passages of Lorem Ipsum available, but the majority have suffered alteration in some form, by injected humour, or randomised words which don't look even slightly believable.</p>
                    </div>
        </div>

    <div class="sample-text">
        <h3 class="text-heading">Sample Text</h3>
        <p class="sample-text">
            Contrary to popular belief, Lorem Ipsum is not simply random text. It has roots in a piece of classical Latin literature from 45 BC, making it over 2000 years old. Richard McClintock, a Latin professor at Hampden-Sydney College in Virginia, looked up one of the more obscure Latin words, consectetur, from a Lorem Ipsum passage, and going through the cites of the word in classical literature, discovered the undoubtable source
        </p>
    </div>
}
Code explanation
First we define the title of our website by typing values inside the bracket after
main, This is what is displayed inside the inside the title bar for the user.The next thing we need to do is create containers for menu bar links, we have done this by creating a
<div>and giving it class calledheader.We create links using the unordered lists, and inside it we will create menus which we will call,
Home,About,ServicesandContact.The next thing we do is create another container for our banners. We created a
div, which we will give a class calledbanner-sectionThe
banner-sectionwould hold 2 more containers one for generic content which is giving the classgeneric-contentand another calledsample-textwhich would contain some sample text for the sake of this tutorial
Now that our page layout has been created we will then style our document using a stylesheet, so let's open our stylesheet.css file and type the following:
.main-nav ul {
    list-style-type: none;
    margin: 0;
    padding: 0;
    overflow: hidden;
    background-color: #333;
}

.main-nav li {
    float: right;
}

.main-nav li a {
    display: block;
    color: white;
    text-align: center;
    padding: 14px 16px;
    text-decoration: none;
}

.banner-section {
    align-items: center;
    position:relative;
    width:100%;
    height:400px;
    background-color: darkorchid;
}
Code Explanation
The link section is given the class
main-nav, so all the formating done inside the class will affect the links in the menu barWe set the list-style-type to none so as to remove the bullets in our lists, the margin and padding are set to 0, while the background color is given a hexadecimal value of
#333The
main-nav liis set to float right, so that the links which are in lists will appear horizontalWe format the links by setting the display to
block, the text color is set to white, the elements are aligned in the center, andtext-decorationof none removes the default line that appears under the links.Our banner is defined with the class name
banner-sectionsection. The items in this block are aligned to the center by setting thealign-items: center, we determine the width and the height by setting thewidth:100%; height400px. Setting the width to 100% ensures the Banner appears properly.
Creating Actions to render the index page
The next thing we need to do is to create a controller action that would render our index view to display content to the user, so to do that we navigate to app/controller and type in the following.
 def index = Action { implicit request =>
    Ok(views.html.index())
  }
Code Explanation
We define a method known as
indexwhich does not accept any parametersWe define an action with an Ok, to display our page. The Ok function displays whatever is contained inside it.
The
view.html.index()represents our index view. If we create another page and call it sayabout, we will call that page in our controller by typing,view.html.about().
Finally we create routes for our index pages by typing the following in our routes file
GET / controllers.PersonController.index
Code Explanation
- When we type localhost:9000 to run our application, our index page is called automatically. We done have to add anything after the
/ - The
controllersis a reference the our application controllers, whilePersonControlleris the name of the controller we have created for the sake of this application, andindexis the index method defined inside thePersonControllercontroller
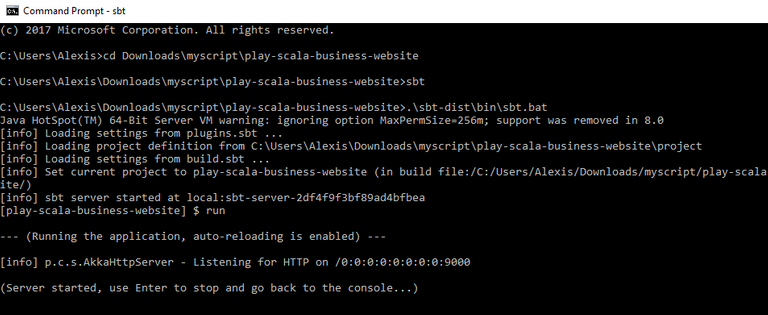
Finally to run our application, we will open command prompt and carry out the following steps
- Type
cdand navigate to the project path - type
sbt - Type
runto run the application
View screenshot below
To view the result on a browser open a browser and type localhost:9000
Curriculum
- Creating a user registration system in play 2.6.x (scala) using mysql
- Creating a user registration system in play 2.6.x (Scala) using mysql
- Retrieving a particular user and initiating GET requests in play 2.6.x(Scala)
- Updating a particular user in play 2.6.x using slick
- Deleting a User and sorting elements in play(Scala) 2.6.x
- Carrying out aggregations in Play(Scala) 2.6.x
- Retrieving Data From 2 Tables in play 2.6.x(Scala) Using Slick: Part 1
Proof of Work Done
Proof of work done can be found here
https://github.com/leczy642/play-scala-slick-web-template


I thank you for your contribution. Here are my thoughts;
As this is an example of content creation, I suggest you increase the volume of it. Otherwise, that may lead to lower votes in future.
Adding GIMP as a resource was unnecessary. Please, don't fill your post with unnecessary resources.
Your contribution has been evaluated according to Utopian policies and guidelines, as well as a predefined set of questions pertaining to the category.
To view those questions and the relevant answers related to your post, click here.
Chat with us on Discord.
[utopian-moderator]Need help? Write a ticket on https://support.utopian.io/.
@yokunjon, thanks for the moderation. I included GIMP because I used it to create screenshots for my tutorial
Thanks for contributing on Utopian.
We’re already looking forward to your next contribution!Hey @leczy
Want to chat? Join us on Discord https://discord.gg/h52nFrV.
Vote for Utopian Witness!