Lesson Objectives
A. Introduction to ASP.NET Membership
B. A Glance at the ASP.NET Web Site Administration Tool
C. Configuring the Membership Provider
D.Working with Membership and MembershipUser class
Needs are;
A.Asp.NET
B. Visual Studio
C. C#
The difficulty level of commands we use is middle.
ASP.NET Membership
The ASP.NET Membership allows the creation and management of users. The ASP.NET Membership can be customized according the requirements of the web project. It follows a provider model. The settings for the Membership system are configured in the web.config configuration file. Editing the settings in the web.config is easy as it does not require compilation of the web application.
Membership Database
The Membership database stores the credentials of the users who access the web application.The information about new users created can be stored in the membership database. The user credentials can be validated by verification in the membership database when the user tries to login. The membership database is aspnetdb with an .mdf file extension (aspnetdb.mdf). The aspnetdb is stored inside the App_Data folder of the web application.
Membership Provider
The Membership Provider provides the Application Programming Interface to work with ASP.NET membership. The membership provider for Microsoft SQLServer database and Microsoft Active Directory Services are built in membership providers in ASP.net. The built in security controls in ASP.Net can be used with ease using the above mentioned providers. The SqlMembershipProvider can be used with Microsoft SQL server.
The ASP.NET Web Site Administration Tool
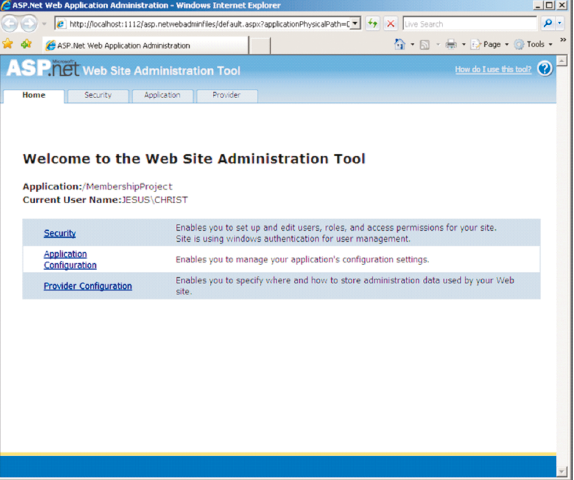
The ASP.NET Web Site Administration Tool provides a graphical user interface to view and modify the settings in the web.config file. This eliminates the need to manually work with the tags in the web.config file. This tool can be used to configure security settings such as authentication and authorization, users and roles. It can also be used to configure providers and web application settings.
Demonstration: Accessing the ASP.NET Web Site Administration Tool
Steps to create the Demo:
1 ) Create a new Web Site named “MembershipProject”
2 ) Select the “ASP.NET Configuration” option from the “Website” menu as shown below:
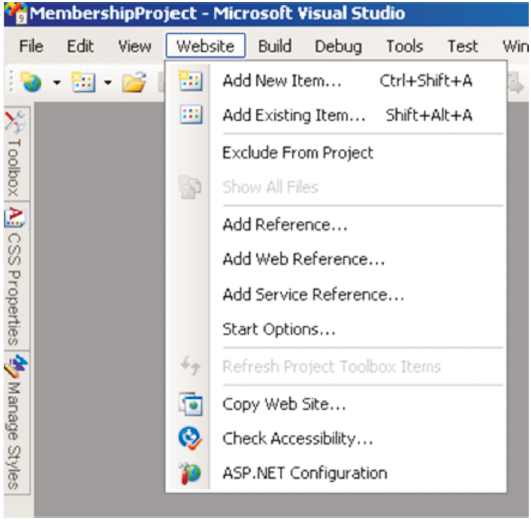
3 ) The ASP.NET Web Site Administration Tool is displayed as shown below:
Configuring the Membership Provider
The Membership Provider in ASP.NET is by default configured to work with the Microsoft SQL Server Express Edition. The Membership provider can also be configured to work with the full versions of Microsoft SQL servers such as SQL Server 2005 or SQL Server 2008. The database to be used by the membership provider should be created in SQL server. Once the database is created, the tables and other objects required by the membership provider to store information have to be created. The executable named "aspnet_regsql.exe" can be used to create the necessary tables and objects. The web.config file can be used to configure the Membership Provider.
Demonstration: Configuring Membership
Let us create a database named “MembershipDatabase” with all the required tables and objects to store the Membership information in Microsoft SQL Server.
Steps to create the Demo:
1 ) Let us open the Visual Studio 2008 Command Prompt. Traverse the following path :
Microsoft Visual Studio 2008 > Visual Studio Tools > Visual Studio 2008 Command Prompt.The Visual Studio 2008 Command Prompt is displayed as below:

2 ) Type aspnet_regsql.exe in the command prompt as shown below and press enter.
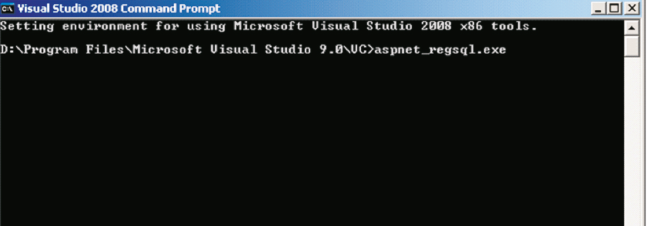
3 ) The “ASP.NET SQL Server Setup Wizard” is displayed as shown below:
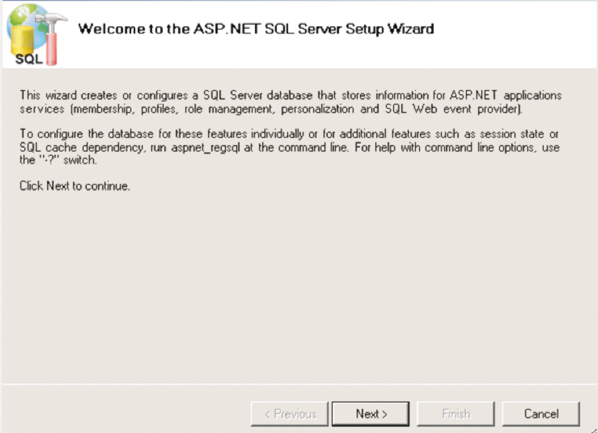
4 ) Click “Next >” button and you will see the “Configure SQL Server for application services” selected by default as shown below:

5 ) Click the “Next >” button and enter the Microsoft SQL Server name in the “Server:” textbox. Select “SQL Server Authentication” radio button. Enter the “User Name” and “Password” of Microsoft SQL Server. Enter “MembershipDatabase” in the “Database:” dropdown. The complete information is shown in the screen below:
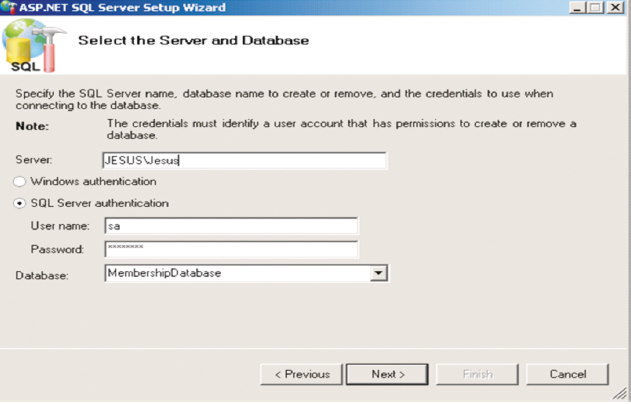
6 ) Click the “Finish” button to complete the database creation.
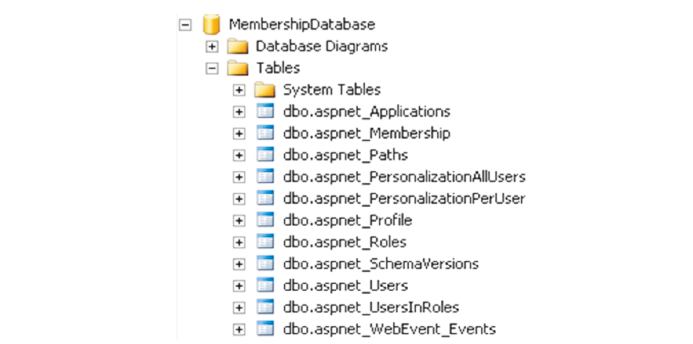
7 ) Connect to Microsoft SQL Server using Microsoft SQL Server Management Studio. Open the Object Explorer and explore the database. You will find the tables which are automatically created in the database as shown below:
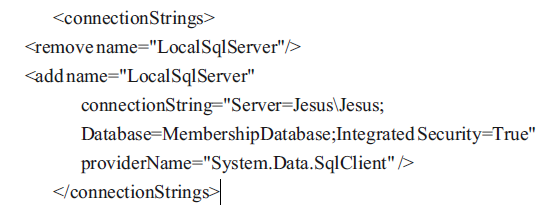
10 ) Open the web.config file. Replace the tag “< connectionStrings/ >” with the following set
of tags below to configure the Membership Provider.
Membership Class
The Membership class allows the creation, updating and deletion of users from the membership database. The various methods present in the Membership class are CreateUser(), UpdateUser(), DeleteUser(), FindUsersByName(),FindUsersByEmail(), GetAllUsers(), GeneratePassword() etc. The CreateUser() method is used to create a new user in the database .The UpdateUser() method is used to update the information about users in the database. A user can be deleted by using the DeleteUser() method. The users can be searched by their name using the FindUsersByName() method and their Email ID by using the FindUsersByEmail() method. The GetAllUsers() method retrieves information about all the users stored in the database. The GeneratePassword() can be used to generate a random password for a new user.
MembershipUser Class
The Membership User class contains various methods such as Change Password(),Change Password QuestionAndAnswer(), ResetPassword(), UnlockUser() etc. the ChangePassword() method is used to change the password for a user by specifying the current user password. The ChangePasswordQuestionAndAnswer() method is used to change the password of a user by using the security question and answer. The ResetPassword() method is used to reset the password which is randomly generated. The account of a user which gets locked by a number of login attempts which is invalid can be unlocked by using the UnlockUser() method.
Demonstration: Using the Membership class.
Let us create a user and store it in the database by using the Membership class.
Steps to create the Demo:
1 ) Open Web Site named “MembershipProject” created in the previous demonstration.
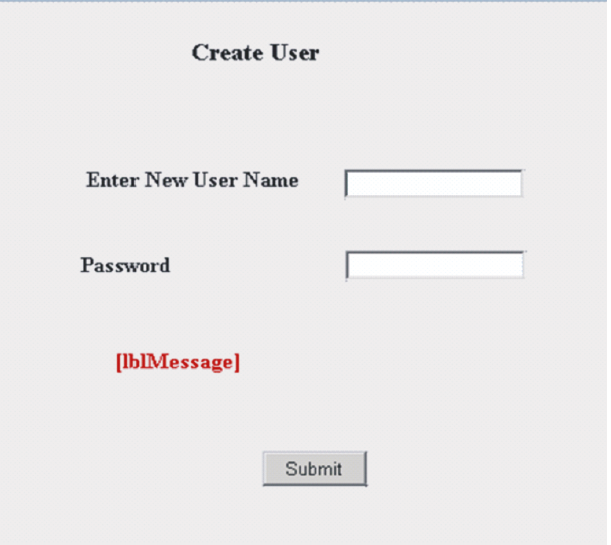
2 ) Add a Web Form named “CreateUser.aspx” to the project and design it as shown below:
3 ) The content in the source view is given below:
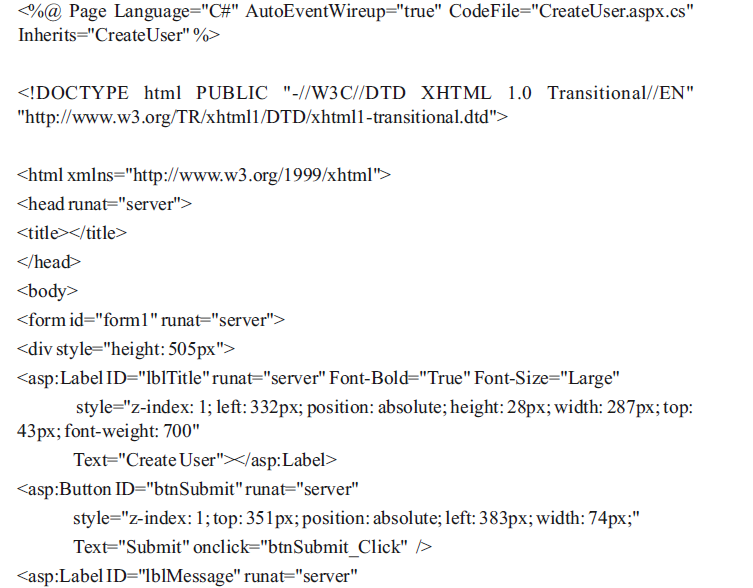


4 ) Switch to the code behind file and replace the code with the code given below:
using System;
using System.Collections.Generic;
using System.Linq;
using System.Web;
using System.Web.UI;
using System.Web.UI.WebControls;
using System.Web.Security;
public partial class CreateUser : System.Web.UI.Page
{
MembershipCreateStatus status;
protected void Page_Load(object sender, EventArgs e)
{
}
protected void btnSubmit_Click(object sender, EventArgs e)
{
if (txtUser.Text.Trim().Length == 0 || txtPassword.Text.Length == 0)
{
lblMessage.Text = "Enter a User Name and Password";
return;
}
try
{
Membership.CreateUser( txtUser.Text.Trim(),
txtPassword.Text.Trim(),"[email protected]","PasswordQuestion",
"PasswordAnswer",true, out status);
}
catch ( Exception ex )
{
lblMessage.Text = "Error occurred while trying to create user!";
}
if ( status == MembershipCreateStatus.Success )
{
lblMessage.Text = "User Created Successfully!";
}
}
}
5 ) Save the file.
6 ) Right-Click the “CreateUser.aspx” file and select “Set as Start Page”.
7 ) Run the project and view the Output 1 below
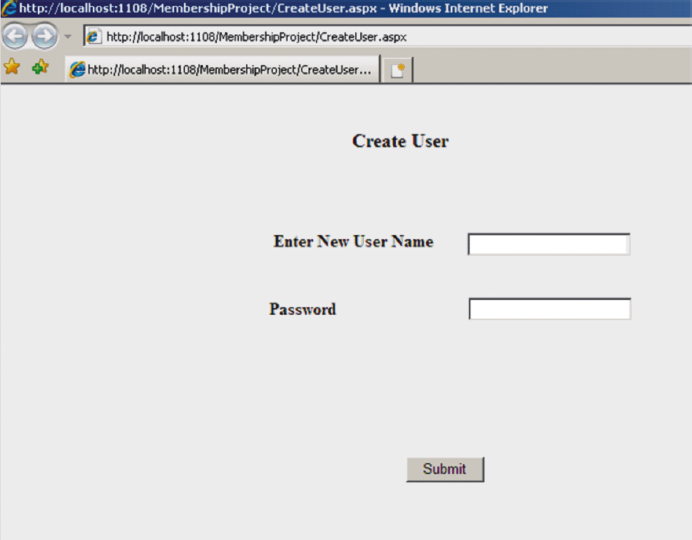
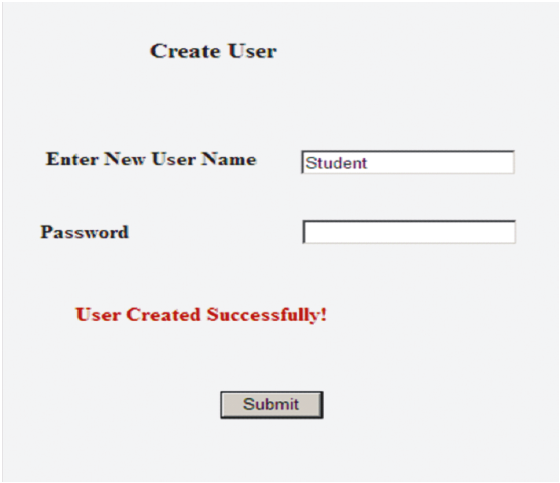
8 ) Enter the New User Name as “Student” and Password as “P@ssw0rd”. Click the submit
button. The User information gets saved in the database and the information is displayed
as shown below:
more&document
Posted on Utopian.io - Rewarding Open Source Contributors
Thank you for the contribution. It has been approved.
You can contact us on Discord.
[utopian-moderator]
Hey @mrsmalue I am @utopian-io. I have just upvoted you!
Achievements
Suggestions
Get Noticed!
Community-Driven Witness!
I am the first and only Steem Community-Driven Witness. Participate on Discord. Lets GROW TOGETHER!
Up-vote this comment to grow my power and help Open Source contributions like this one. Want to chat? Join me on Discord https://discord.gg/Pc8HG9x