This tutorial series shows how to build web applications with the MEAN stack. The MEAN stack is MongoDB, Express.js, Angular, and Node.js. This stack allows to write applications, where Javascript can be used both for the client and the server part.
In this tutorial a simple webapplication to manage portfolios of cryptocurrencies such as Bitcoin or Ethereum will be built.
What will I learn?
In this part of the tutorial series
- you will learn to setup routes to register and authenticate users,
- you will learn how to use token based authentication to secure your routes,
- and you will learn how to test your routes without a frontend.
Requirements
For this part of the tutorial you need the following background knowledge:
- Previous parts of this series
- Working with the command line
- Experience in JavaScript
Difficulty
Intermediate.
Tutorial contents
This part of the tutorial shows how to extend the server framework created in the previous parts of this series with registration of new users and authorization of users that are already registered. In the last part of the tutorial, we already wrote all code necessary to add users to the database and to retrieve them by their email. In this lesson I will show how to create routes with Express.js and how to use token based authentication to secure routes. We will use Postman to test our routes.
Register a middleware to parse JSON bodies
All messages to communicate between frontend and backend will be encoded in JSON, which is human-readable, easy to write and compact. For the automatic conversion of JavaScript objects from and to JSON in the bodies of our HTTP requests, we use the body-parser middleware with Express.js. First install it with
npm install body-parser@1 --save
Then go to app.js and add it to the list of imports at the top of the file with
const bodyparser = require("body-parser");
Now register it as middleware with the app object after its creation:
app.use(bodyparser.json());
If you are unsure, whether you put everything at the correct location, you can always lookup the full source code, which you can find on Github (you find the link at the end of each tutorial). If you remember the first lesson, you may know, that the callback functions registered with Express.js routes receive three parameters. The first parameter, typically named req represents the incoming HTTP request. body-parser automatically parses the the body of the incoming HTTP requests and attaches the result to reqbody. E.g. if the body of the incoming message is
{
  "foo" : bar,
  "amount" : 1.0
}
you can directly access the values via req.body.foo and req.body.amount.
Add a route to register users.
As with the user model in the previous part of this series, we put all routes in a separate directory in our project. Create a folder routes and a new file users.js in it. We need access to the Express.js router and our user model, so import them:
const router = (module.exports = require("express").Router());
const User = require("../models/user.js");
The router for the user endpoints is exported, because we need it in app.js. So go to app.js and import the user routes with
const userroutes = require("./routes/users.js");
Now register it with the app object:
app.use("/users", userroutes);
Back to routes/users.js we start with the route for the /register endpoint:
router.post("/register", async (req, res, next) => {
  let newuser = new User({
    email: req.body.email,
    password: req.body.password
  });
The route expects a JSON document with the fields email and password. With these, a new instance of the user model is created. This instance can now be passed to User.addUser. This is an async function, which may return error, so it needs to be wrapped in a try/catch block. Since we made the email field of our user model unique, an error will occur if there is already a user with the same email address in the database. Either way, the callback function of the route should send a response at some point, otherwise the client will wait forever and eventually report a timeout. There are various ways to send a response, but since we decided to use JSON as serialization format for server/client communication, the json() method is used. This method sends the passed javascript object as JSON in the body of the response.
  try {
    let added_user = await User.addUser(newuser);
    if (added_user) {
      res.json({
        success: true,
        msg: "User added"
      });
    } else {
      res.json({
        success: false,
        msg: "User not added"
      });
    }
  } catch (err) {
    res.json({
      success: false,
      msg: "Error occured."
    });
  }
});
Test the /register route with Postman
Postman is a handy little GUI to create HTTP requests. It is available as standalone application or as extension for the Chrome browser. Get it here.
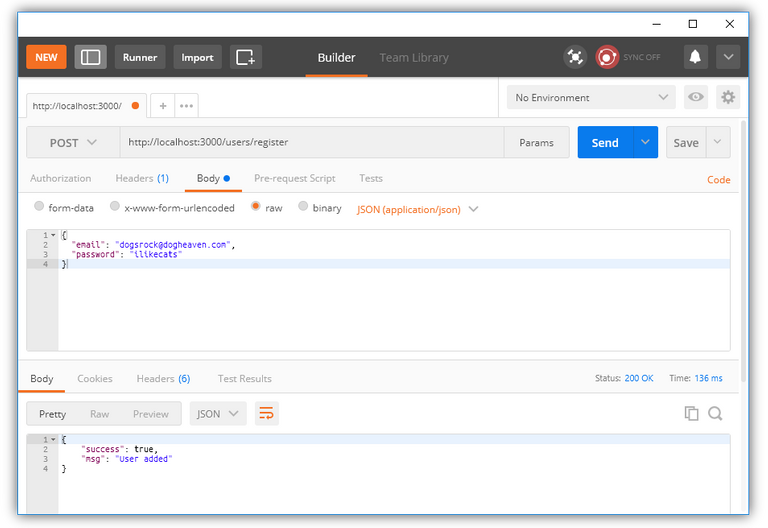
Open a tab for a new request and change the method from GET to POST. Enter http://localhost:3000/users/register as request URL. It is necessary to specify what format the data in the body will have. Therefore select Headers and enter Content-Type as key and application/json as value. Now switch to Body, select raw and enter the following JSON string
{
  "email": "[email protected]",
  "password": "ilikecats"
}
Now hit Send and if everything works as expected (be sure that your node app runs, I'd suggest to use nodemon as presented in the previous tutorial) our app will report, that the user has been added successfully:

If you immediately try that again with the same request, it will fail because the user already exists in our database.
Create a central file for configuration
Before we implement the /authenticate route, let's create a single file, where we put all configuration. Create a new folder /config and a new file /config.js. We move the URL of the MongoDB instance to the database and create a new configuration variable secret, which will be used later to create JWT tokens. The configuration file should look like
"use strict";

// secret to sign the json web token
module.exports.secret = "Ilikecats";
// the URL to our local instance of MongoDB
module.exports.db_url = "mongodb://localhost:27017/mean_stack_tutorial";
Now go to app.js, import ./config/config.js with
const config = require("./config/config");
and replace the hard coded database URL with the configuration variable:
mongoose.connect(config.db_url);
If you have sensitive data in your configuration (e.g. AWS keys), you should consider adding such files to your .gitignore to exclude them from version control. This may protect you from accidentally leaking such critical data on Github.
Authenticate users
When we authenticate users, we will return a token to our client, that can be used to authenticate the user in protected API endpoints. To achieve this, we need three new packages. The Express.js middleware passport, that simplifies protection of routes, passport-jwt which provides a JWT (JSON web token) based strategy for passport, and jsonwebtoken to create a JWT for a user object. Install them with npm
npm install passport@0 --save
npm install passport-jwt@3 --save
npm install jsonwebtoken@8 --save
For the /authenticate route, the jsonwebtoken package is needed, so it must be imported in routes/users.js together with config.js which is required because it contains the secret to sign the token.
const jsonwebtoken = require("jsonwebtoken");
const config = require("../config/config");
With this we have everything required for the user authentication route:
router.post("/authenticate", async (req, res, next) => {
  try {
    let user = await User.getUserByEmail(req.body.email);
    if (!user) {
      res.json({
        success: false,
        msg: "Unknown user"
      });
      return;
    }
    let matched = await User.passwordMatches(req.body.password, user.password);
    if (matched) {
      const jwt = jsonwebtoken.sign({ id: user._id }, config.secret, {
        expiresIn: 604800
      });
      res.json({
        success: true,
        msg: "User authenticated",
        token: "bearer " + jwt
      });
    } else {
      res.json({
        success: false,
        msg: "Incorrect password"
      });
    }
  } catch (err) {
    res.json({
      success: false,
      msg: "Error occured: " + err
    });
  }
});
Given the email of the user in the request's body, the callback at first retrieves the user from the database. If it doesn't exist, an error is reported to the frontend. Otherwise passWordMatches is called to verify, whether the given password is the correct one. If not, again an error is reported to the frontend.
Finally if the password matches, the token is created. For this jsonwebtoken.sign() is used. This function expects three parameters. The first parameter is the data to be encoded in the token. In this case we only encode the database id of the user, since we can read all other data from the database. The second parameter is some secret which is also required to decode the token. Keep it secret! Keep it safe!.
In the third parameter a dictionary with optional parameters can be passed. For example with expiresIn, it is possible to specify how long the token is valid (the number supplied is in seconds and corresponds to one week). At last the created token is included in the response to the frontend. For passport to work correctly it is vital that the string "bearer " is prefixed to the token.
Test the new route in PostMan, if everything works as expected, the response should look like

Setup passport to protect another route
Passport supports a variety of authentication options (e.g. authentication with a Facebook or Google account). For this we need to provide a function that setups passport for authentication with a JWT token. Most of this is supplied by the passport-jwt package, but nevertheless we need to setup some code in a new file config/passport.js
const JwtStrategy = require("passport-jwt").Strategy;
const ExtractJwt = require("passport-jwt").ExtractJwt;
const User = require("../models/user");
const config = require("../config/config");

module.exports = function(passport) {
  let opts = {};
  opts.jwtFromRequest = ExtractJwt.fromAuthHeaderAsBearerToken();
  opts.secretOrKey = config.secret;
  passport.use(
    new JwtStrategy(opts, (jwt_payload, done) => {
      User.getUserById(jwt_payload.id)
        .then(user => {
          if (user) {
            return done(null, user);
          } else {
            return done(null, false);
          }
        })
        .catch(err => done(err, false));
    })
  );
};
If you lookup the README.md of passport-jwt you will notice that this is more or less some boilerplate code adapted to our use case. We need to pass some options to the JwtStrategy constructor. It is necessary to specify where the authorization token is expected. With ExtractJwt.fromAuthHeaderAsBearerToken() we tell passport, that the token will be passed in the Authentication field of the request's header. The bearer scheme will be used, which simply means that the string "bearer " must be prefixed to the token string.
Next to the options, a callback function is passed to the constructor. This callback function receives the object encoded in the JWT token and must call the done callback with the user object received from the database. passport will add the user to the request object of a route callback in req.user.
Before we add the protected route, we need to register the passport middleware with our Express.js app. Go to app.js and add the following lines to import passport and the initialization function created above.
const passport = require("passport");
const passport_config = require("./config/passport.js");
Now add the passport middleware to the app object and call the initialization function
app.use(passport.initialize());
app.use(passport.session());
passport_config(passport);
With all been setup we can now add a protected route. Go to /routes/users.js and add the following route for the /portfolio endpoint.
router.get(
  "/portfolio",
  passport.authenticate("jwt", {
    session: false
  }),
  (req, res, next) => {
    res.json({
      user_email: req.user.email,
      user_id: req.user._id
    });
  }
);
In contrast to the routes created before, this new route is created with an additional second parameter, which tells passport to protect this route with the JWT strategy. The callback function will only be called, if the the authorization with the token was successful. In this case, the user extracted by the function defined in config/passport.js can be accessed by req.user. In this example, we only return the email and the id of the user to the frontend.
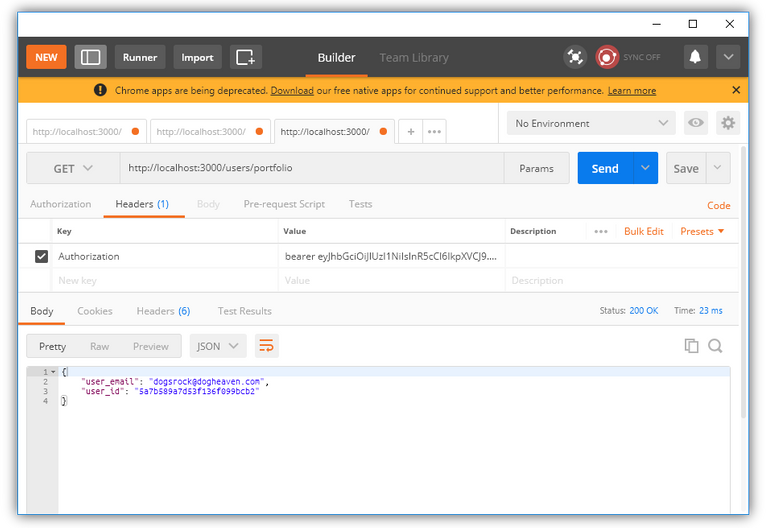
Try to access this route with Postman. Create a Get request, enter http://localhost:3000/users/portfolio as URL and hit Send. The reply is Unauthorized. Now go back to the authentication request from before and copy the string returned in "token". In the request to /portfolio, go to Headers and enter Authorization as key and the copied token as value (be sure to include the "bearer " prefix). If you send the request again, it is successfully answered:

This concludes the third part of the tutorial series on how to build a web application with the MEAN web application stack.
Example Code on Github
The code for this part of the tutorial can be found on Github.
What's next?
In the next part I will start building the frontend with user registration and authentication.
Curriculum
Previous parts of this series:
Posted on Utopian.io - Rewarding Open Source Contributors
Thank you for the contribution. It has been approved.
You can contact us on Discord.
[utopian-moderator]
Hey @nafestw I am @utopian-io. I have just upvoted you!
Achievements
Suggestions
Get Noticed!
Community-Driven Witness!
I am the first and only Steem Community-Driven Witness. Participate on Discord. Lets GROW TOGETHER!
Up-vote this comment to grow my power and help Open Source contributions like this one. Want to chat? Join me on Discord https://discord.gg/Pc8HG9x