Official Github repo for this tutorial : https://github.com/facebook/react-native
What will I learn?
- About redux and why is redux used in react native
- Learn about store, reducers, action
- Integrating redux in our application
Requirements
- A laptop/PC with Mac OS/ Linux/ Windows
- Preinstalled node.js
- Preinstalled Code editor
Note: This tutorial is performed in Visual Studio Code in a laptop with Windows 10 Home, 64 bit OS
Difficulty
Intermediate, you must have good knowledge of JavaScript to catch up this tutorial.
Tutorial Content
In my previous session, I explained to you about modal, data flow in react component etc. So, in this tutorial, you will be learning about redux and its use in react native.
What is redux?
As per the official documentation, Redux is the predictable state container for the JavaScript application.
Redux is all about managing data in javascript application. Redux is mostly used with react but redux can be used in any javascript application. Redux is all about having storage facility that helps JavaScript applications to manage state. Redux basically impose guidelines of how updates can happen in our application.
So, why redux?
Well basically when our application grows it becomes hard for us to manage the data flow, and manage the UI. As a complex application has many components passing data simultaneously the code really becomes tangled and hard to understand. That’s where redux comes into play.
Imagine our daily routine. We have to do many task in our day to day routine like take medicine, goinig gym, attending meeting etc and so on. Now as the no of task goes on expanding we start forgetting the task and our brain gets tangled. But suppose if we have a notebook where we can write all the task to be done then it will really be easy for us to just look at it and perform the task. Same is the scenario for redux.
We use redux so that we can organize data flow and manage data much more easily and efficiently.
There are many scenarios where data needs to be accessed in different place. Hence redux makes it easier as it stores in one place for eg the login credential of the user should be accessed over multiple components.
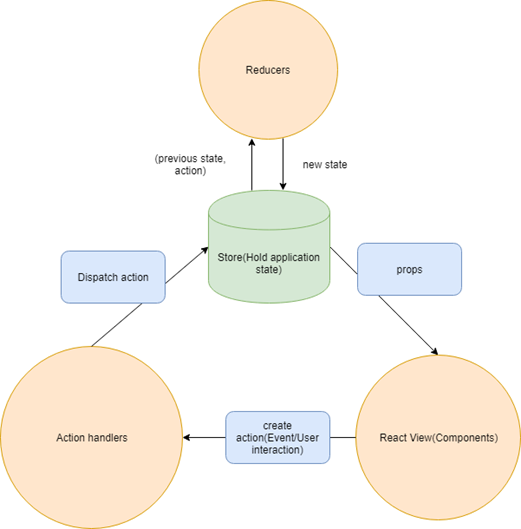
To manage data in redux we have three things:
Store:
store is one data object for the application. Store holds the state of entire application.
Reducers:
Reducers provide the outline to update the store
Action:
Action basically activates the reducers. Action basically and carries the information that need to be delivered to the state. Action can be anything like pressing a button, loading a request etc and so on.

The state of the application lives in the store. We cannot directly access the and modify the store. To modify the state of the store we need to dispatch the action via reducers which means
To change data of the store we need to dispatch the action
That was for changing the data of the store. when we want to retrieve data, we do not get it directly from the store. Instead, we get a snapshot of the data in the store at any point in time using store.getState(), which gives us the “state” of the application as on the time at which we called the getState method and we access this in our react component via props.
To access the data of the store we need to get the current state of the store
Now let us add redux in our application. To add redux in our application we should to do it using npm-install –save react-redux

Here we have used –save flag so that it will be stored in package.json and other can know the dependencies to be installed.
index.js is the main entry point of our application. When we use redux in our component we use the concept of main storage unit commonly referred to as ‘store’. Even if we did all the settings and created store we will have to let react native know that there exists a store. This is where we use Provider.
Here the Provider is providing the access to the store to the entire application. We will be making store later in the tutorial. Here we are simply assuring that the provider provides the store to its child component and in this case we have defined our whole application as child by defining <App/> inside the <Provider>.
Our index.js will look like this
import { AppRegistry } from 'react-native';
import App from './App';
import React,{Component} from 'react';
import {Provider} from 'react-redux';
import store from './src/redux';

export default class SteemitTutorial extends Component{

    render(){
        return(
            <Provider store={store}>
            <App/>
            </Provider>
        )
    }
}
AppRegistry.registerComponent('SteemitTutorial', () => SteemitTutorial);
Let us start by creating our first action
We will call our action file Auth.js which will be inside folder redux->action
export const login =(username,password)=>{
    return{
        type:'LOGIN',
        username:username,
        password:password
    };
};
Here we have created our first action creator login which will have the parameter username and password and returns java script object which allows user to login.
Here ‘type’ is required so that we can make this action valid and this particular action will also have the payload (necessary information) in this case username, password to pass on the value. Later, we will be accessing this payload from our reducer.
Now let us set up our reducer. Let us name this Auth.js and it goes inside the folder redux->reducers
Reducers basically views the state of our current application and takes the necessary action.
We have exported our function as reducer which takes the current state and action as the parameter.
So here when the LOGIN action is when the action type is equal to ‘LOGIN’.
const defaultState={
    isLoggedIn: false,
    username:'',
    password:''
};

export default function reducer(state=defaultState, action){

    switch(action.type){
        case 'LOGIN':
        return{
            isLoggedIn:true,
            username:action.username,
            password:action.password

        };
        default:
        return state;

    }
}
Let us create another file called index.js inside reducers
We should combine reducers if there are multiple number of reducer. In this case we only have one reducer that is auth.
import {combineReducers} from 'redux';
import auth from './Auth';

const rootReducer=combineReducers({
    auth
});

export default rootReducer;
Inside the redux folder we will be creating another file named index.js. and this is where we will be creating out store for the application. We can create store by simply importing {createStore} from ‘redux’ and passing it the reducer as reducer works back and forth from store and action and updates app’s state.
import {createStore} from 'redux';
import rootReducer from './reducers';

let store=createStore(rootReducer);

export default store;
We have action and reducers made. We now need to connect our Login.js to redux. For that
connect is used on our component so that it can receive argument that allow us to connect our component to redux store.
‘mapStateToProps’ and ‘mapDispatchToProp’ are default argument of connect.
mapStateToProps:
‘mapStateToProps’ take actual global state and map it to react component property type so we can reference it in our component. We can reference the state by using prop in our component.
mapDispatchToProps:
‘mapDispatchToProps’ are used to fire up the action. Here when ‘onLogin’ function is triggered then this dispatch the action login with the argument username and password.
const mapStateToProps=(state)=>{
    return{
        isLoggedIn:state.auth.isLoggedIn

    };

}
const mapDispatchToProps=(dispatch)=>{
    return{
        onLogin:(username,password)=>{dispatch(login(username,password));},

    }
We use connect to tie our application to the redux store.
export default connect(mapStateToProps,mapDispatchToProps)(Login);
Now, our Login.js looks like this:
import React, { Component } from 'react';
import {  Text, TextInput, View, Button,StyleSheet } from 'react-native';
import { login } from '../../redux/actions/Auth';
import {connect} from 'react-redux';
class Login extends Component{

    state={
        username:'',
        password:''

    }

    userLogin(val){
       this.props.onLogin(this.state.username,this.state.password);

    }

    render(){
        return(
            <View style={styles.loginContainer}>
                 <TextInput
                    placeholder='Username'
                    autoCapitalize='none'
                    autoCorrect={false}
                    autoFocus={true}
                    keyboardType='email-address'
                   value={this.state.username}
                   onChangeText={(text)=>this.setState({username:text})}
                   />
                <TextInput
                    placeholder='Password'
                    autoCapitalize='none'
                    autoCorrect={false}
                    secureTextEntry={true}
                    value={this.state.password}
                    onChangeText={(text)=>this.setState({password:text})}

                  />

                 <Button
                 onPress={(val)=>this.userLogin(val)}
                 title="Login"/>

            </View>
        );
    }
}

const mapStateToProps=(state,ownProps)=>{
    return{
        isLoggedIn:state.auth.isLoggedIn

    };

}
const mapDispatchToProps=(dispatch)=>{
    return{
        onLogin:(username,password)=>{dispatch(login(username,password));},

    }
}


const styles=StyleSheet.create({
    loginContainer: {
        width:"100%",
        height:"100%",

      }
})

export default connect(mapStateToProps,mapDispatchToProps)(Login);
We have created Home.js so that we can display the home screen when the user successfully logs in.
We will be displaying the user name in our home page. For that we will require our Home page to connect to redux store and get the username that is why we use connect function to get the current state of username and display it using ‘this.props.username’
Home.js
import React,{Component} from 'react';
import {StyleSheet,Text,View} from 'react-native';

import {connect} from 'react-redux';

class Home extends Component{
    render(){
        return(
            <View>
                <Text>Welcome Home {this.props.username}</Text>
            </View>

        );
    }
}

//so that we can get the state of username from the store
const getStateOfData = (state) => {
    return {
        username: state.auth.username
    };
}

 //to connect the Home component to the redux store
export default connect(getStateOfData)(Home);

In our App.js we will be displaying Home if the isLoggedIn value is true that is if the user has logged in and if the users haven’t logged in then we will be displaying our Login page that is Login.js
render() {
  if(this.props.isLoggedIn)
  return <Home/>;
  else
  return <Login/>
  }
}
And we get the state of isLoggedIn from our redux store.
const mapStateToProps=(state)=>{
  console.log("inside map state to props of app.js");
  return{
    isLoggedIn:state.auth.isLoggedIn
  };
}
export default connect(mapStateToProps)(App);
Now finally our App.js will look like this:
import React from 'react';
import { StyleSheet, Text, View,TextInput,Button,Image } from 'react-native';
import {connect} from 'react-redux';
import Login from './src/components/login/Login';
import Home from './src/components/home/Home';

 class App extends React.Component {


  render() {
  if(this.props.isLoggedIn)
  return <Home/>;
  else
  return <Login/>
  }
}

const mapStateToProps=(state)=>{
  console.log("inside map state to props of app.js");
  return{
    isLoggedIn:state.auth.isLoggedIn
  };
}

const styles = StyleSheet.create({
  container: {
    width:"100%",
    height:"100%",
    alignItems: 'center',
    justifyContent: 'center',
  },
});

export default connect(mapStateToProps)(App);
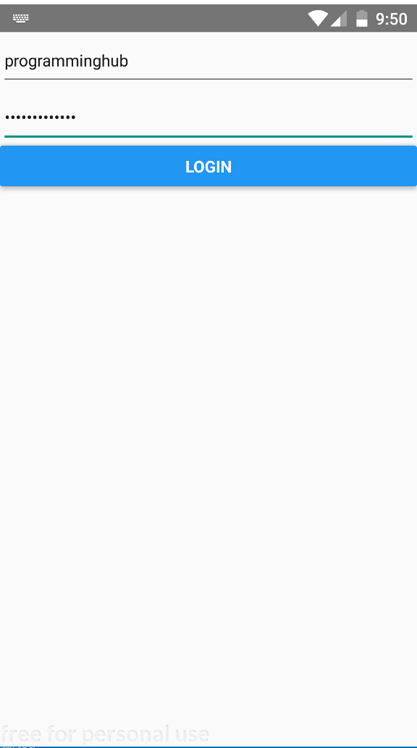
Now let us run the application:

Now if we login then our homepage will load:

I hope you understood why redux is used in react native and learnt to implement it too. I have tried to make it as simple as possible.
All above codes can be downloaded from my GitHub link. Click here to download.
CURRICULUM
Thank you for your contribution.
While I liked the content of your contribution, I would still like to extend few advices for your upcoming contributions:
Looking forward to your upcoming tutorials.
Link to the Answers of the Questionnaire -
Click here
Chat with us on Discord.
[utopian-moderator]Need help? Write a ticket on https://support.utopian.io/.
@portugalcoin Thank you.. links are corrected. Will keep in mind other suggestions.
Thanks for contributing on Utopian.
We’re already looking forward to your next contribution!Hey @programminghub
Contributing on Utopian
Learn how to contribute on our website or by watching this tutorial on Youtube.
Want to chat? Join us on Discord https://discord.gg/h52nFrV.
Vote for Utopian Witness!