Repository
What Will I Learn?
- Create pusher channel
- Use pusher and settings in Vue
- Use pusher and settings in PHP
Requirements
- Basic HTML, Javascript,CSS
- Basic Vuejs
- Basic PHP
- Localhost (xampp, wampp, or etc)
Difficulty
- Intermediate
Preparation
I will share how to make a simple chat app using PHP as backend and Vuejs as frontend. This is a tutorial series. in this section, I will use the technology provided pusher. we will learn how to apply the technology to our project. for more details about pusher, you can visit the official website https://pusher.com.
Create App keys in pusher
- Login/Create a new account
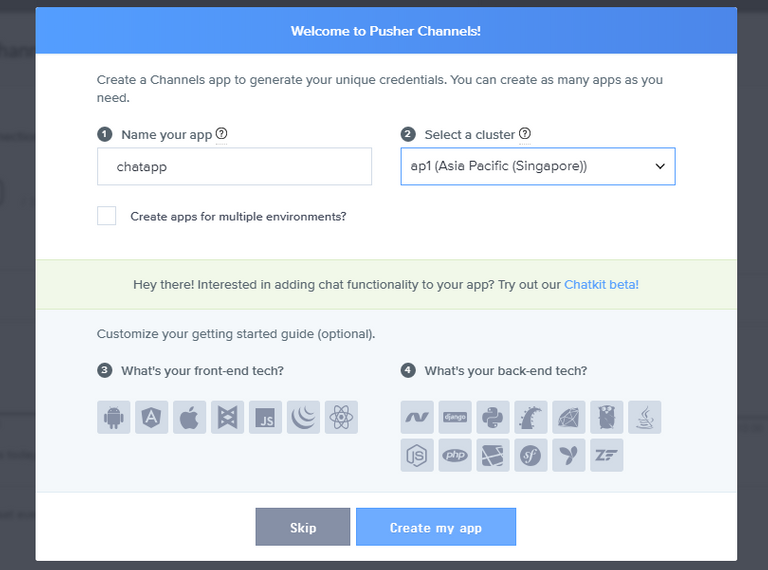
Please login or create a new account at Pusher. after you successfully log in you can access the dashboard. please make new Chanel apps. Create a channel app like the picture below, you can name your application as you wish. and select the cluster you want.
You can also choose what technology you will use in the frontend and backend sections. but for this tutorial, I do not choose anything.
- Get App Keys
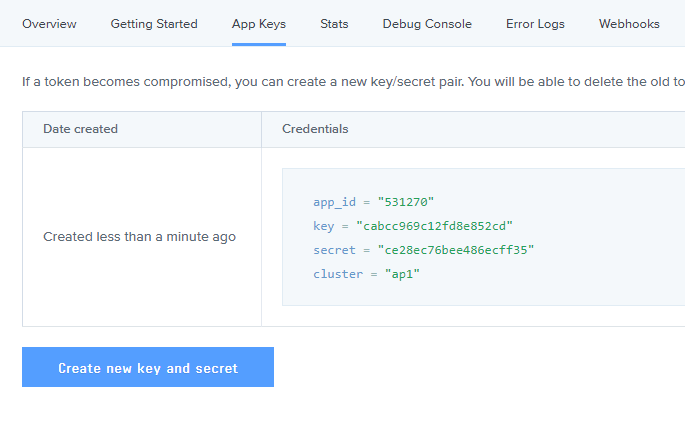
You can go to the dashboard of the application you created and select the app keys menu. in real life, we do not want anyone to know our app keys. because these app keys are confidential. but in this tutorial, I show the app keys for tutorial purposes.
After we have got app keys in pusher next we will do some setting on PHP as backend technology that we use.
Setting Backend
Because we will use PHP we need to install package pusher on PHP. We can install via composer.json like this:
composer require pusher/pusher-php-server
If it has been successfully installed then we can see the package in composer.json in our project folder.
{
    "require": {
        "pusher/pusher-php-server": "^3.0"
    }
}
Then I will create index.php file to handle all code related to the backend.
Setting Frontend
- Load Vuejs
We will create the static structure in the index.html file. Because we will use Vuejs as frontend. we will load the Vuejs in index.html via CDN:
<script src="https://cdn.jsdelivr.net/npm/[email protected]/dist/vue.js"></script>
- Load Axios
Then for AJAX request, we will use axios. We will also load Axios in index.html via CDN:
<script src="https://unpkg.com/axios/dist/axios.min.js"></script>
- Load Pusher.js
In javascript section we will also load the library pusher.js. we can load pusher.js in index.html via CDN:
<script src="https://js.pusher.com/4.2/pusher.min.js"></script>
- Create index.html file
We will make the frontend part in index.html. here is the html structure I have created.
<!DOCTYPE html>
<html>
<head>
    <title>Chat App using PHP and Vuejs</title>
    <script src="https://js.pusher.com/4.2/pusher.min.js"></script>
    <script src="https://cdn.jsdelivr.net/npm/[email protected]/dist/vue.js"></script>
    <script src="https://unpkg.com/axios/dist/axios.min.js"></script>
    <style type="text/css">
        body{
            width: 80%;
            margin:10% auto;
            font-family: sans-serif;
        }
        textarea{
            width: 99%;
            overflow: hidden;
        }
        .chat-message{
            padding: 10px;
        }
        .username{
            font-weight: 800;
            padding-bottom: 5px;
        }
        .username, .time{
            font-size: 0.8rem;
        }
        .message{
            white-space: pre-wrap;
        }
    </style>
</head>
<body>
    <div class="chat-box" id="app">
        <h1>Chat App using PHP and Vuejs</h1>
        <input type="text" placeholder="Your name">
        <hr>
        <div class="chat-lists">
            <div class="chat-message">
                <div class="username"> Me
                    <span class="time">24/05/2018</span>
                </div>
                <div class="message">Hi, this is my first contribution</div>
            </div>
            <div class="chat-message">
                <div class="username"> My Friend
                    <span class="time">24/05/2018</span>
                </div>
                <div class="message">oh yeah, good luck bro..!!</div>
            </div>
        </div>
        <div class="chat-input">
            <textarea name="chat-box" rows="8"></textarea>
        </div>
    </div>
<script src="main.js" type="text/javascript"></script>
</body>
</html>
We load Vuejs, Axios and Pusher.js before the closing <head> tag and before the closing tag <body> we load the main.js file, This file is a javascript file that we will create for our chat app.
<script src="main.js" type="text/javascript"></script>
We can see the static page we have created by opening the index.html in the browser, more or less the result will be like this:
You can add your own CSS. The CSS I created is simple because our focus is not on the CSS.
Use Pusher
We have done the settings in the backend and frontend. Now we need to use pusher section in the PHP and Javascript. We have split our javascript file in main.js.
- Use pusher in javascript
We will use pusher in our javascript file and do some settings.
main.js
Pusher.logToConsole = true;
var pusher = new Pusher('cabcc969c12fd8e852cd',{
    cluster     : 'ap1',
    encrypted   : true
})
var channel = pusher.subscribe('chat-channel');
We have loaded pusher.js in the
<head>section of the index.html file. So we can use the Pusher function in this main.js. During the development mode, it is recommended to display errors in the console., You can do like thisPusher.logToConsole = true;We can configure the frontend with APP KEYS application that we created in the dashboard pusher.
APP KEYS
app_id = "531270"
key = "cabcc969c12fd8e852cd"
secret = "ce28ec76bee486ecff35"
cluster = "ap1"
to initialize pusher in frontend we can do it with new pusher (). This function has 2 parameters. The first is the key and the second is an object that contains options. cluster : 'ap1' is the cluster you selected when creating the chanel app on the dashboard pusher. encrypted : true is an option to encrypt data. The value is boolean.
Then we can make a channel which will be connected to the backend
var channel = pusher.subscribe('chat-channel');. We can use thesubscribe()method and name the channel.Use pusher in PHP
in the backend section, we will do things that are not much different from the frontend. We will do the configuration here.
index.php
<?php
require('../vendor/autoload.php');
define("APP_KEY", 'cabcc969c12fd8e852cd');
define("APP_SECRET", 'ce28ec76bee486ecff35');
define("APP_ID", '531270');
$pusher = new Pusher(
    APP_KEY, APP_SECRET, APP_ID, [
        'cluster'   => 'ap1',
        'encrypted' =>  true
    ]
);
We will load whatever package we have installed pusher through the composer by loading autoload.php located in the vendor folder
require('../vendor/autoload.php');.Then we will make some constants for APP_KEY, APP_SECRET, APP_ID. We can fill the value of these constants with APP KEYS that we can in dashboard pusher.
APP KEYS
app_id = "531270"
key = "cabcc969c12fd8e852cd"
secret = "ce28ec76bee486ecff35"
cluster = "ap1"
- In frontend we only need 'key' from APP KEYS.maka in backend or server we need to initialize 'key', 'app_id', 'secret', 'cluster'. we pass the constants APP_KEY, APP_SECRET, APP_ID in the class
new pusher().
$pusher = new Pusher(
    APP_KEY, APP_SECRET, APP_ID, [
        'cluster'   => 'ap1',
        'encrypted' =>  true
    ]
);
Using Vue on the frontend
- Initialization Vue
Now we will start using the Vue framework on the frontend. we have to initialize Vue first. We can easily initialize it like this:
Example:
var vi = new Vue({
    el  : '#app',
    data:{
        chats   : [],
        username: '',
        chatInput: ''
    }
});
We initialize vue on elements with ID #app, We can create local variable in vue with property
data: {}, There are some variables that we will use and we connect with html element through v-model. to know the basics of vue, you can visit the documentation at https://vuejs.org/v2/guide/
Use V-model in element HTML
by using the v-model we can connect the input element with the local variable we have created in thedata: {}. we can use it like this:
Index.html
    <div class="chat-box" id="app">
        <h1>Chat App using PHP and Vuejs</h1>
        <input type="text" placeholder="Your name" v-model="username">
        <hr>
        <div class="chat-lists">
            <div class="chat-message" v-for="chat in chats">
                <div class="username"> {{chat.username}}
                    <span class="time">{{chat.time}}</span>
                </div>
                <div class="message">{{chat.message}}</div>
            </div>
        </div>
        <div class="chat-input">
            <textarea name="chat-box" rows="8" v-model="chatInput" @keydown="sendMessage">
            </textarea>
        </div>
    </div>
- To use the v-model on the input element, we can use this way v-model = "variable". We put
username: ' 'in input username andchatInput: ' 'in textarea. - Then we use v-for to loop on the variable
chats:[]that contain the contents of the chat. Later this chats variable will be assigned a value with the ['username'], ['time'], and ['message'] array. - We will run a function that will be triggered when keyboard is typed. the function we put on
@keydown = "sendMessage", @keydown is a function of vuejs that handles when keyboard is typed. This is a shorthand of v-on.
Submit Message with AXIOS
We will start the Post request to the server. In this tutorial, I will use AXIOS to help request. We will create a function that we have put in <textarea> element that is sendMessage(). We can create a function in Vue with property methods: {}.
Example:
methods:{
        sendMessage(e){
            if(e.keyCode===13){
                e.preventDefault()
                if(this.chatInput == ''|| this.chatInput.trim() == ' ')
                    return
                var date  = new date();
                axios.post('http://localhost/chatapp/chat/index.php?method=sendMessage',{
                    username    : this.username,
                    message     : this.chatInput,
                    time        : date.toLocaleString()
                }).then(data=>{
                    console.log(data)
                })
            }
        }
    }
- The idea is we'll post data when the user hit enter on the keyboard. we can user the keyCode to watch if the user has hit enter.
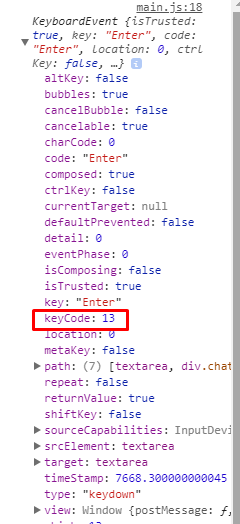
keyCode === 13refers to enter, If we doconsole.log (e)we will get data like this.
Then we will prevent the user from sending the empty message
this.chatInput = ' 'and if after we dotrim()==' 'the result is still empty we will do the return and not run the code below it.We can post with Axios with
post ()method. This method has 2 parameters. The First parameter is the URL or Endpoint Rest API in this tutorial we have example endpoint from our local server that ishttp://localhost/chatapp/chat/index.php?method=sendMessage,
I have a query parameter?method=sendMessage, so the backend can know what action to run. The second parameter is the data we will post to the backend or server.
The Data:
{
    username    : this.username,
    message     : this.chatInput,
    time        : date.toLocaleString()
}
Data in the form of objects that contain key and value. username is the key, and this.username is the value from v-model, Then we can chain with the callback function .then (data=>{}).
Handle the submit message in the backend
Because we use PHP native we need to do some settings for CORS.
Example:
header("Access-Control-Allow-Origin: *");
header("Access-Control-Allow-Headers: Content-Type");
$_POST = json_decode(file_get_contents('php://input'), true);
The code to allow this file to be accessed from any URL or endpoint and we can convert the data into JSON in PHP with json_decode(file_get_contents('php://input'), true);
Trigger channel
Before we trigger channel we need to check the parameter query we have passed in URL Endpoint.
if($GET_['method'] == 'sendMessage'){
    $data['username']   == $_POST['username'];
    $data['message']    == $_POST['message'];
    $data['time']       == $_POST['time'];
    $pusher->trigger('chat-channel','chat-event',$data);
}
We can get the data in the post to the backend with
$_POST['the key'];, We use the $ _POST variable to convert the data to JSON. $ _POST is the variable we have declared in$_POST = json_decode(file_get_contents('php://input'), true);.after that, we insert the value into variable $ data of the type of arrayTo trigger we can use trigger() method. this method has 3 parameters. the first is the name of the channel ('chat-channel'). The second is the name of the event ('chat-event') and the third is the data ($data) in the form of arrays.
Bind Event in the frontend
We have already triggered the channel in the backend, now the task on the frontend to listen to the event sent by the backend. We can use the bind() method to listen to the trigger event.
Example:
channel.bind('chat-event', function(data){
    console.log(data);
});
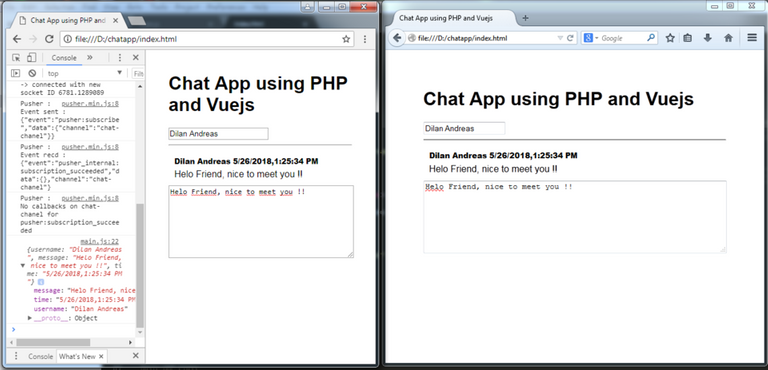
The bind() function has two parameters. the first is the name of the event that has been in the trigger in the backend. in this tutorial, the event name is 'chat-event'. the second parameter is a callback function that contains the data in the pass of the backend. to see the result we can see the following picture.
Thank you guys for following this tutorial, I hope you can further develop the code that I have given in GitHub. thank you...


✅ @steemit.wiki, I gave you an upvote on your first post! Please give me a follow and I will give you a follow in return!
Please also take a moment to read this post regarding bad behavior on Steemit.
Thank you for the contribution.
Your contribution has been evaluated according to Utopian policies and guidelines, as well as a predefined set of questions pertaining to the category.
To view those questions and the relevant answers related to your post, click here.
Need help? Write a ticket on https://support.utopian.io/.
Chat with us on Discord.
[utopian-moderator]
You account has been banned due to being the same account as ryanalfarisi
Need help? Write a ticket on https://support.utopian.io/.
Chat with us on Discord.
[utopian-moderator]