I had no previous knowledge in making a node.
The only related knowledge was negligible, of just using very few Linux (Terminal) commands.

Chose it to be a Zencash secure node, since they are the cheapest, and a fork of Zcash.
And have found a tutorial.
Short intro
For a Zencash secure node, you will need
- a stake of 42.3 Zen
- a VPS
- a DNS
Mainly, i have followed the tutorial step by step.
In the following paragraphs i will present the differences from the tutorial and some problems i have encountered.
Google VPS - Google Cloud Platform
I have used the tutorial here. But it describes how to use Digital Ocean VPS and since Google is providing a free trial of 300$ for a max of 12 months, of course I have opted to use something free.
Google's free trial should be enough for 10 months => 30$/month
Steps
- Create a GCP account. Add your card - will not make payments without your confirmation.
- Start the free trial.
- Start a project. Start a VM ComputeEngine
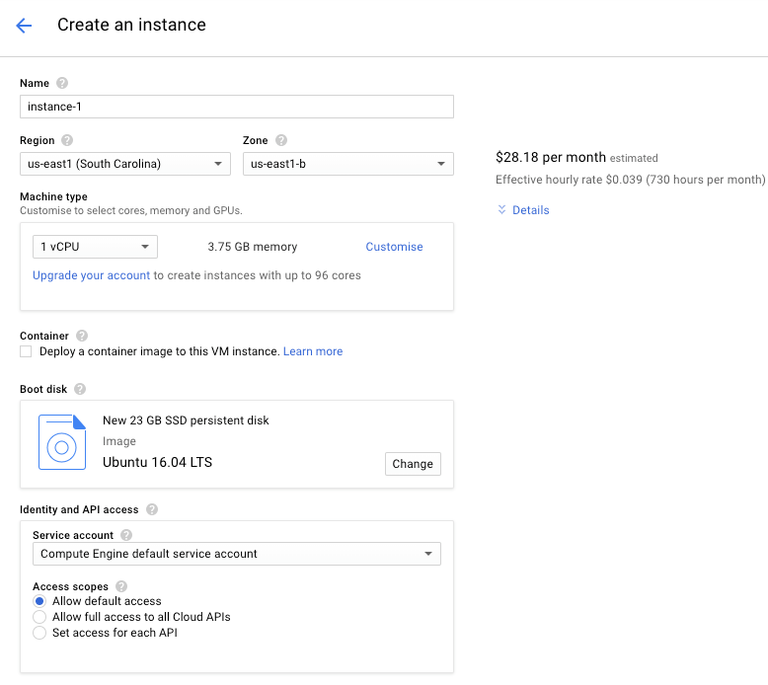
Configure your server to have
3.1. 1 vCPU
3.2. ~4 GB RAM
3.3. at least 20 GB SSD
3.4. Ubuntu 16.04 LTS
I have found that the GCP US-east servers are cheaper => 10 months free
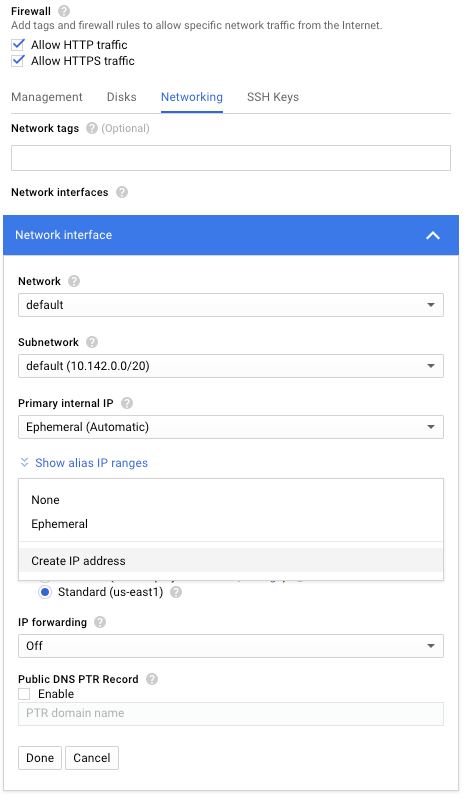
3.5. Make sure to allow HTTP & HTTPS traffic. acme needs it
3.6. Under Networking, make your External IP static. reserve it
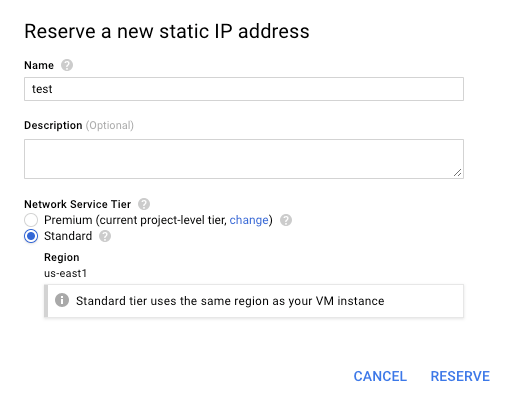
3.7. Name it something related. No need to pay for it, so make it standard
3.8. Under SSH - add your ssh keys in order to connect from other computers without using gcp's interface. Later add each user to sudo
3.9. Create it
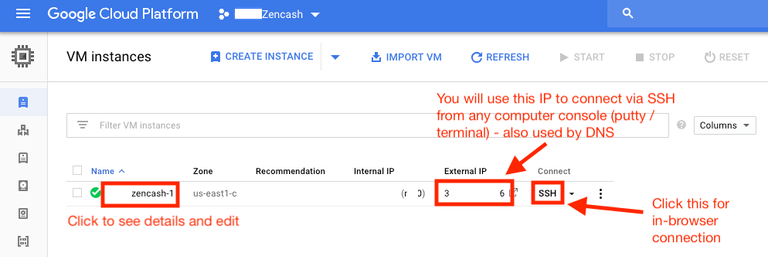
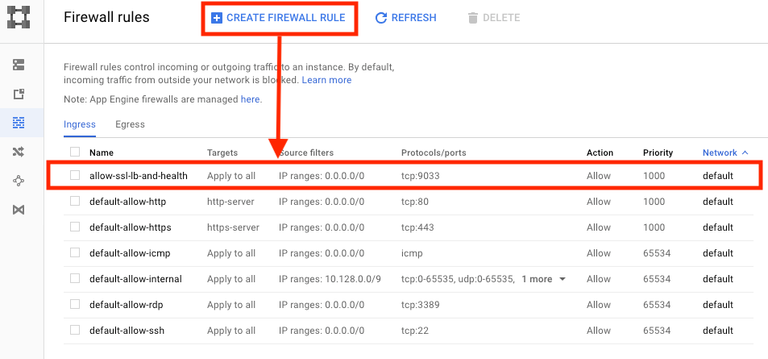
4.Edit the GCP Firewall settings.
https://console.cloud.google.com/networking/firewalls should directly redirect to your project's firewall settings
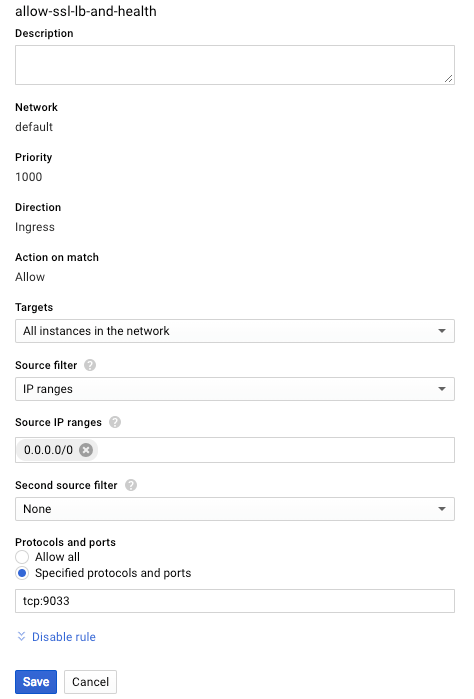
Create the tcp:9033 rule.
This will allow the SSL certificate communication check
Test it from a terminal window after you have added the certificate to your server
openssl s_client -connect SERVER_IP_OR_NS:9033
Other observations to the Tutorial
Tutorial's Section 8: Install a free certificate from LetsEncrypt
Section 8.2. Just use GoDaddy. I have waited uselessly 1.5 days by using NS1 - free.
Then created via GoDaddy and it has worked/propagated instantly.
I have used a .online domain since it is only 1.5$/year - for the first year - made it for one year
Section 8.6.
I have edited both root (sudo su) and the current user's crontab in order for this to work. "Quick and dirty, but it works"
crontab's content, notice the dots before acme.sh:
6 0 * * * "/home/YOUR_USER/.acme.sh"/acme.sh --cron --home "/home/YOUR_USER/.acme.sh" > /dev/null
Tutorial's Section 9
3 Transactions of 0.1 ZENs each is enough
Tutorial's Section 10 Install the Tracker
Section 10.3. node setup.js Add a real email since this will be used by zencash to announce errors (https://securenodes2.na.zensystem.io/)
Section 10.4. node app.js Will throw an error if you do not have enough balance on the server. just send more
Section 10.5. After running the commands, do a pm2 save to save the added process.
Section 10.6. Combine with sudo if it does not work as is
Section 10.9. Do not forget to replace with your USER_NAME / PATH
Section 10.12. Do not forget to replace with your USER_NAME / PATH
ALL NODE TESTS
- zen-cli getnetworkinfo -> tls_cert_verified should be true
- pm2 logs -> cert check should be true
error: cert check: valid=false. no peers found yet with secure connections to this node.
verify with: call on another computer terminal: openssl s_client -connect SERVER_IP_OR_NS:9033
It should print something - zen-cli getinfo -> blocks should be on track https://explorer.zen-solutions.io/
- find your server/secure node https://securenodes2.na.zensystem.io/
Make sure cert is VALID and status is UP
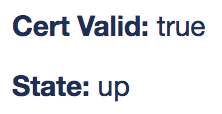
Make sure there is no recent Compliance Exception or Downtime right now
Send yourself a challenge

Check your mail to start the challenge. Results will be under Challenge Results
https://securenodes2.na.zensystem.io/nodes/YOUR_NODE_ID/chals
IF EVERYTHING WORKS
You should start receiving payments (successful or errors) in ~1 day
Hope it helped
Ask any related question.
I am a noob, but will answer as best as i can.
In making the server i have used only the tutorial above mentioned and google search for debugging.
Zencash Donation:
znkJdfDB61REsPKV6D33f7qLTAr8sNX66JT
Awesome
thanks :) hope it helps
This post has received a 3.82 % upvote from @boomerang.
You got a 2.10% upvote from @postpromoter courtesy of @octav!
Want to promote your posts too? Check out the Steem Bot Tracker website for more info. If you would like to support the development of @postpromoter and the bot tracker please vote for @yabapmatt for witness!
Congratulations @octav! You have completed some achievement on Steemit and have been rewarded with new badge(s) :
Click on the badge to view your Board of Honor.
If you no longer want to receive notifications, reply to this comment with the word
STOP