Today we're going to set up a purposely vulnerable machine to practice our hacking and get those 1337 ski11z. The machine we'll use is specifically chosen b/c it let introduces us to some of the most common methods & tools hackers use to break into a system and it let's us do all this legally.
In future posts I'll cover in-depth the tools and techniques needed to exploit the machine we're setting up. However just setting it up will teach us valuable skills in finding safe machines to practice on and VM networking setups we will use with every machine we create. Let's get to it!
Prerequisites:
Virtual Box (read my guide here to learn how to install for Windows/Linux)
Download the mrRobot OVA file
Setting It Up
Importing the Machine
Now that we've installed Virtual Box and downloaded the vulnerable machine file we need to set it up. To do this we simply do the following:
Hit Ctl-I(or go to File-Import Appliance)
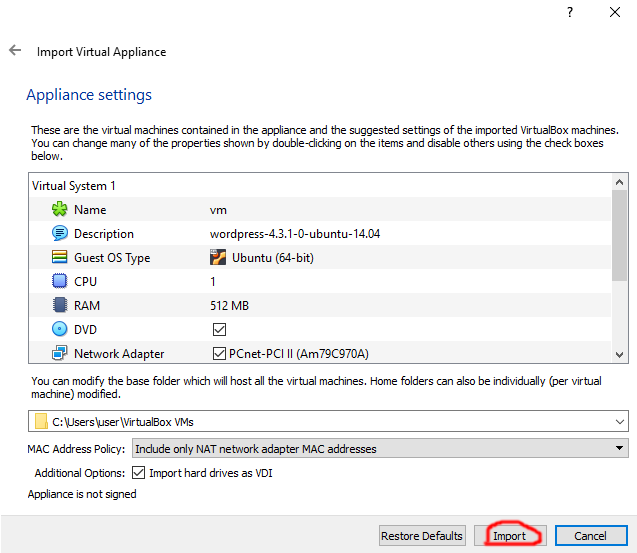
Choose the mrRobot OVA file. Click next. A windows like below should pop up. Then click Import.
Setting Up Networking
Now we need to setup a network on both the vulnerable machine and our network in general.
Setting Up Machine Adapter
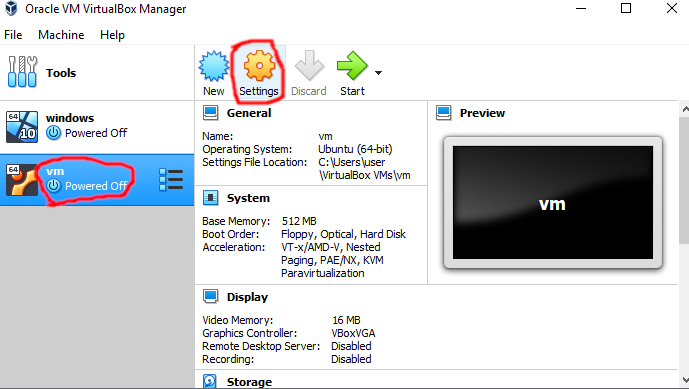
First we'll set up the vulnerable machine adapter. We do this by selecting the mrRobot VM(labeled simply vm in this case) and clicking Settings.
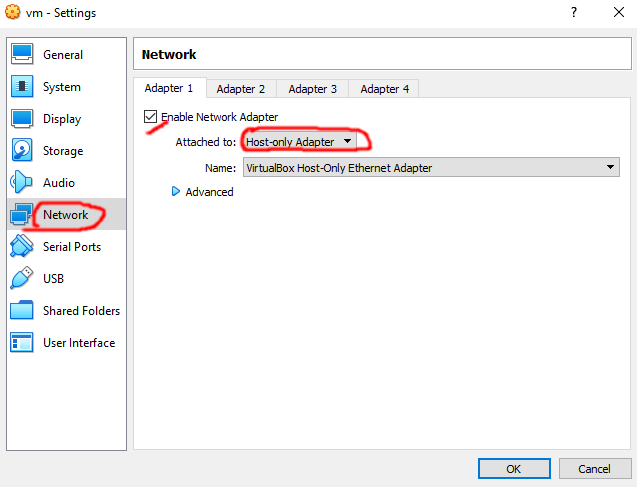
Now select the Network option(to the left), make sure it is Enabled and Host-Only is selected as shown.
Setting Up DHCP Server:
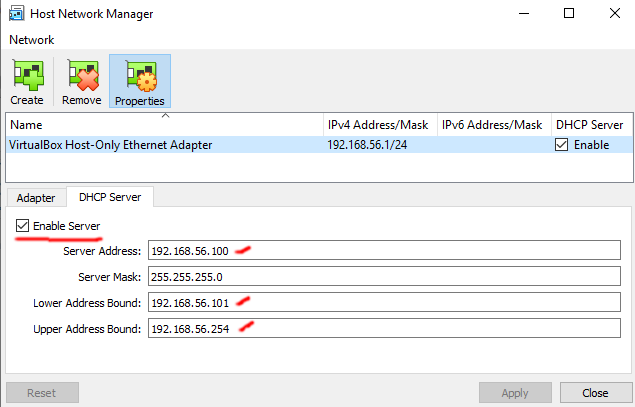
Now we need to setup the DHCP server that will give our vuln-machine an IP address. Hit Ctl-H(or File-Host Network Manager) and make sure the options and numbers are the same as in below 2 pictures...
- IPv4 Address- The IP of actual Host-Only network adapter you're setting up.
- Server Address: The address of the DHCP server which hands out IP's to machines
- Lower/Upper Address Bound: The IP range you want computers(such as our Mr. Robot VM) to be assigned in. Though not shown in the picture I recommend you limit the range to no more than 10(110-120,130-140,150-160, etc...) This simplifies finding the IP address of machines on your network.
IMPORTANT: The first 3 rows of #'s(in the pictures below 192.168.56.xxx) SHOULD BE THE SAME for IPv4 Address, Server IP, & Lower/Upper bounds.
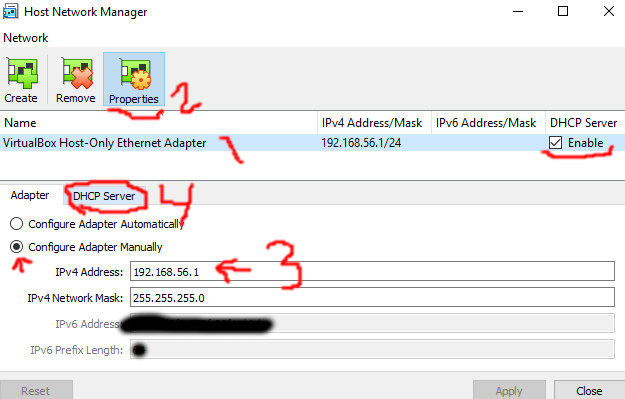
Once you complete the above you have set it up. This process typically only needs to be done once. Whenever you add a new VM you simply select it & go to Settings-Network-Select Host Only and you'll be done. Then you start the machines you want to practice on and your Kali hacking VM and get to it!
Conclusion
I hope you enjoyed today's tutorials. Getting this set up is something that can be really challenging for beginners if you don't have someone to teach you. It took me many days to figure this out when I was just beginning so if you found this useful please upvote and follow. If you have any questions leave them below(with screenshots if possible) and I'll personally help you get it set up. As always happy and safe hacking and always use your skills for good.