
¡Hola, amigo ilustrador y/o creador de comic y manga!
Imagina que estamos sentados en nuestra cafetería favorita, con una buena taza de café en la mano y un cuaderno de bocetos abierto frente a nosotros (¡ya yo tengo mi tacita de café conmigo!). Hoy quiero hablarte en este artículo sobre algo que me encanta: el sombreado en el dibujo. Si alguna vez has mirado una ilustración y te has preguntado cómo logran esos efectos tan realistas, ¡estás en el lugar correcto! Vamos a hablar sobre algunas técnicas básicas de sombreado que son perfectas para principiantes.
1. Entendiendo la Luz y la Sombra
Antes de referirnos a las técnicas, es fundamental entender cómo funciona la luz. La luz crea sombras, y esas sombras son lo que da profundidad a tus dibujos. Piensa en una esfera iluminada por una lámpara: donde la luz golpea, verás áreas brillantes; donde no llega, se formarán sombras. Así que, cuando dibujes, pregúntate: ¿de dónde viene la luz? Esto te ayudará a decidir dónde aplicar el sombreado. Si al inicio se te hace difícil visualizar la luz, dibuja una flecha que apunte hacia el área que está siendo iluminada. Eso te ayudará a tener siempre en cuenta de dónde parte la luz y hacia dónde se deben proyectar las sombras.

2. El Sombreado a Mano Alzada
Una de las técnicas más simples y efectivas es el sombreado a mano alzada. Toma tu lápiz (puedes usar uno suave como un 2B) y comienza a hacer trazos ligeros en las áreas donde deseas crear sombra. No presiones demasiado al principio; es mejor construir la intensidad gradualmente. Puedes usar movimientos circulares o líneas suaves para crear un efecto más natural. Sujeta el lápiz con suavidad, esto le permitirá a la muñeca moverse con facilidad evitando el dolor por el exceso de presión y posibles lesiones a futuro.
3. Sombreado con Rayas (Hatching)
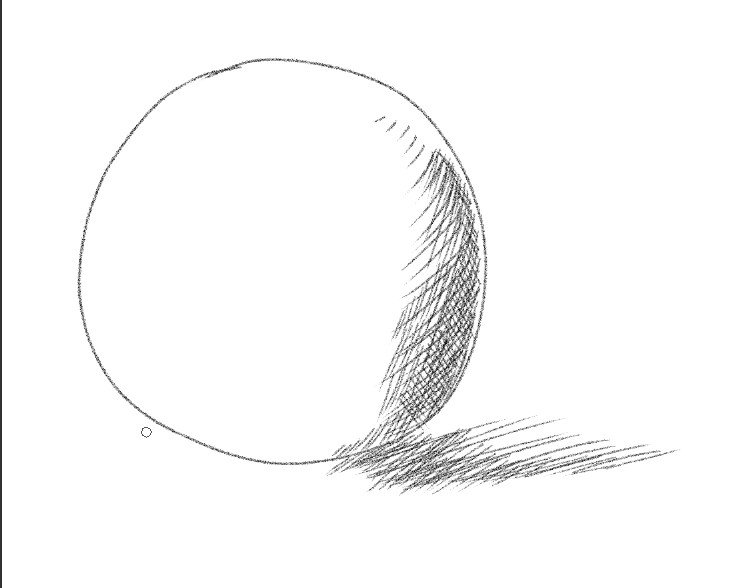
Esta técnica consiste en dibujar líneas paralelas muy cerca unas de otras. Mientras más cerca estén las líneas, más oscura será la sombra que crees. Puedes variar la dirección de las líneas para dar diferentes texturas o formas. Por ejemplo, si estás dibujando un objeto redondeado, puedes curvar las líneas alrededor del objeto para seguir su forma. Se logran acabados muy bonitos con esta técnica básica.

4. Sombreado Cruzado (Cross-Hatching)
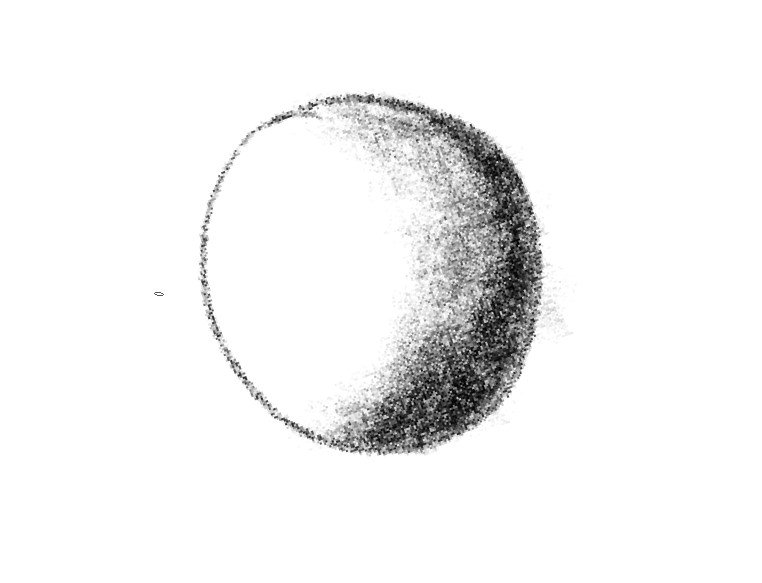
Si quieres llevar tu sombreado al siguiente nivel, prueba el cross-hatching. Aquí es donde dibujas líneas en una dirección y luego añades otra capa de líneas cruzadas en un ángulo diferente. Esto crea una sombra más rica y compleja. Es como si estuvieras tejiendo una red de sombras sobre tu dibujo. Cuantas más capas de líneas agregues, más oscura y profunda será la sombra. Esta técnica es especialmente útil para crear texturas en superficies como la piel o la tela. Esta técnica se usa mucho en el manga para lograr sombreados con el sólo uso de tinta.
5. Difuminado con el Dedo o un Difumino
Una vez que hayas aplicado tus sombras con líneas, puedes suavizarlas usando el dedo o un difumino (un pequeño utensilio de papel o cartón). Simplemente frota suavemente sobre las áreas sombreadas para mezclar las líneas y crear un efecto más suave y natural. Ten cuidado de no difuminar demasiado; a veces, un poco de textura puede ser muy atractivo. También recuerda mantener las manos limpias para evitar manchar otras zonas de la ilustración. Puedes colocar un trozo de papel bajo tu mano y recuerda tener algo de papel o toallas cerca para limpiarte las manos si usas tus dedos para difuminar.

6. Sombreado con Puntos (Stippling)
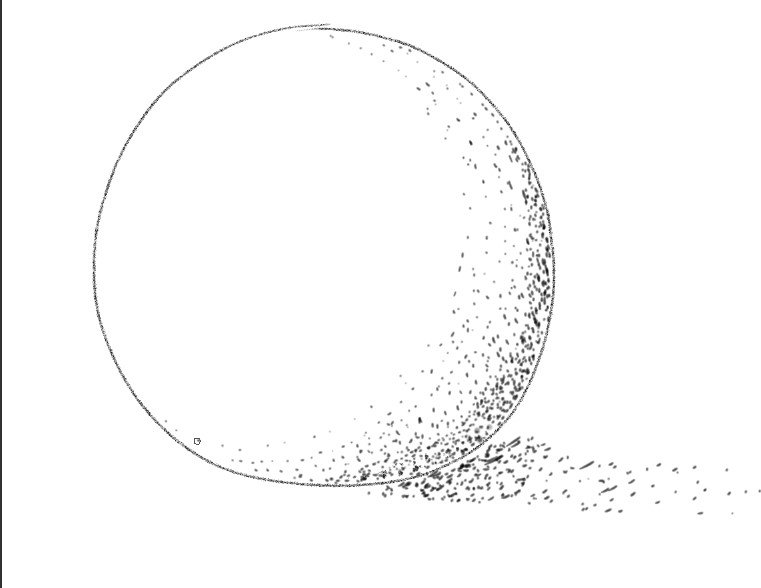
Esta técnica es perfecta si te gusta tener un control total sobre tu sombreado. En lugar de usar líneas, simplemente haces pequeños puntos en las áreas que deseas oscurecer. Cuantos más puntos coloques y más cerca estén unos de otros, más oscura se verá esa área. El stippling puede ser un poco tedioso, pero el resultado final puede ser impresionante y muy detallado. Si optas por esta técnica, lo mejor es relajarse. ¡Hasta te puede servir de actividad para meditar!
7. Práctica, Práctica y Más Práctica
Como todo en la vida, la práctica es clave. No te desanimes si tus primeros intentos no son perfectos; cada artista tiene su propio estilo y ritmo de aprendizaje. Dedica tiempo a experimentar con estas técnicas en diferentes objetos: frutas, flores o incluso retratos simples. Con cada trazo, irás mejorando. Si estás empezando, opta por aprender con figuras básicas como una esfera, un cubo o un cilindro para ir desarrollando confianza y poder experimentar con objetos más complejos.
8. Observa y Aprende
Una excelente manera de mejorar tus habilidades de sombreado es observar a otros artistas. Busca tutoriales en línea o libros sobre dibujo que se centren en el sombreado. Analiza cómo utilizan la luz y la sombra en sus obras; esto te dará ideas sobre cómo aplicar esas técnicas a tus propios dibujos. Si estás aprendiendo a dibujar en digital, te recomiendo que practiques directamente a hacer estas técnicas con el lápiz o pluma y evitar el atajo de usar brochas predeterminadas con este tipo de sombreado, para que puedas dominarlas y así estés en capacidad de usar estas técnicas también en el arte tradicional.
Así que ahí lo tienes, amigo ilustrador. Hemos hecho un breve recorrido por algunas técnicas básicas de sombreado que puedes empezar a practicar hoy mismo. Recuerda que el arte es un camino, no una meta. Cada trazo que hagas te acerca más a tu propio estilo y voz artística. No tengas miedo de experimentar y cometer errores; son parte del proceso.
¿Practicarás alguna de ellas? Me encantaría ver cómo aplicas estas técnicas y, quién sabe, tal vez podamos compartir algunos consejos y trucos mientras disfrutamos de un buen café. ¡Que te diviertas dibujando!
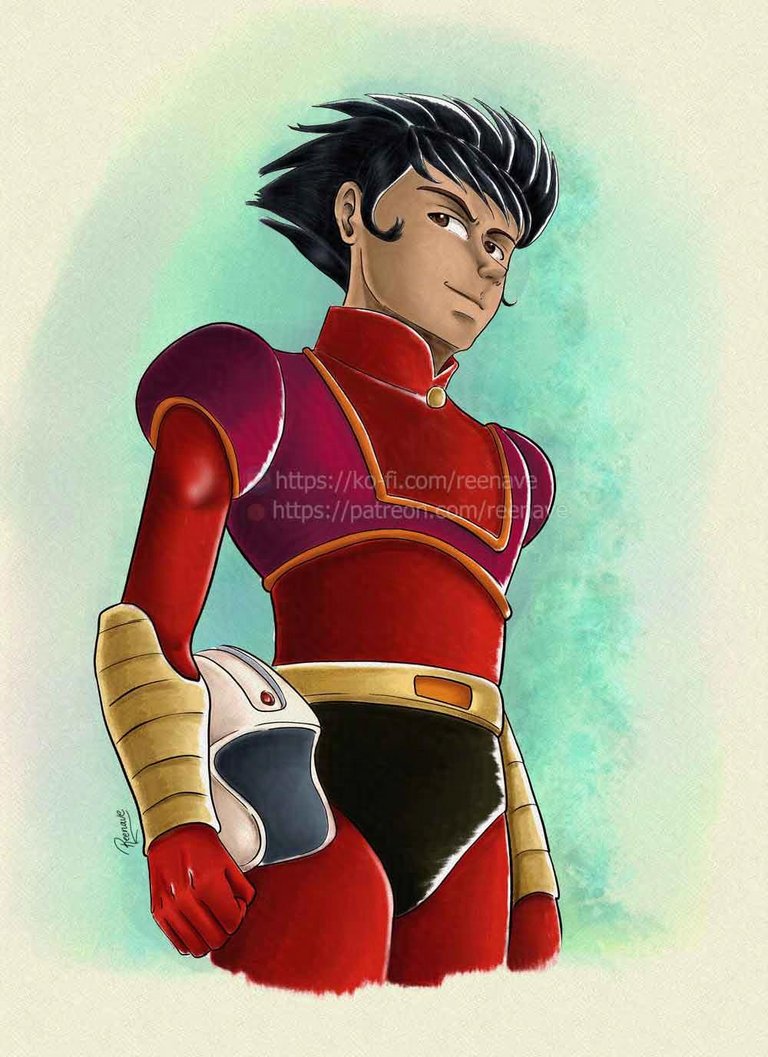
Te comparto una ilustración que hice hace algunos meses sobre Koji Kabuto, personaje del anime Mazinger Z
Espero que este artículo te haya inspirado y te ayude en tu camino artístico. Si tienes alguna pregunta o necesitas más consejos, no dudes en decírmelo. ¡Deja tus dudas en los comentarios! y podrían ser la base para nuevos artículos que puedan ayudar a otros amigos ilustradores y creadores de comics y manga.
Nota: Dibujé los ejemplos de manera rápida para que puedas tener una visión de la técnica. Recuerda tomar tu tiempo para lograr acabados mejores.
¡Hasta el siguiente artículo!
Mis blogs: Noise Steemit Hive Publish0x Medium
Mis redes sociales: Instagram Facebook Twitter YouTube TikTok
Mis tiendas: Redbubble
Comisiones Abiertas: Fiverr
Suscríbete, dale like y comparte si estás disfrutando la historia para que recibas notificación al haber actualización!

Hello, illustrator and/or comic and manga creator!
Imagine we are sitting in our favorite café, with a nice cup of coffee in hand and an open sketchbook in front of us (I already have my little coffee cup with me!). Today, I want to talk to you in this article about something I love: shading in drawing. If you've ever looked at an illustration and wondered how they achieve such realistic effects, you’re in the right place! We’re going to discuss some basic shading techniques that are perfect for beginners.
1. Understanding Light and Shadow
Before we refer to the techniques, it's fundamental to understand how light works. Light creates shadows, and those shadows are what give depth to your drawings. Think of a sphere illuminated by a lamp: where the light hits, you will see bright areas; where it doesn't reach, shadows will form. So, when you draw, ask yourself: where is the light coming from? This will help you decide where to apply shading. If at first, it’s hard for you to visualize the light, draw an arrow pointing toward the area that is being illuminated. This will help you always keep in mind where the light originates and where the shadows should be projected.
2. Freehand Shading
One of the simplest and most effective techniques is freehand shading. Take your pencil (you can use a soft one like a 2B) and start making light strokes in the areas where you want to create shadow. Don’t press too hard at first; it’s better to build up the intensity gradually. You can use circular movements or soft lines to create a more natural effect. Hold the pencil gently, as this will allow your wrist to move easily, avoiding pain from excessive pressure and potential injuries in the future.
3. Hatching
This technique involves drawing parallel lines very close to each other. The closer the lines are, the darker the shadow you create. You can vary the direction of the lines to give different textures or shapes. For example, if you are drawing a rounded object, you can curve the lines around the object to follow its shape. Beautiful finishes can be achieved with this basic technique.
4. Cross-Hatching
If you want to take your shading to the next level, try cross-hatching. This is where you draw lines in one direction and then add another layer of crossed lines at a different angle. This creates a richer and more complex shadow. It’s like weaving a network of shadows over your drawing. The more layers of lines you add, the darker and deeper the shadow will be. This technique is especially useful for creating textures on surfaces like skin or fabric. It is widely used in manga to achieve shading using only ink.
5. Blending with Your Finger or a Blending Stump
Once you've applied your shadows with lines, you can soften them using your finger or a blending stump (a small tool made of paper or cardboard). Just gently rub over the shaded areas to blend the lines and create a smoother, more natural effect. Be careful not to blend too much; sometimes, a bit of texture can be very appealing. Also, remember to keep your hands clean to avoid smudging other areas of the illustration. You can place a piece of paper under your hand and keep some paper or towels nearby to clean your hands if you use your fingers to blend.
6. Stippling
This technique is perfect if you like to have total control over your shading. Instead of using lines, you simply make small dots in the areas you want to darken. The more dots you place and the closer they are to each other, the darker that area will appear. Stippling can be a bit tedious, but the final result can be impressive and very detailed. If you choose this technique, the best approach is to relax. It can even serve as a meditative activity!
7. Practice, Practice, and More Practice
Like everything in life, practice is key. Don’t be discouraged if your first attempts aren’t perfect; every artist has their own style and learning pace. Take the time to experiment with these techniques on different objects: fruits, flowers, or even simple portraits. With each stroke, you will improve. If you are just starting, focus on learning with basic shapes like a sphere, cube, or cylinder to build confidence and experiment with more complex objects.
8. Observe and Learn
An excellent way to improve your shading skills is to observe other artists. Look for online tutorials or drawing books that focus on shading. Analyze how they use light and shadow in their works; this will give you ideas on how to apply those techniques to your own drawings. If you are learning to draw digitally, I recommend practicing these techniques directly with a pencil or pen and avoiding the shortcut of using preset brushes for this type of shading, so you can master them and be able to use these techniques in traditional art as well.
So there you have it, fellow illustrator. We’ve taken a brief look at some basic shading techniques that you can start practicing today. Remember that art is a journey, not a destination. Every stroke you make brings you closer to your own style and artistic voice. Don’t be afraid to experiment and make mistakes; they are part of the process.
Will you practice any of these techniques? I would love to see how you apply them, and who knows, maybe we can share some tips and tricks while enjoying a good coffee. Have fun drawing!
I’m sharing an illustration I did a few months ago of Koji Kabuto, a character from the anime Mazinger Z.
I hope this article has inspired you and helps you on your artistic journey. If you have any questions or need more advice, feel free to let me know. Leave your doubts in the comments! They could be the basis for new articles that can help other fellow illustrators and comic and manga creators.
Note: I sketched the examples quickly so you can get a sense of the technique. Remember to take your time to achieve better finishes.
Until the next article!
*Disclaimer: *English is not my native language. Even when I have a conversational level, I can make a lot of mistakes in the structure of the sentences. Feel free to kindly correct me. It will help me in my learning process. Thanks for your understanding. **
My blogs: Noise Steemit Hive Publish0x Medium
My Social Networks Instagram Facebook Twitter YouTube TikTok
My shops: Redbubble
Commissions Open: Fiverr