In the first part of this series, I showed what Bias frames are, what they are for and how they are stacked to a master bias. In this part, we will talk about dark frames and what’s their particularity.
Dark frames
Like bias frames, dark frames are calibration frames. With the bias frames, we tried to get rid of the noise that appears during the readout of the sensor. The dark frame is used to eliminate the noise, that is produced in the sensor itself while exposing. This noise is also called thermal noise because it depends on the temperature of the sensor. The higher its temperature, the higher is the noise. A temperature reduction of 7 degrees leads to a halving of the noise. That’s why Astro cameras are cooled. However, even cooled sensor with -20°C will produce noise. To reduce the noise even further dark frames were subtracted from the image. But not only the noise will be cut in the picture there are also hot and cold pixels. These pixels have a malfunction, independent of the exposure their value is always high (hot pixel) or low (cold pixel).
Dark frames needed to be recorded with the same settings as the light frames (the images you take). There is only one difference. As with the bias frames, they are made with the lens cap on the telescope or lens, so that no light can reach the sensor. It is essential that the sensor temperature is the same as on the light frames.
The problem with the temperature
Since you can not control the temperature of the sensor in a typical DSLR, making correct and matching dark frames will be a challenge or just impossible.
Although others see it very differently, I do not recommend darks when you are using a DSLR.
When you are using a cooled Astro camera, you will have no problems.
I have made a little comparison what effect different dark frames will have on the image. All images were processed in the same way and amount. PixInsight has calculated the noise values.

Picture 1 was made with dark frames at the wrong temperature and has the following details:
6 light frames, each 300 seconds @ -15°C
6 dark frames, each 300 seconds @ -5°C
Pixinsight has calculated a noise of 5241.283Picture 2 was made without dark frames and has the following details:
6 light frames, each 300 seconds @ -15°C
0 dark frames
Pixinsight has calculated a noise of 4617.330Picture 3 was made without dark frames but doubled lights and has the following details:
12 light frames, each 300 seconds @ -15°C
0 dark frames
Pixinsight has calculated a noise of 4299.316Picture 4 was made with dark frames at the right temperature and has the following details:
6 light frames, each 300 seconds @ -15°C
6 dark frames, each 300 seconds @ -15°C
Pixinsight has calculated a noise of 3987.551
When you compare the different values of noise, you will see that the only way to maximize the quality is to make correct and matching darks. Even if I am always suspicious of any calculations, I come to the same result when I am reviewing it visually. If you are not able to make correct darks, use the time instead to capture more light frames. This will be the best way to increase the quality.
Master dark
As with the bias frames, our dark frames also contains noise that will occur randomly and is different in every dark frame. We also need to get rid of this random noise. We make it the same way as for the bias frames; we will make a master frame. Unfortunately, the dark frames need the same exposure time as the light frames. When making exposures of 300 seconds, your darks also need to have 300 seconds. So this process will take much time if you want to take a large bunch of dark frames. If you are using a cooled Astro camera, you can make dark frames anytime. So you do not need to take it on the same night. You can also make the darks some days later, or create a dark library which you can use for your images. So it should be no problem to get a nice amount of dark frames. I always try to get around 100 dark frames to make the master dark. If you use a DSLR and you will use darks instead of taking more light frames, you have to take the dark frames on the same night right after the session. At this time the temperature difference would be the smallest.
Stacking the master dark will be very similar to the process of stacking the master bias.
Let’s start …
Due to some software updates and the build of my new Astro-PC, I need to make all dark frames again. So we will get through this process only using 16 pcs, but that's no big problem.
As we only want to have the specific thermal noise of the sensor, we first need to calibrate our dark frames with the master bias, that we have created in the first part. This step will remove the noise that comes from the sensor readout and the camera electronics. For this step we are using the ImageCalibration process (PROCESS -> ImageCalibration -> ImageCalibration).
We now add all our dark frames by clicking “Add Files”.
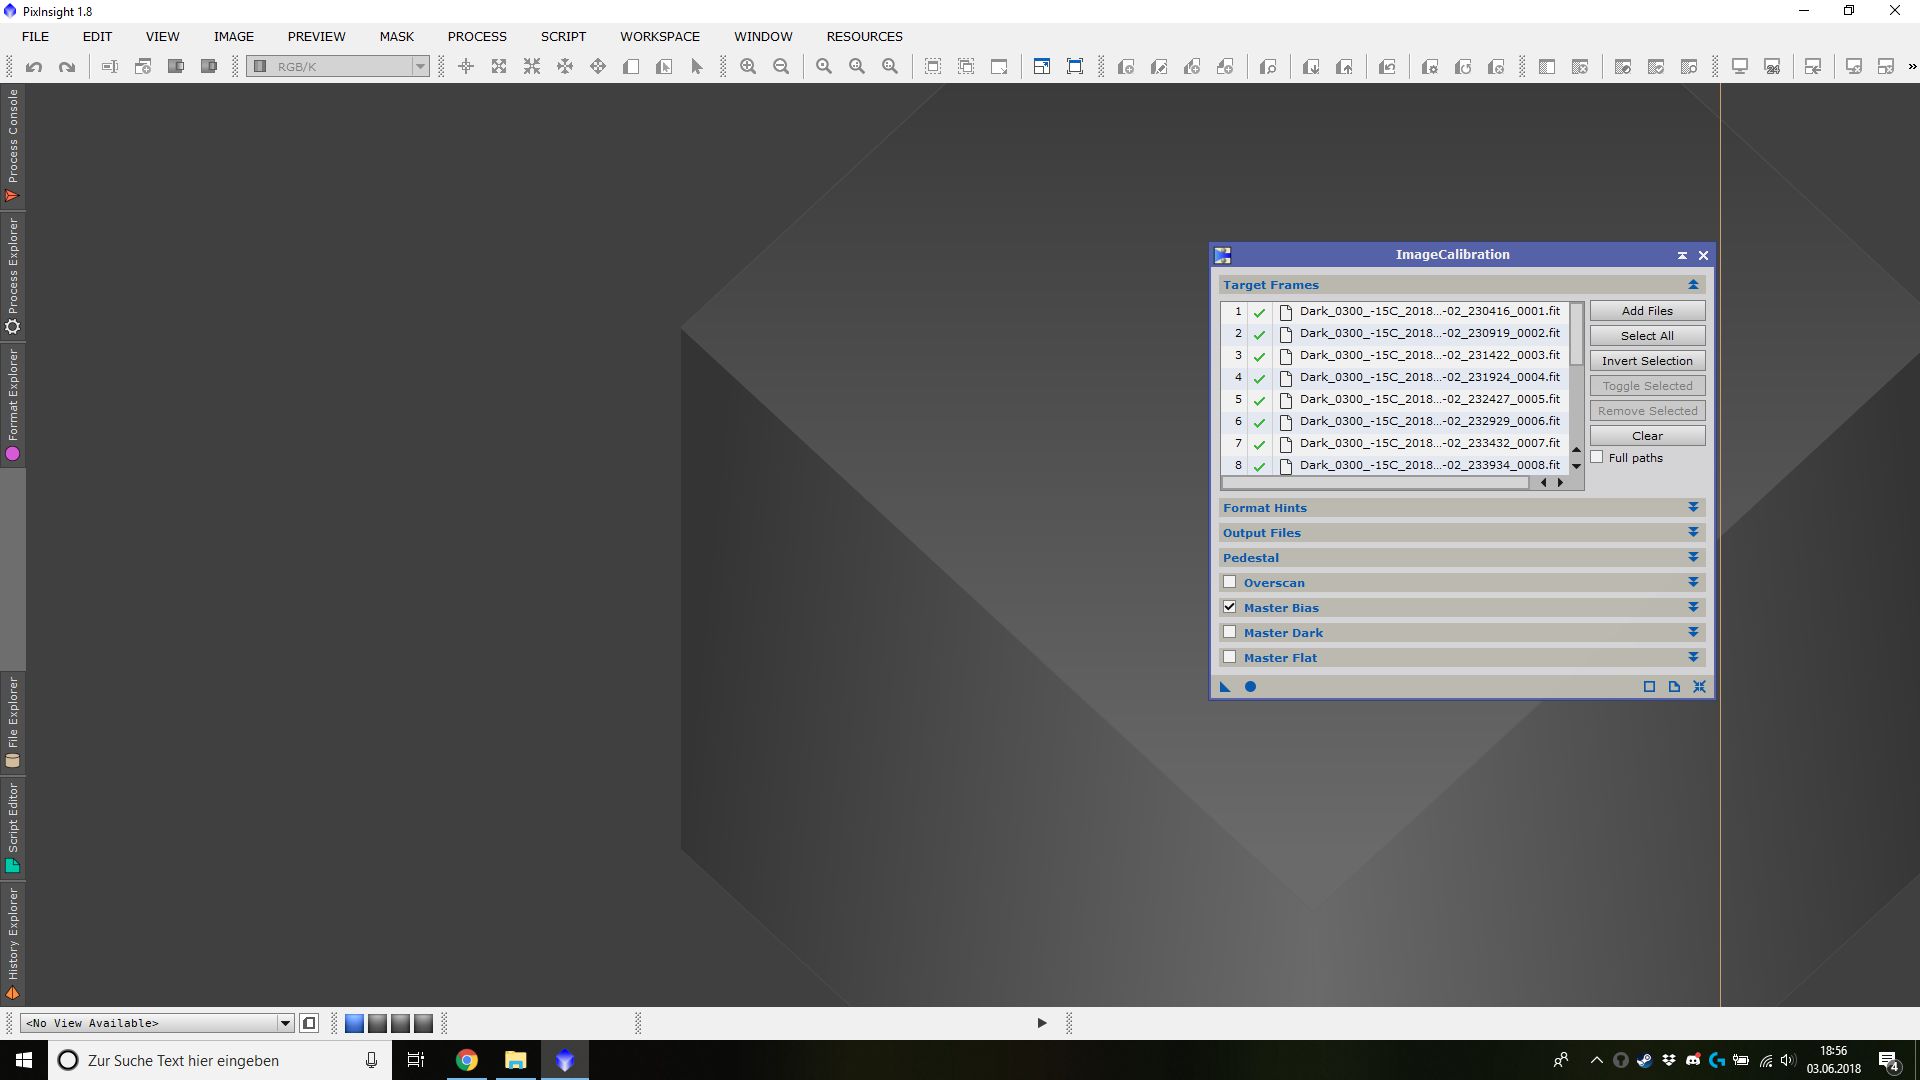
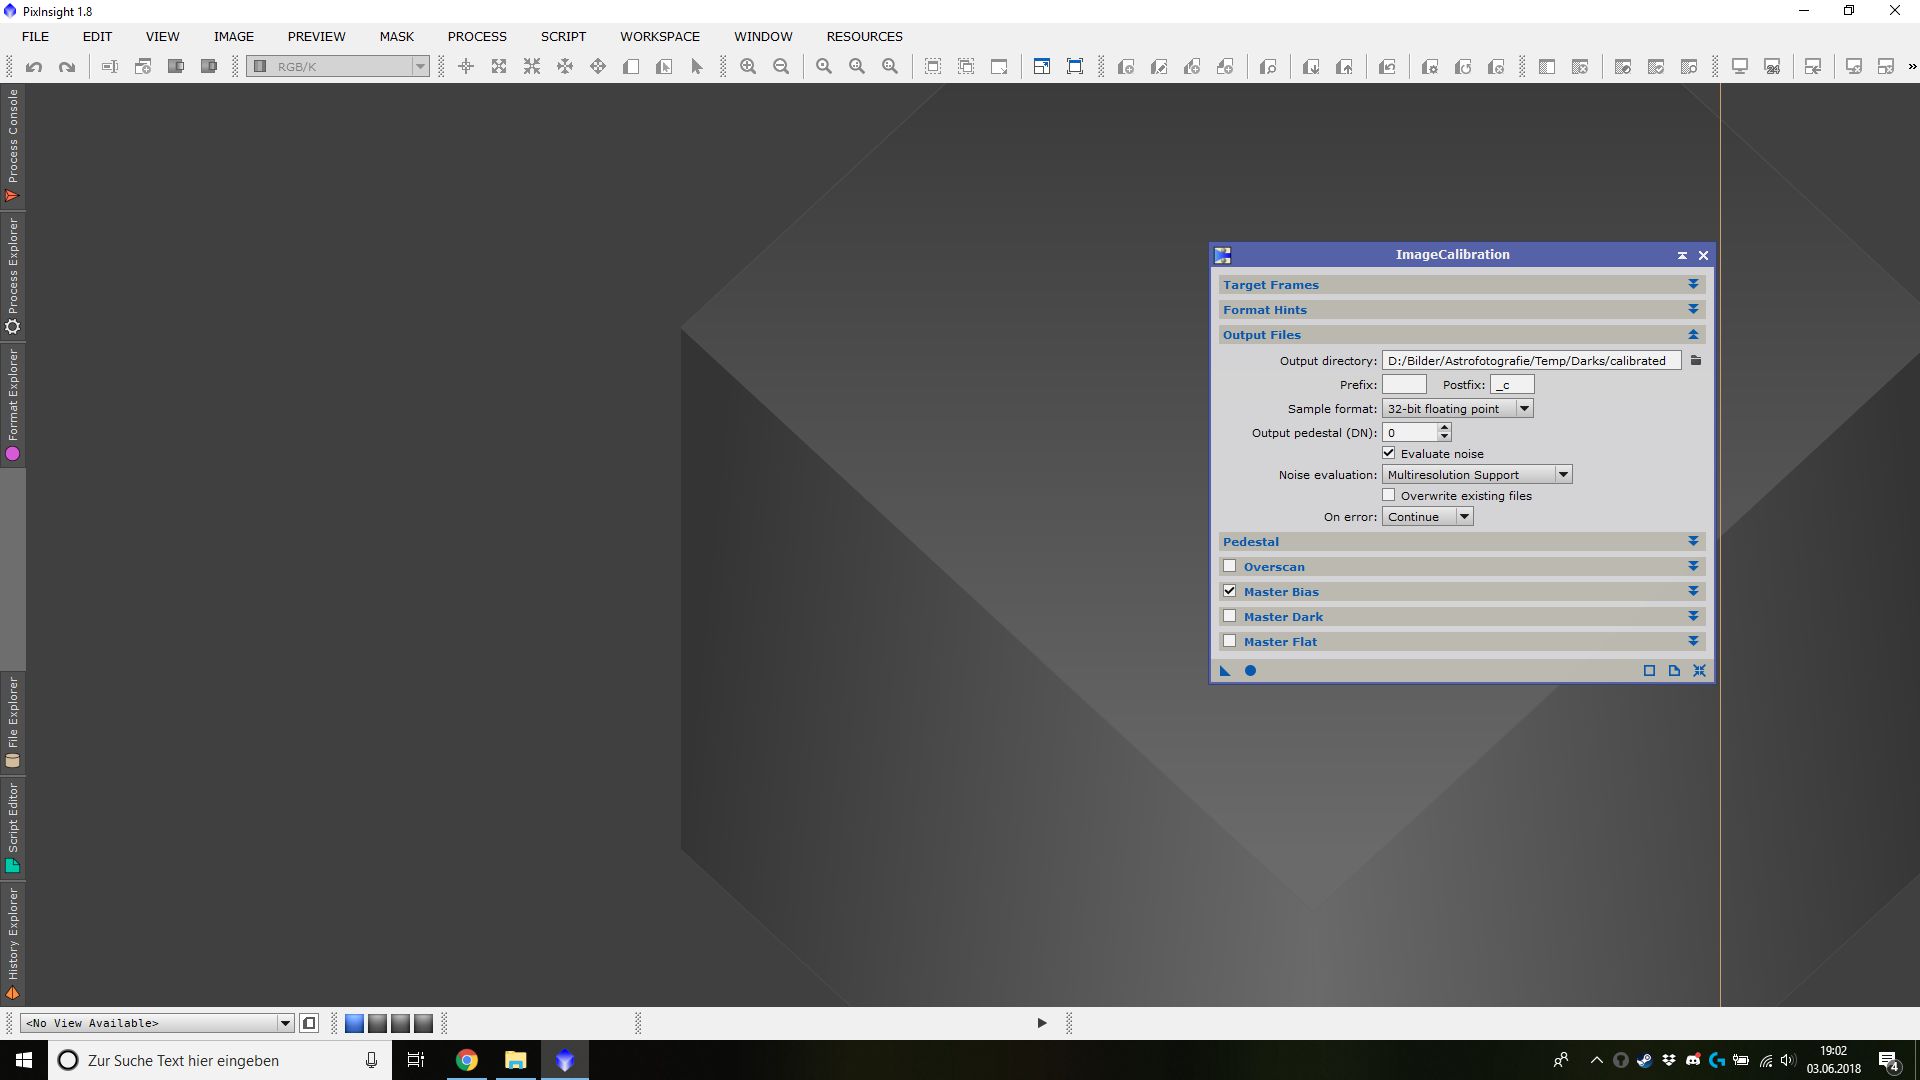
If you have added, all your dark frames go to the “Output Files” tab. Here we need to set the path were the calibrated images will be stored. I made a folder called “calibration” in the folder were my darks are. To choose the folder click the small folder icon on the right side.
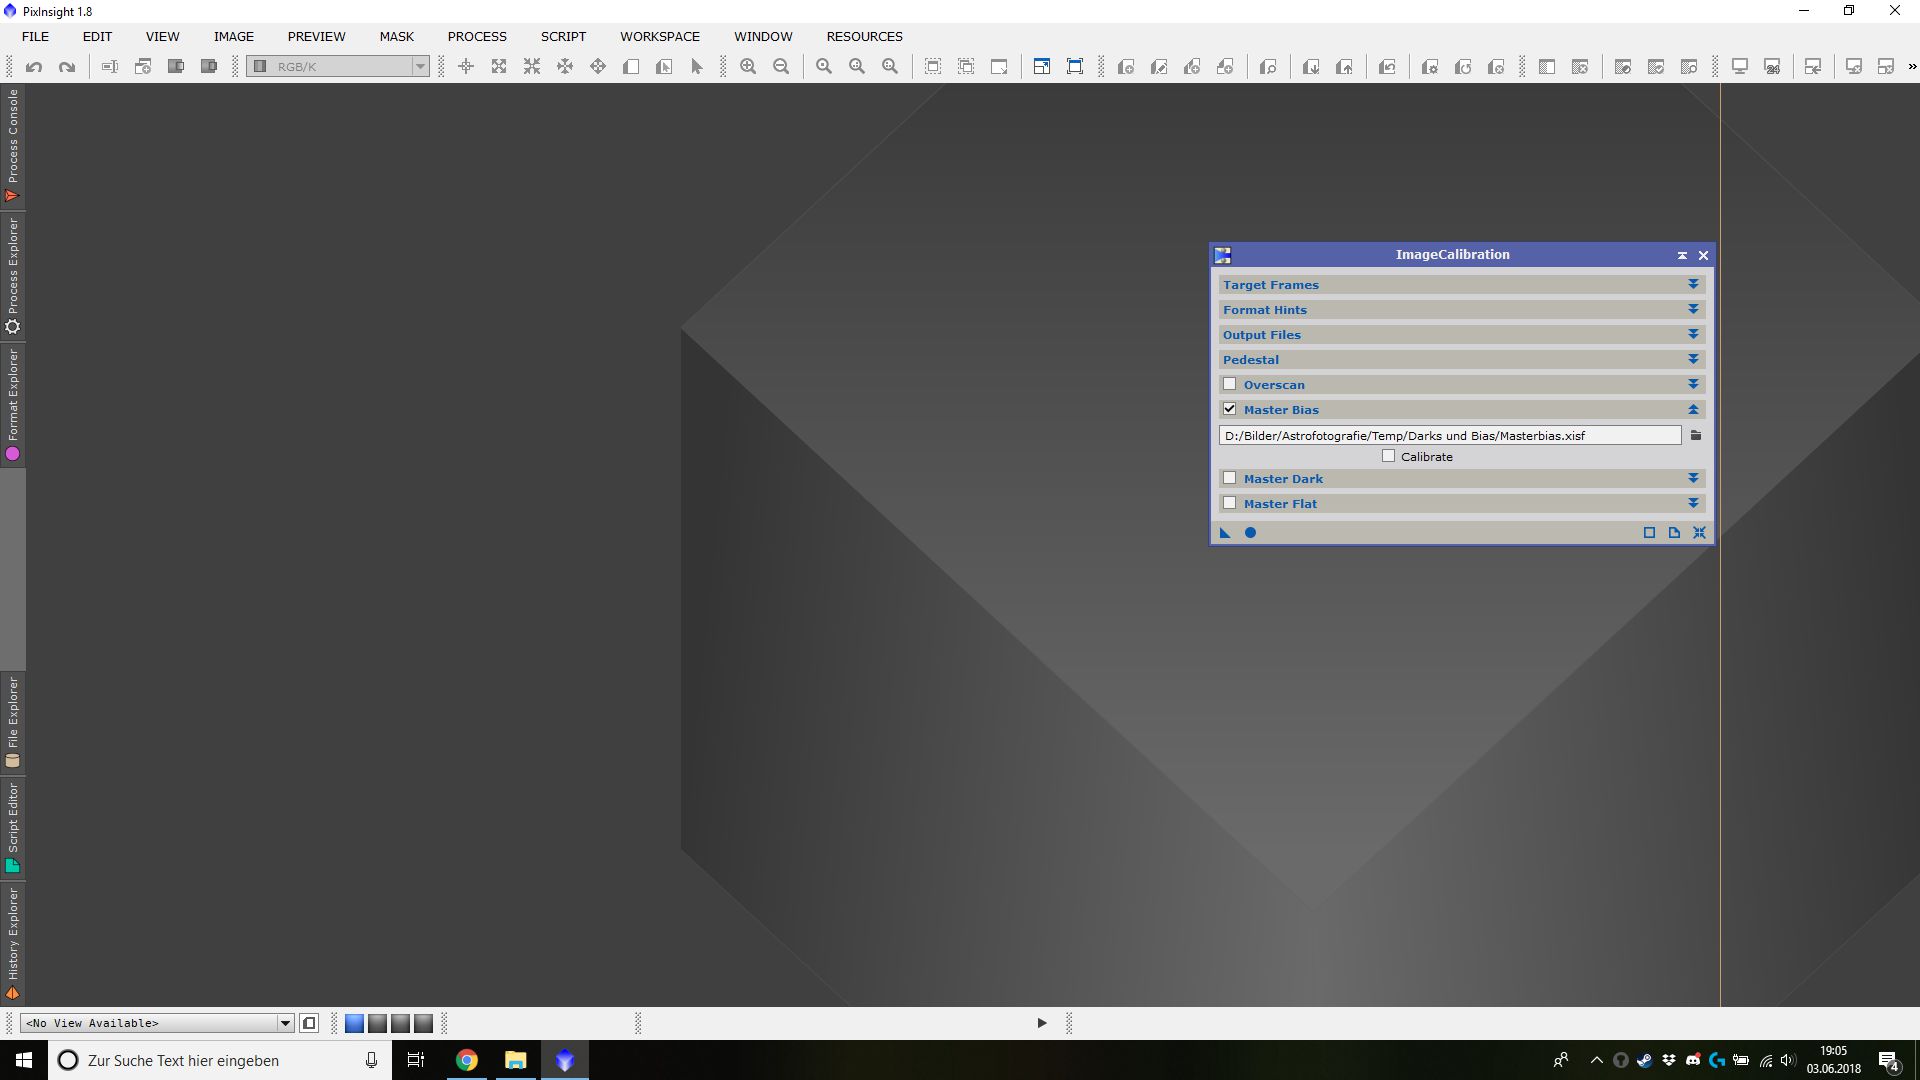
As we need to only calibrate with the master bias, we have to uncheck everything except “Master Bias”. Choose your master bias file by clicking on the small folder icon.
Once everything is set up, click the small circle (Apply Global) at the bottom of the ImageCalibration window, this will start the process.

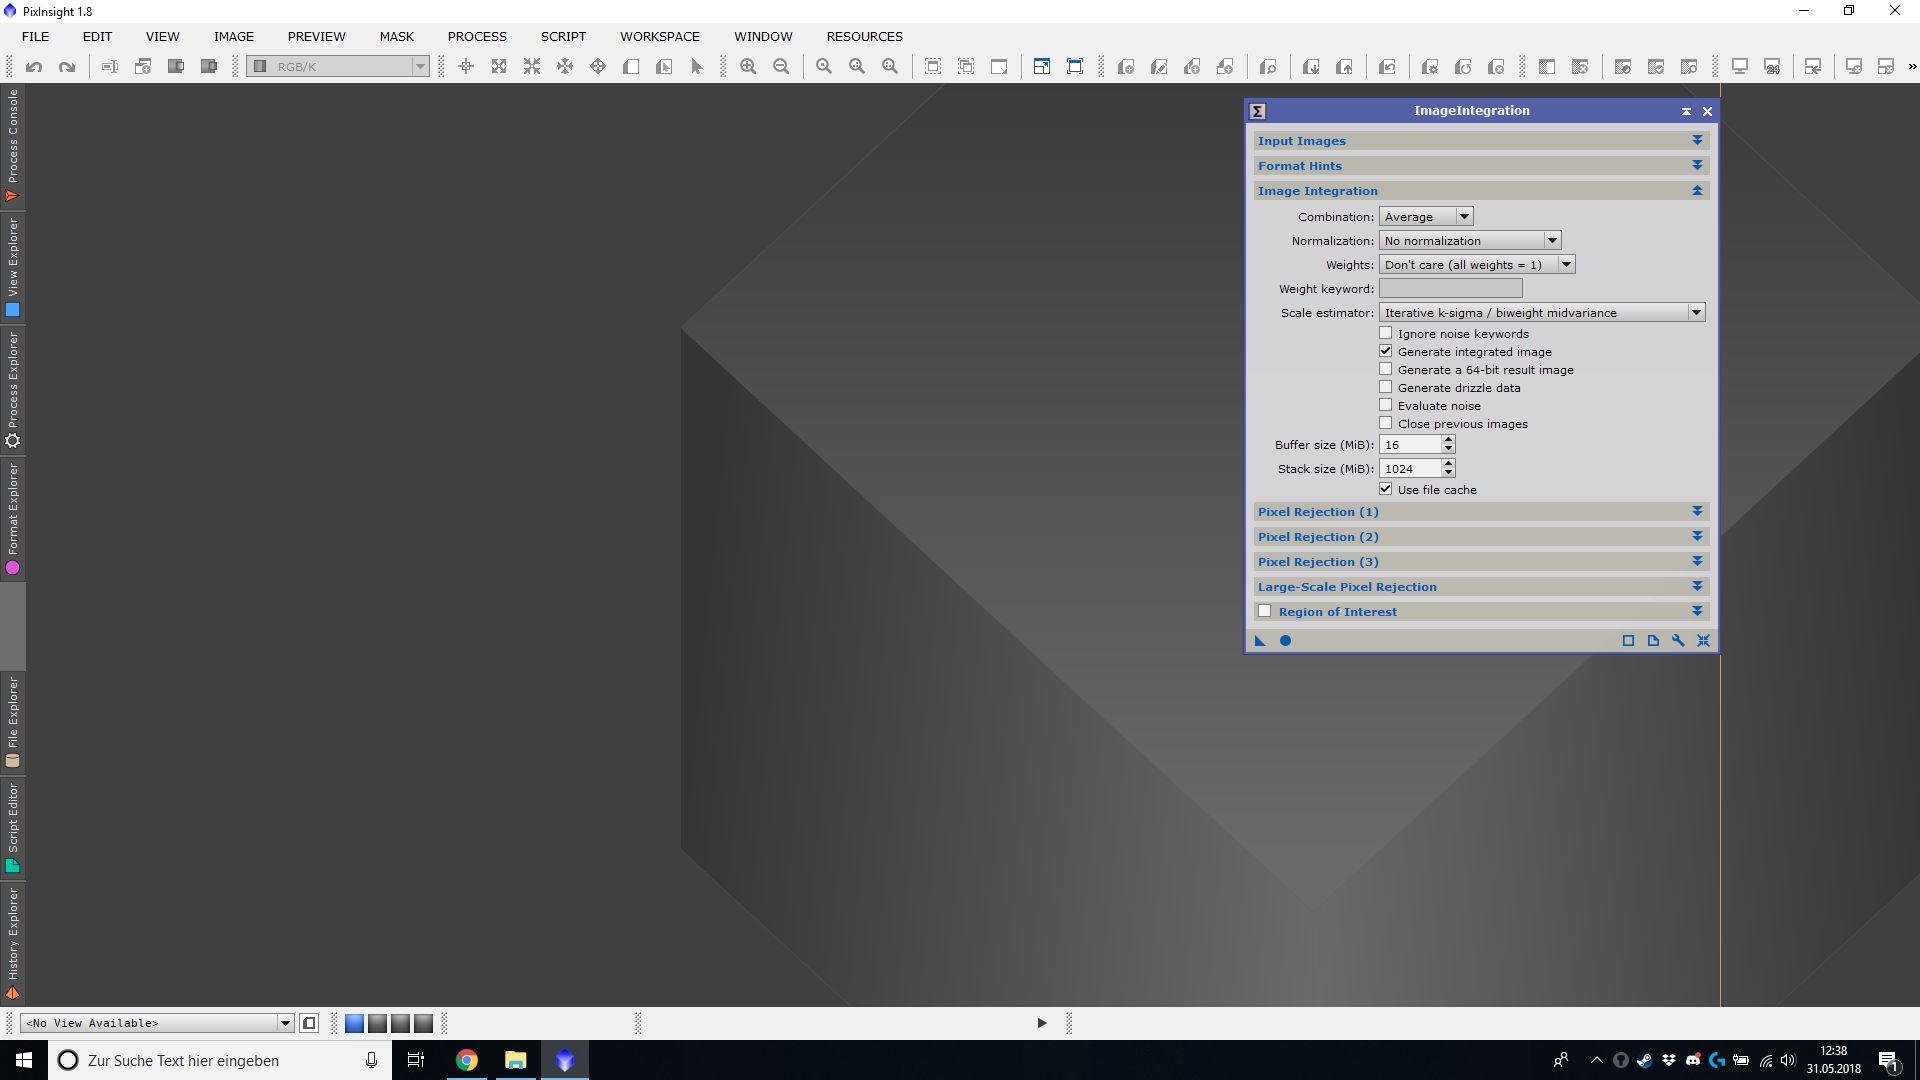
When the process has finished, we want to stack the calibrated dark frames. Open the ImageIntegration process (PROCESS -> ImageIntegration -> ImageIntegration) and add all of your calibrated dark frames by clicking “Add Files”.
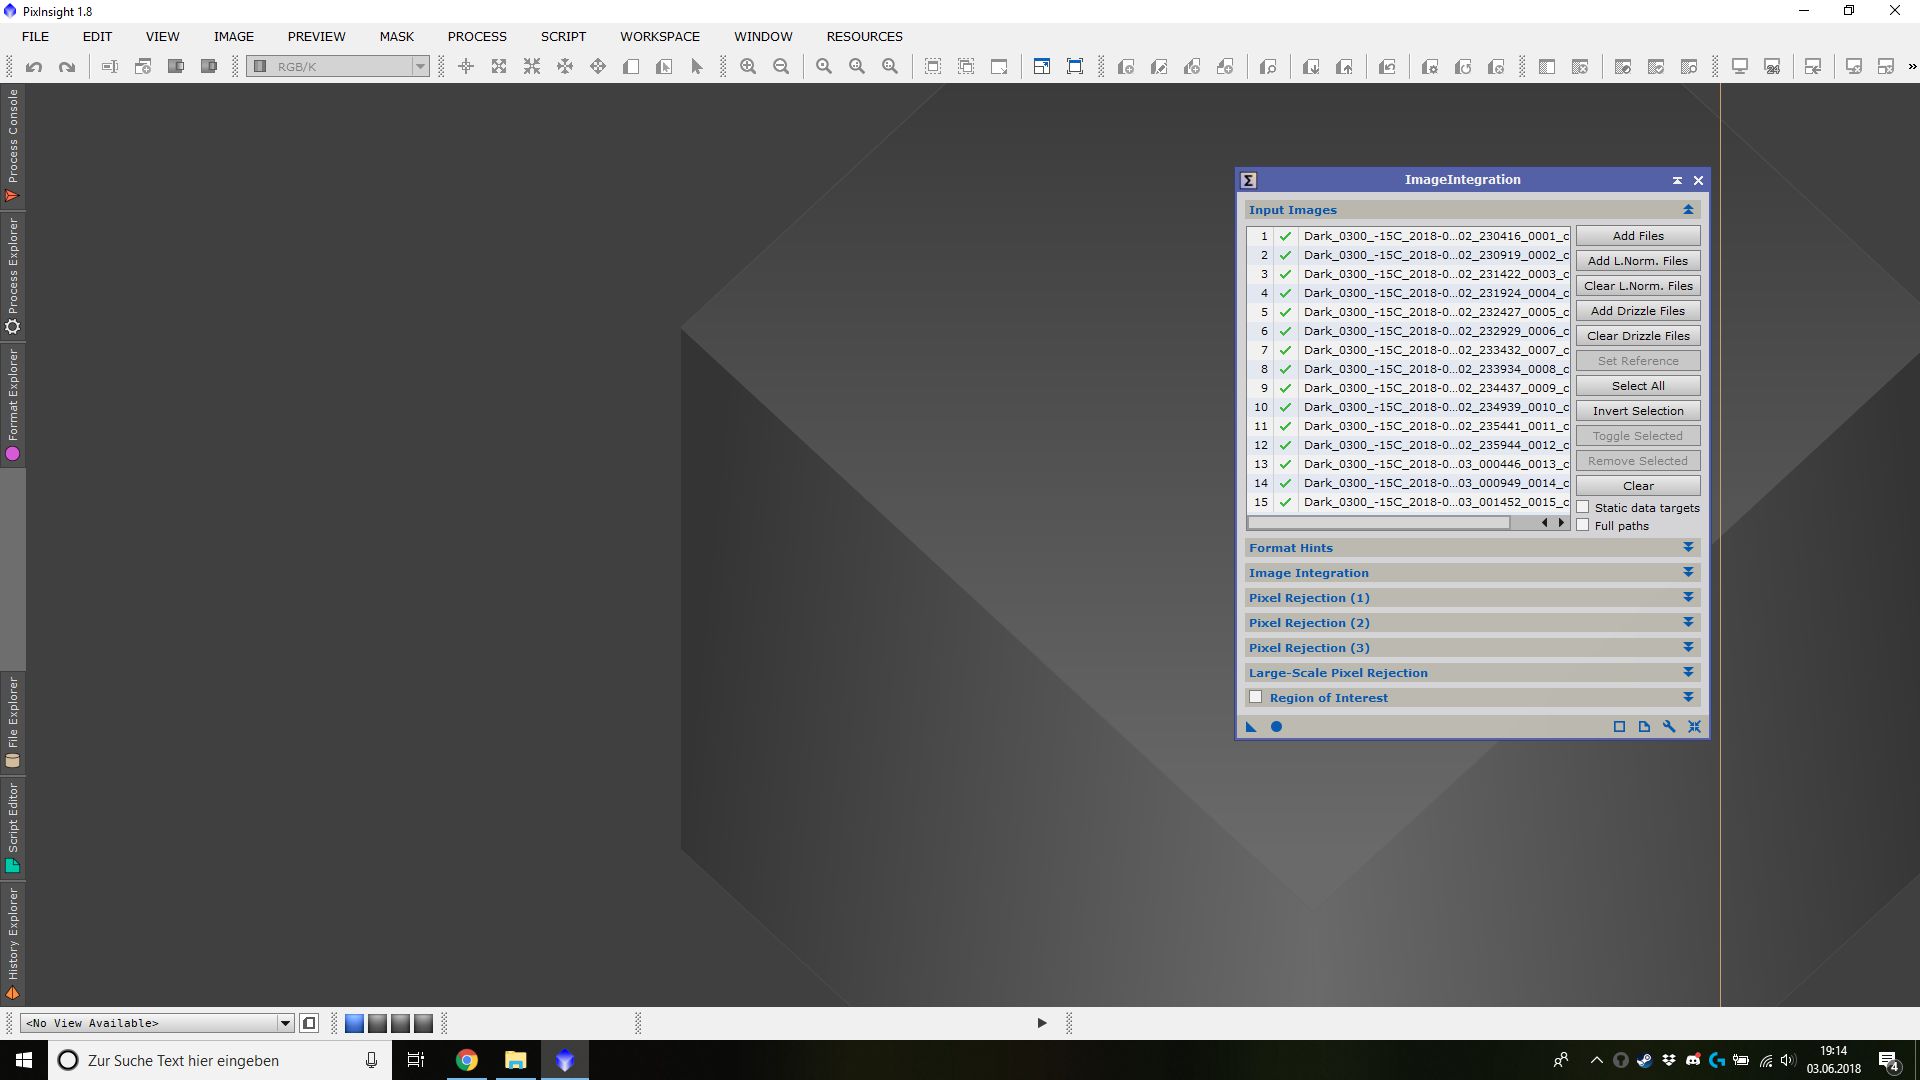
If you have added, all your darks go to the “Image Integration” tab. Here we need to make some settings. The settings here are the same as for the bias frames.
- Combination: Average
- Normalization: No normalization
- Weights: Don't care (all weights = 1)
- Check "Generate integrated image"
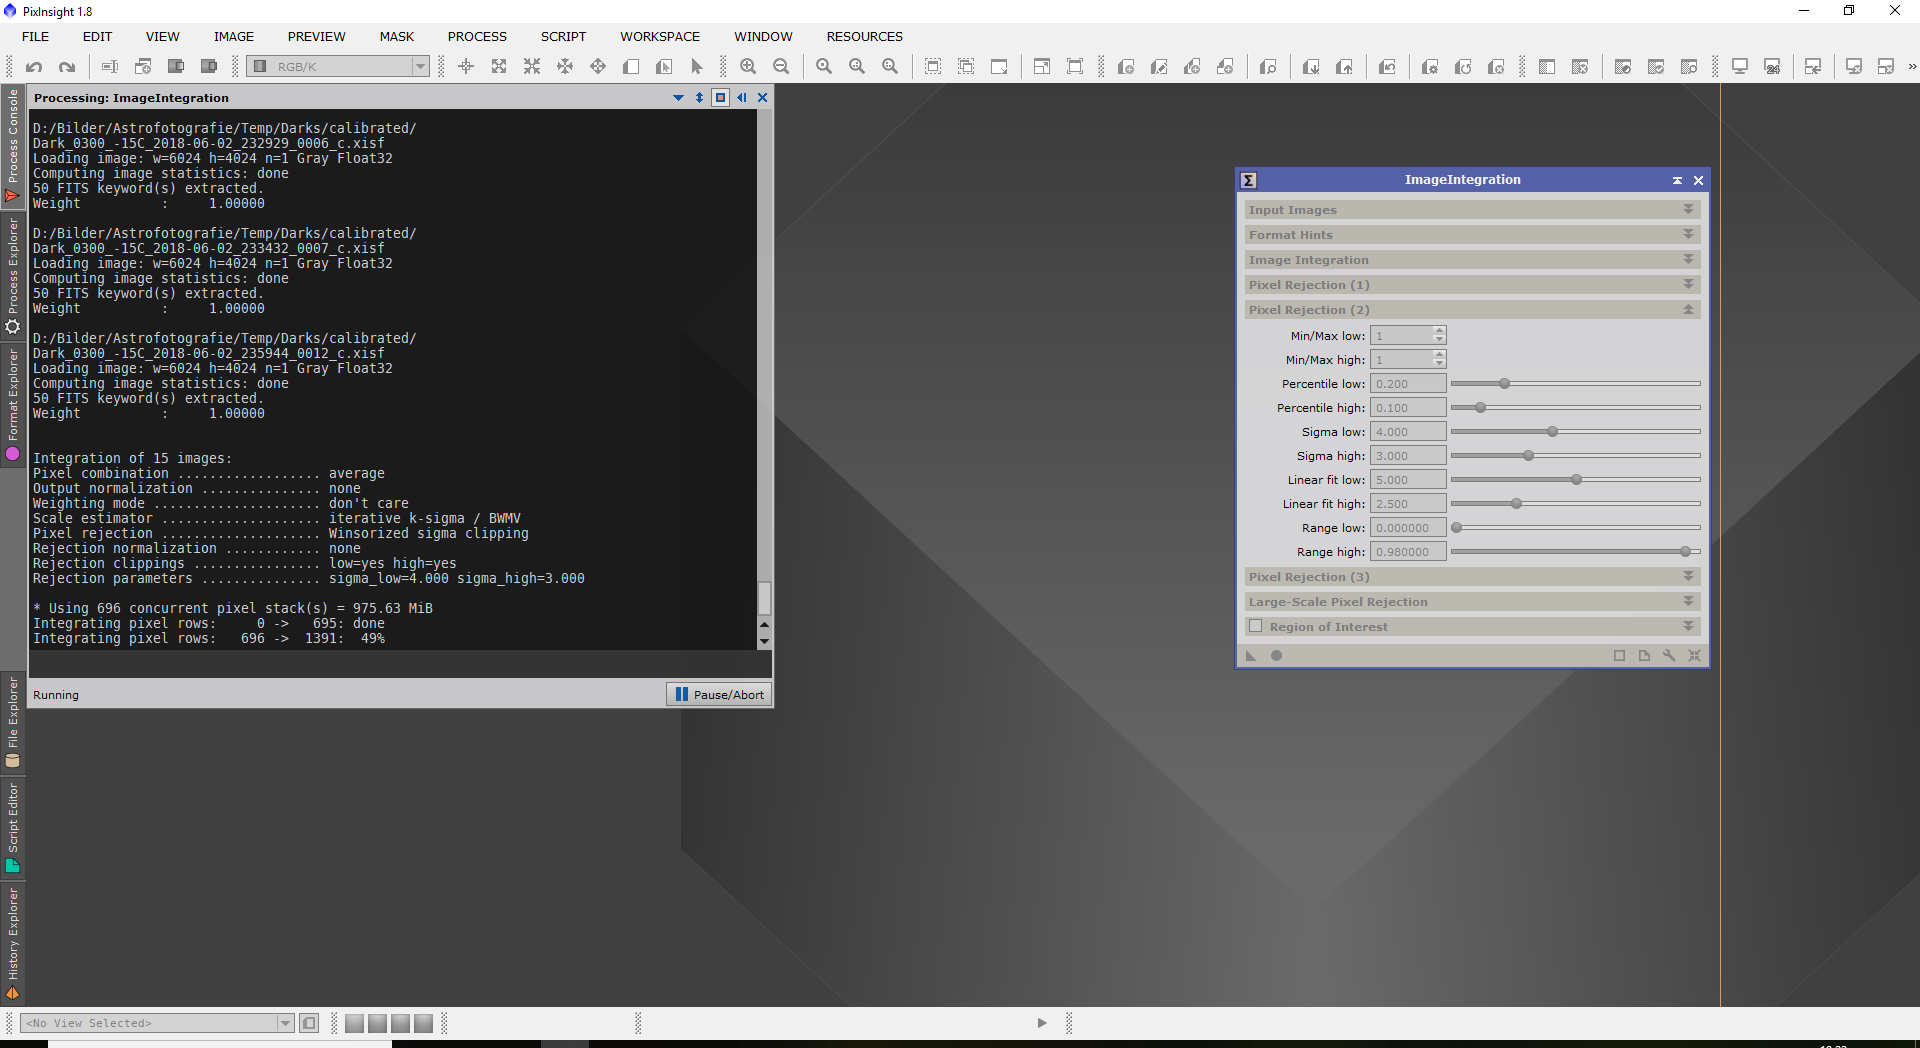
If you have set up everything like in the screenshot, go to the “Pixel Rejection (1)” tab. Here we use the following settings.
- Rejection algorithm: Winsorized Sigma Clipping
- Normalization: No normalization
- Check "Clip low pixels"
- Check "Clip high pixels"
Because we have less than 20 frames, we will choose “Winsorized Sigma Clipping” as the algorithm. As a small clue, you can use “Winsorized Sigma Clipping” <=20 images and “Linear Fit Clipping” if you have >20 images.
![]()
Have you everything set up? Then we go to the “Pixel Rejection (2)” tab. Here we will leave the default settings.
![]()
Once everything is set up and done, we click the small circle (Apply Global) at the bottom of the ImageIntegration window, this will start the stacking process. The process console will open and show you the actual status of the process.
After the process finished, a new image will appear. At first, save it. Maybe you will include more information in the filename? I will name mine “Masterdark_-15C_300S”. Use the PixInsight file format “.xisf”.
We will here also make an auto stretch with the ScreenTransferFunktion what information is in the master dark.
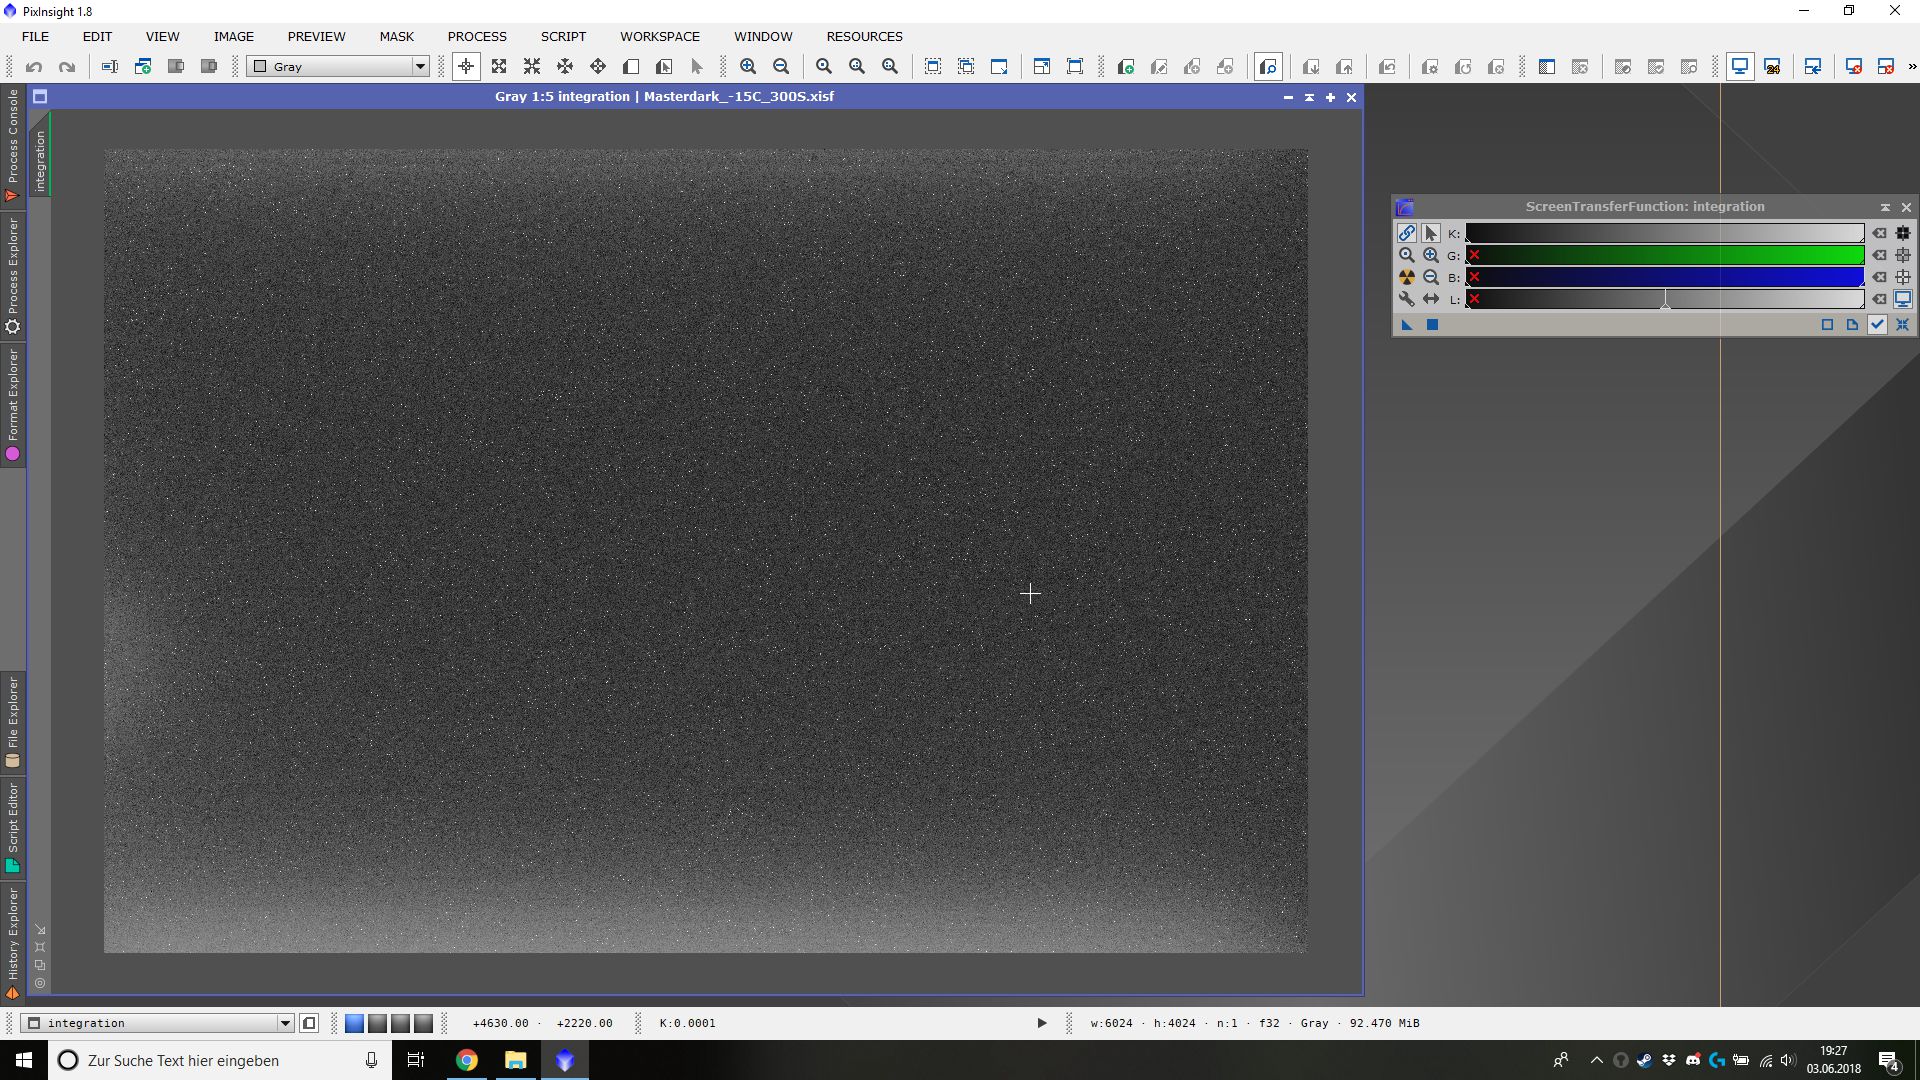
You see a lot of thermal noise that is produced by the sensor and you see also glowing from the electronics in and around the sensor. These are the brighter areas at the bottom, on the top, and on the left side.
Let’s also compare a single dark frame with the stacked master dark.
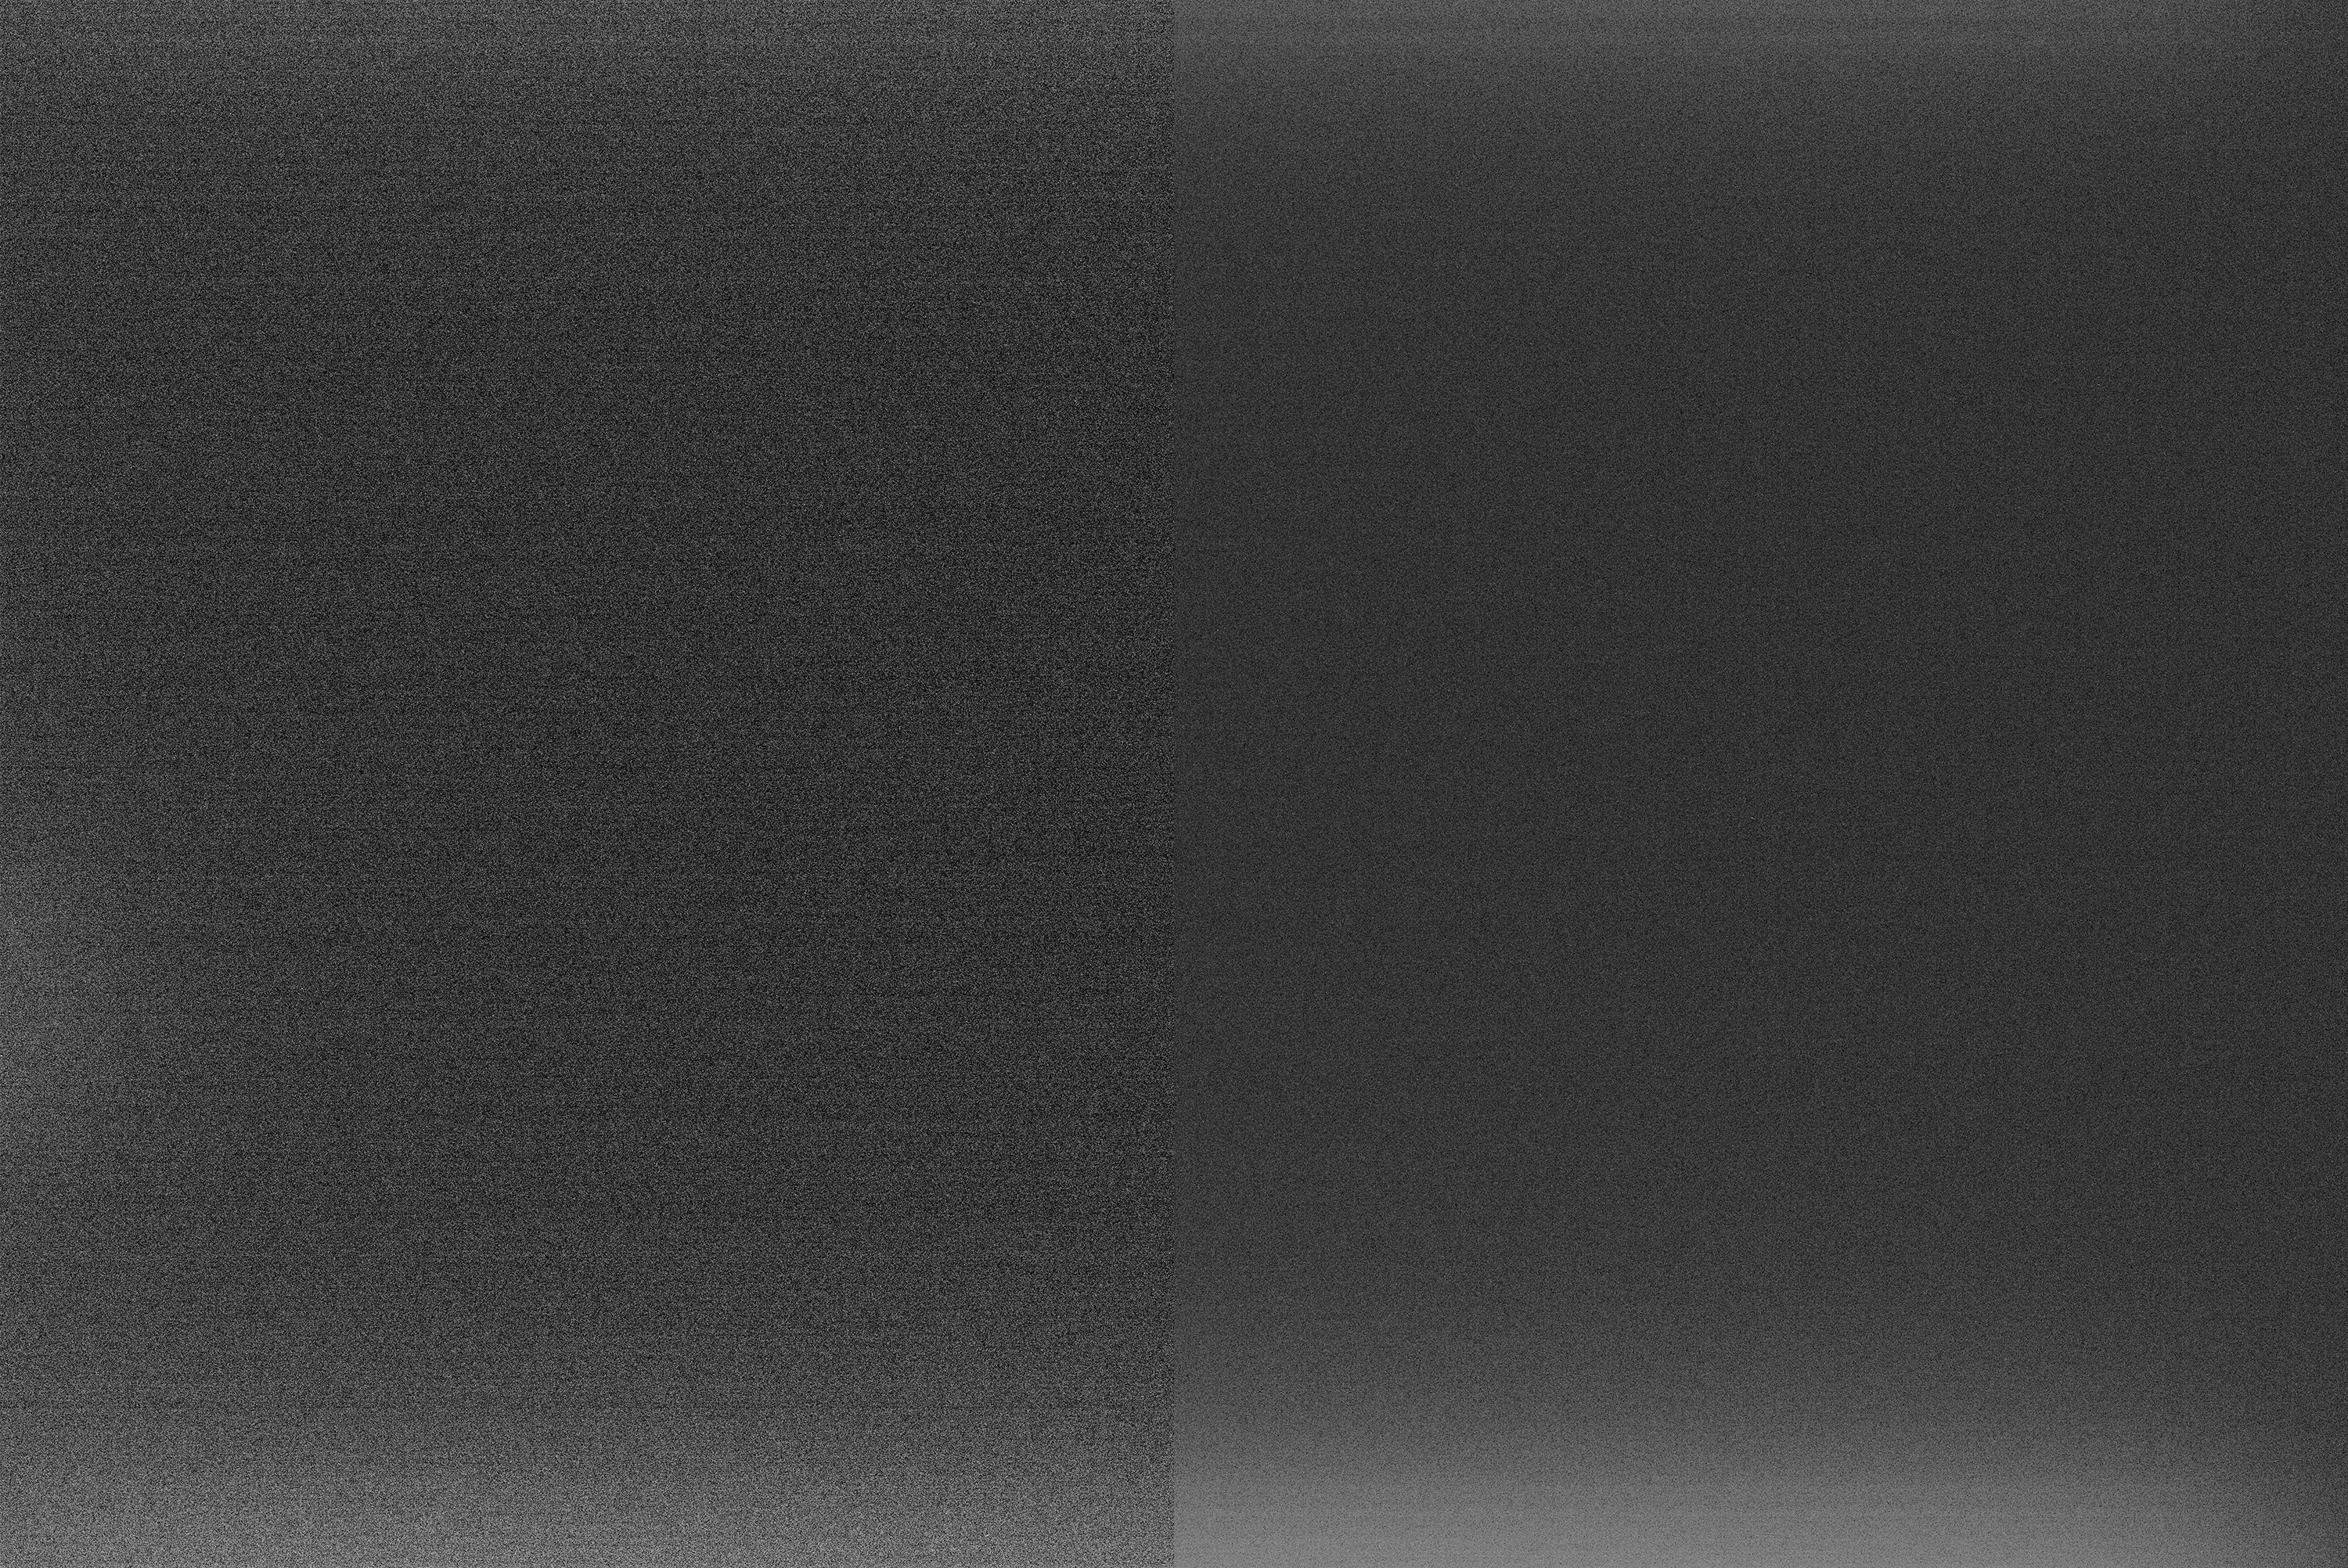
On the left is a single dark frame and on the right is the master dark. You see that the master dark has lower noise compared to the single dark frame. The noise that left is the noise that we need, the thermal noise of the sensor.
Conclusion
We now have the second type of calibration frame. With the master dark, we can subtract the noise, which appears while the sensor is exposing, from our light frames to improve the quality of our single frames and even much more in the final stack of our upcoming image.
Thank you very much for visiting and reading!
I hope that this has been a useful article for you. If you have any questions or suggestions please don't be afraid to let me know of anything you thought about this post!
Yours,
@astrophoto.kevin
All images, otherwise clearly indicated, in this post are my own work.
You can use it for free if you credit them to @astrophoto.kevin

Good read Kevin, I will have to get hold of a trial Pixinsight and give it a try.
Thank you very much, Terry :-)
If you try it, just let me know.
Hi @astrophoto.kevin! You have did very well. You have very nicely and in a simple way elaborated all things here!
Moreover, I liked the way of presentation that you put to get rid of the noises.
Have a good day ahead! You are doing very fine. Keep the spirit high! :)
Cheers!! :)
Thank you very much, mate :-)
I thank you very much for your kind words @star-vc :-)
I love this series!
Having learned this and had to do a reduction process (in IRAF tho), and having so much confusion about it at first... This is just so simplified yet very narrowly explained everything.
Very nice post! :)
Cheers!
Thank you very much for your warm words. It is a pleasure for me that you like it. :-)Thank you very much @svemirac :-)
Excellent explanation of how these type of images are processed :)
And the reduction of noise in the image is quite considerable.
Thanks for sharing this!
I'm really pleased that you like it . :-)Thank you very much @dedicatedguy :-)
Hi @astrophoto.kevin, just stumbled across your very interesting tutorial. You put a lot of effort in it, which I highly appreciate. Your tipps will help me big time with my first steps in that field. Well deserved upvote and looking forward to reading more from you...
Thank you @traveling-tobi, I am very glad that this tutorial is an aid to you. I wish you much fun with your first steps. if you need help, then just get in touch :-)
This is a great post to read, and as a photographer myself I think it's very valuable. Thank you for writing!
I'm happy that you like it. :-)Thank you very much @hetty-rowan
It's a specialism in photography that I have done nothing with ... yet! But with your tutorials I might give it a try, as soon as I got myself a new camera ...
Are you buying a new camera? Which one?
I will make a tutorial, which uses just a tripod and a camera and no special mounts or something. But unfortunately, I have to wait until late autumn or winter so that the objects are visible on the night sky.
Oh that's very nice. I hope to be able to buy the camera I want in de early winter around chrismas or so. And depending on what my earnings are on steemit I will have to wait even longer maybe ... But I got my mind set on a Nikon D750. I wish I could go for a D850 but that is just not realistic now. And my Nikon D300s can not do the trick any longer unfortunately. I don't have a job right now, my partner is working like crazy to pay the rent and other costs .. so all have to come from my blogging here on steemit. And that takes longer then I wish, but ... I will get to it.
The D750 is an excellent camera, two friends of mine have one. For me, the D850 would have too many pixels. In my eyes, all today's cameras are capable of making great pictures. Then I hope that your earnings would be enough for the D750 or the D850. Keep on blogging and you will see that all went fine. :-)
Thanks for your kind words. I know that the D750 is allready a fantastic camera. And I do have to keep in mind that my computer also needs to be able to handle the RAW files. So I will stick to the D750, and as I'm used to a D300s now ... I think it will be a very great upgrade.
Hi astrophoto.kevin,
LEARN MORE: Join Curie on Discord chat and check the pinned notes (pushpin icon, upper right) for Curie Whitepaper, FAQ and most recent guidelines.
Thank you very much for your support @curie
A great article! You are professionalism... Astrophotography is something wonderful!
Oh no, I'm far away from being professional. :-)Thank you very much @astromaniac
This post was shared in the Curation Collective Discord community for curators, and upvoted and resteemed by the @c-squared community account after manual review.
Congratulations @astrophoto.kevin! You have completed some achievement on Steemit and have been rewarded with new badge(s) :
Click on the badge to view your Board of Honor.
If you no longer want to receive notifications, reply to this comment with the word
STOPTo support your work, I also upvoted your post!