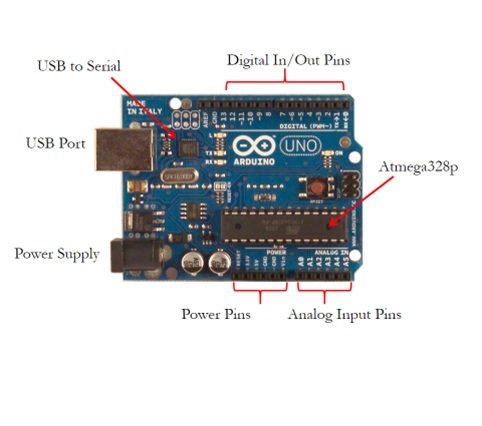
Have you ever looked at some gadget and wondered how it really worked? Maybe it was a remote control boat, the system that controls an elevator, a vending machine, or an electronic toy? Or have you wanted to create your own robot or electronic signals for a model railroad, or perhaps you’d like to capture and analyse weather data over time? Where and how do you start?
The Arduino board can help you find some of the answers to the mysteries of electronics in a hands-on way. The Arduino system offers an inexpensive way to build interactive projects, such as remote-controlled robots, GPS tracking systems, and electronic games. The Arduino project has grown exponentially since its introduction in 2005.
The Arduino Board
According to the Arduino website http://www.arduino.cc/, “Arduino is an open-source electronics prototyping platform based on flexible, easy-to-use hardware and software. It’s intended for artists, designers, hobbyists, and anyone interested in creating interactive objects or environments.”
In simple terms, the Arduino is a tiny computer system that can be programmed with your instructions to interact with various forms of input and output.
The Many Flavours of Arduino:
There are different types of arduino board, each depending on the Microcontroller present.
· Arduino Uno
· Arduino Leonardo
· Arduino Lily Pad
· Arduino Mega
· Arduino Nano
· Arduino Mini
· Arduino Mini Pro
· Arduino BT
In this Context, I will be making use of the Arduino Uno equipped with ATmega328 as the microcontroller.

Hardware Features
Microcontroller ----------------------------- Atmega328
Operating Voltage ------------------------- 5V
Input Voltage(recommended) ---------- 7-12V
Input Voltage(limit) ---------------------- 6-20V
Digital I/O Pins -------------------------- 14 (6 provide PWM)
Analog Input Pins ------------------------ 6
DC current per I/O pin ------------------ 40mA
Flash Memory --------------------------- 32 KB (ATmega328) of which 2 KB used by boot loader
SRAM -------------------------------------- 2 KB (ATmega328)
EEPROM --------------------------------- 1 KB (ATmega328)
Clock Speed ------------------------------ 16 MHz
*PWM – Pulse Width Modulation
Downloading and Installing the IDE
To install the Arduino IDE for Windows, MacOX and Linux follow these instructions:
· Using a web browser such as Firefox, visit the software download page located at http://arduino.cc/en/Main/Software/
· No installer needed, just unzip and install.
· Before running the IDE, make sure the board is plugged via a USB cable.
· If the board is not recognized, navigate to arduino under device manager to install the driver.
· Then run the IDE, it looks like the figure below.

In #2, we’ll learn How to Blink an LED using Arduino.
Am a Systems Engineering Undergraduate interested in studying and making research about facts of life, which has been helping a lot in my field of study.
Thanks for sharing this. Learning how to use arduino boards would be fun and useful. I'm curious how an arduino board compares to a raspberry pi. Is it that the programming is more intuitive for non coders?
Actually no, the difference between both is that Arduino can run a single program at a time while rasberry pi can run multiple programs which makes it more complicated to use.
In order words, arduino is simpler to use than rasberry pi because rasberry pi needs knowledge about linux operating systems.
But in either of the two, it depends on your choice.
Good stuff @ebook-wizard cheers.
Following for more.
Alright @hammaraxx
Nice post, are you on steemit chat?
Yes @ogochukwu