Ypu might need more battery storage. I mean it still depends on the amount of Sun you have where your solar panels are. To optimize my solar panels (1420 watts) I had 2-24V 450ah. But what you have works too
It is enough for sure, what I'm saying is that your solar array can produce more... you could have more battery storage, that's all. And therefore more mining rig!
Oh, yeah, that's what this test is all about. Honestly I am at the end of the budget for this project, but yeah, if I had more storage, that would be cool. The numbers I ran were also based on using the low power mode on the miner all day. I will be able to jack up the hashrate during the day then throttle it after the sun goes down. But yeah. I hear you. I think I am going a bit overkill on this one as far as solar, but I also have the automatic transfer switch on this rig, so I am going to be testing the limits. I can do it with 900W on 12V though easily too.
I'm finding out that Windows users have to log in through a Microsoft owned account, every time they initialize their pc... It blows my mind, cause it means that Microsoft (i.e., indirectly OpenAI and all their products) knows at every moment who's browsing the web and using that particular pc.
Nowadays there are several Linux OS that are even easier to handle than Windows (for example, Mint and Pop OS), to avoid exposing ourselves to such a daily rape.
Windows 10 at least still gives the option to create an offline account but it nags you about it. Not sure about Windows 11. I use Linux as much as possible anyway.
According to "Switched to Linux", Microsoft is taking steps to oblige all Windows users to run the OS on a TPM 2.0 chip equipped computer, a decision that concretely discards many machines that work perfectly well, and would go on working for several years.
So it seems there'll be more "healthy" pc's for sale in the coming months, ready for Linux distros to be installed on them 😀.
Hey industriousliv, thanks for your comment! Yes, it's kind of a life changing switch. Most Linux distributions also allow us to use machines that are 10 or 15 years old, without a glitch. I'd suggest you find an old (second hand) pc and install only "Linux Mint" on it, as choosing "dual boot" (having Windows & Linux on the same pc) often makes users come back to Windows for many tasks, due to their habits.
In the case of Linux Mint 21, its minimum specs are:
2 GB of RAM (4 GB recommended for comfortable usage)
20 GB of disk space (100 GB recommended)
1024×768 resolution
64-bit CPU (single core) with 2 GHz speed or better
If that laptop has a 64-bit CPU, you're good to go! If it's a 32-bit one, you'll have to stick with Mint 19.3, or - preferably - look for a lighter distribution (there are several of them).
I know you do, sometimes I take profits, as this shall be the purpose of all, yes skin in the game is important, but also to know, when to take profits, and use them wisely. I see some folks in here, use what they gain on survival, and this is a vicious cycle.
GM! I am grinding hard on getting INLEO’s prop approved so we can continue on with onboarding solana, Arbitrum and other major crypto ecosystems like Dash
I know, maybe it is not a secret, but I do the same, with some friends that did not vote for it. My friend from real life, Uwe voted already, so we try to push some others.
It was a busy day for me but the good thing is that it was a productive day and I am quite satisfied with how I ended my day. It's almost time of dinner, and right now, I am waiting for my father to return home to finish dinner together.
Day 226 of the #foodtalk on LeoThis is the #threadcast for , 5/2/2025. It's time for some meal inspirations and food conversation. Don't forget to use #foodtalk in your comments.
Discussion
Be part of the Food Talk Show On Leo. Here is Day 225 that leads you to the previous threadcasts.
Share your meals and food experiences.
Check out the food content and food summary videos in in the threadcast.
Share other food-related content and ask questions about food.
More about food with tips and tricks will be dropped in the threadcast. Upvote the comments you find interesting & connect with others. Let's have fun. #foodie
Are you looking for a quick and delightful breakfast option that your family will love? Look no further! In this article, we’ll guide you through the simple steps to create delicious banana waffles that are crispy on the outside and fluffy on the inside. Perfect for those overripe bananas too!
Getting Started: Preheat and Prepare
Begin by preheating your waffle iron, adjusting it to medium-high heat if possible. This ensures your waffles cook evenly and achieve that perfect golden color.
In a large bowl, combine 1 and ½ cups (or 180 grams) of all-purpose flour with 1 tablespoon of granulated sugar to sweeten your waffles slightly. Add 1 tablespoon of baking powder to help them rise, along with half a teaspoon of salt and 1 teaspoon of cinnamon to enhance the flavor profile. If you love spices, consider adding a touch of cardamom, allspice, or nutmeg for an extra kick.
Using a whisk, mix all these dry ingredients thoroughly to ensure an even distribution of flavors throughout the batter.
The key ingredient for these banana waffles is ripe bananas. You will need about 2 medium-sized bananas, which is approximately 1 cup when mashed (or 245 grams). If your bananas aren’t ripe enough, a quick hack is to bake them. Preheat your oven to 350°F (175°C), place the bananas on a baking sheet (still in their peel), and bake for about 10 minutes until they turn blackened. This process softens the texture and makes the bananas sweeter.
Mixing Wet Ingredients
In a separate medium bowl, mash the bananas and add half a cup (120 milliliters) of milk, 1 large egg, and 2 teaspoons of vanilla extract. Whisk these together until fully combined.
Now, it's time to combine the wet and dry ingredients. Pour the banana mixture into the bowl with the dry ingredients. Use a spatula to gently fold the mixture together. Be careful not to overmix, as this can lead to dense waffles. The goal is to have just combined elements with a lumpy batter, resembling that of a banana cake.
For added richness, incorporate a quarter cup of melted unsalted butter at this stage and mix until evenly distributed.
With your batter ready, scoop about one-third to half a cup of the mixture into your preheated waffle iron, depending on its size. Close the lid and cook for 3 to 4 minutes, or until the waffles are golden brown. Pay attention as the first waffle might take a bit less time, but subsequent batches will require a consistent cooking time.
To ensure crispy waffles, transfer them to a cooling rack immediately after they’re done. This allows steam to escape, preventing sogginess.
These banana waffles can be frozen for later enjoyment. Simply place them in a freezer bag, and they can last up to three months. Whenever you're craving waffles, pop them in the toaster or air fryer at 350°F (175°C) for a few minutes; they’ll come out just as delicious as when they were freshly made.
When serving, garnish your waffles with additional banana slices and plenty of maple syrup. The warm spices and banana flavor paired with sweet maple syrup create a delightful breakfast experience that’s hard to resist!
This easy banana waffle recipe is perfect for busy mornings, special brunches, or even a quiet weekend treat. Not only does it help reduce food waste by using ripe bananas, but it also fills your kitchen with delightful aromas and brings a smile to everyone’s face. Enjoy making these delicious waffles and share them with family and friends! If you love discovering new recipes, don’t forget to subscribe for more delightful culinary adventures!
If you're looking for a simple yet delightful snack that you can whip up quickly, look no further! John Canel from Preppy Kitchen shares a fantastic recipe for raspberry bars that are not only easy to make but also incredibly satisfying. This treat is perfect for grabbing on the go, and it has a lovely chewy texture with a balanced sweetness. Here’s how to prepare them.
Preparing for Baking
To start off, preheat your oven to 350°F (180°C). This temperature is ideal for baking your raspberry bars to golden perfection.
3/4 cup (170g) of room temperature unsalted butter
1 cup (240g) of seedless raspberry jam
The rolled oats give the bars their wonderful chewy texture. Make sure to use old-fashioned rolled oats, as quick oats are too small, and steel-cut oats are too thick for this recipe.
Mixing the Dry Ingredients
In a large bowl, combine the flour, baking soda, salt, and rolled oats. After mixing these dry ingredients together, add the brown sugar. It's helpful to crush any large clumps of brown sugar to ensure even mixing.
Give everything a good stir until all the ingredients are well combined. The mixture will form a crumbly texture.
Now, let’s add the room temperature unsalted butter. You want the butter to be soft enough that you can press it with your finger but not melting. To mix in the butter, use a fork or pastry blender to cut it into the dry ingredients until you achieve a crumbly texture. This step can be a fun activity for kids to help with as well!
Once everything is combined well, you’ll know it's ready when it holds its shape when pressed together.
Preparing the Baking Dish
Next, prepare an 8x8 inch square baking dish. Line the dish with foil, leaving about a 2-inch overhang on the sides, which allows for easy removal later. A quick spray with non-stick cooking spray will ensure nothing sticks to the dish.
Now, take 2/3 of the crumble mixture and evenly distribute it as your base layer in the baking dish, pressing it down firmly with clean hands.
Spread 1 cup of seedless raspberry jam over this base, making sure to leave a half-inch border around the edges. This helps prevent the jam from bubbling out while baking.
Use the remaining crumble mixture, pressing it together into larger clumps and then breaking them up before scattering it evenly over the jam layer. This technique is key to achieving a delightful crumbly texture.
Baking Time
Now it’s time to pop the bars into the oven! Bake at 350°F for about 35 minutes, or until the top is golden brown and the edges are bubbling.
Allow the bars to cool completely in the dish before using the foil to lift them out.
Once cooled, use a serrated knife to cut the bars into your preferred size. For generously sized pieces, aim for about 9 squares; the recipe on the blog suggests cutting them into 16 smaller squares if you prefer bite-sized treats.
Your raspberry bars are now ready to enjoy—chewy, crunchy, gooey, and perfectly sweet. Not only do they serve as a delicious snack, but they also keep well at room temperature for up to a week and can be frozen for up to three months.
Make sure to subscribe to John Canel’s Preppy Kitchen for more delightful recipes, and enjoy these gorgeous raspberry bars as a tasty treat anytime!
Making your own bread can be one of the most rewarding kitchen experiences. Not only do you get to enjoy a warm, fluffy loaf fresh from the oven, but you also control the ingredients, ensuring there are no preservatives or unwanted additives. In this article, we’ll explore how to make delicious, fluffy white bread from scratch, which promises to be a delightful addition to your table.
Warm water is crucial for activating the yeast; if it’s too cold, the yeast won’t foam, and if it’s too hot, it can kill the yeast. A good tip is to warm your mixing bowl beforehand to maintain the water temperature if you’re working in a chilly kitchen.
Activating the Yeast
In the bowl of a stand mixer, combine the warm water and sugar. Stir in the active dry yeast and let it sit for about five minutes until it becomes foamy. If your yeast doesn’t foam, that’s a sign it’s expired, and you’ll need to start over with fresh yeast.
While waiting for the yeast to activate, it's time to measure the flour. It’s crucial to get the correct measurement for optimal texture. If you have a scale, go for it; otherwise, fluff up the flour in the container, sprinkle it into your measuring cup, and level it off for accuracy.
Once you’ve got your flour, add the 2 teaspoons of salt and mix it in.
Mixing the Dough
After the yeast has foamed, it’s time to combine everything. Pour the flour and salt mixture into the yeast mixture along with the melted butter (make sure it’s not too hot). Attach the dough hook and mix on low speed until the dough comes together in a shaggy ball, then scrape down any bits stuck to the bowl.
Increase the mixer speed to medium-low and continue mixing for about 5 to 7 minutes until the dough is smooth and springs back when pressed lightly. The dough should feel wet but not overly sticky and should cling to the dough hook without sticking to your fingers.
If mixing by hand, flour a clean countertop and knead the dough until it gains elasticity.
First Rise
Transfer the dough to a lightly greased bowl, turning it to coat it in oil to prevent drying out. Cover the bowl and leave it in a warm place to rise for about 40 to 50 minutes, or until nearly doubled in size.
A nice trick is to preheat your oven to 100°F for a short time, then turn it off. Place your bowl inside for a cozy environment conducive to dough rising.
Once the dough has risen, punch it down to release the air, then transfer it to a lightly floured counter. Divide the dough into two equal parts.
Shape each piece into a rectangular form (9 by 12 inches is a good target), rolling it tightly from the short end to create a log. Pinch the seams tightly and tuck the ends under to form a loaf. Place the loaf seam side down in a greased loaf pan.
Second Rise
Cover the loaves lightly with plastic wrap and allow them to rise again for about 25 to 30 minutes until they poke above the edge of the pan.
Preheat the Oven
During the second rise, preheat your oven to 350°F so it’s ready when the bread is.
After the second rise, you can brush the loaves with melted butter for extra richness. Bake the loaves in the preheated oven for 30 to 35 minutes, until they turn a lovely golden brown.
Cooling and Slicing
Once baked, allow the bread to cool in the pan for a few minutes, then transfer it to a wire rack to cool completely. Slicing into the finished loaf reveals a soft, pillowy texture that is simply irresistible.
Conclusion
Homemade white bread is a comforting, satisfying endeavor that fills the kitchen with a delightful aroma. With this easy-to-follow recipe, you can now enjoy bakery-quality bread right from your own oven. Don’t forget to share with friends and family, and if you loved this recipe, be sure to check out more amazing recipes for future baking adventures!
Bitcoin is doing its think
Ethereum has changed but thriving
Dash is killing it like always
Steem started off bad but was reborn has Hive
Litecoin founder promised everyone privacy features then dumped on everyone’s head at the top, price never recovered
Monero is actually the closest thing I can think of as Digital Cash if we are speaking honestly however it has a lot of risks no one talks about and the Law hasn’t been very easy on it
And of course none of us expected Doge to be doing what its doing now
I wonder how many people got a couple of Dash masternodes and kept them for the past 10 years :)
Thanks I will try and look around inLeo and use it more
I just started these recently to keep me busy over winter when I do not get out for photo walks, but this was my fourth one i have done and 7 more to do :)
yes. that happens on other places on hive. I don't mind them because the fade away and it doesn't cost us much in the long run. But, I want to identify those that want to be real lions. Thats where i want my votes to go
Khal — Today at 6:46 PM @everyone We’re aware of some missing delegation payouts to @leo.voter HIVE POWER delegators the past week or so. Hive Engine has been facing some intermittent outages / DDoS attacks that have slowed blocks and caused some missed delegator payouts of LEO on our end.
We will remedy these when HE is fully back online. You may see a missed payment today and a random few from the past few days. We are tracking which ones have been missed and all will be remedied once everything has stabilized.
now that would be super awesome. But I think a Leo meme coin should come when Leo is about to hit huge user base milestones so it can pick up otherwise the Leo itself has dipped too much
The fascinating world of overunity devices has intrigued inventors and enthusiasts for decades. In a recent video response, the creator demonstrates a simple yet effective mechanical device, showcasing the mechanisms behind its operation and the principles that might lead to overunity conditions.
At the heart of this demonstration lies a modestly designed spinning rotor device. Crafted some time ago, it relies on basic mechanical components instead of complex solid-state electronics. The rotor is equipped with two sets of neodymium magnets, pivotal for its functionality. A notable feature is the 10-pound steel weight placed atop the rotor, which serves to illustrate the machine's ability to handle substantial loads.
The creator highlights that the rotor operates on inexpensive lazy Susan bearings, demonstrating that intricate designs are not always necessary for successful operation. At its core, the device employs a solenoid powered by standard batteries, with AA-batteries typically preferred due to their manageable heat output when using this particular solenoid.
One insight the creator shares is the potential vulnerability of solid-state devices during events like an EMP (electromagnetic pulse). By sticking with a largely mechanical system, the creator emphasizes longevity and operational stability—qualities that can be compromised in high-tech electrical systems. This philosophy results in a design that is both robust and reliable, capable of functioning under various conditions.
The construction of the rotor features a micro switch that activates the solenoid periodically. The mechanism engages and disengages as the rotor turns, effectively harnessing the power of the neodymium magnets. This design is reminiscent of Rube Goldberg machines—complex assemblies where each action leads to another—showcasing a whimsical and ingenious approach to operational engineering.
The Power of Repulsion
During the demonstration, the creator spins the rotor manually to get it started, and once engaged, the device continues to rotate smoothly. While he mentions the capability to handle weights of up to 30 pounds, it is evident that the current setup with a 10-pound weight is already pushing the boundaries of the device's mechanical prowess.
The demonstration vividly illustrates the fundamental principle that underlies the operation of many overunity devices: the interaction between the force fields of permanent magnets. By leveraging these natural properties, the creator effectively demonstrates that such a device can sustain motion with minimal energy expenditure.
High Frequency Resonance and Replication
For those interested in replicating such devices, the creator suggests that methods relying on high-frequency resonance or simple mechanical rotary designs utilizing neodymium magnets are the most promising pathways to explore. The simplicity of the mechanical design may appeal to those without extensive training in electronics, making it potentially accessible for a broader audience.
The creator expresses confidence in the capabilities of the device, suggesting that it can run for extended periods without significant power draw. This assertion challenges conventional perceptions of energy use and efficiency, hinting at exciting possibilities in the field of energy generation and mechanical devices.
Conclusion: A Step Towards Understanding
Ultimately, the video serves as an intriguing glimpse into the mechanics and potential of overunity devices. By demonstrating a simple rotor device that operates on basic mechanical principles, the creator provides valuable insights into a domain often shrouded in complexity and skepticism.
With a focus on mechanical reliability and the principles of magnetism, the exploration of these devices opens doors for further inquiry and innovation in the realm of energy production—offering hope for a future where efficiency and sustainability can be seamlessly integrated into design.
As the creator wraps up the demonstration, the message is clear: understanding and exploration are key to unlocking the vast potentials of energy systems, making it a captivating topic for inventors and enthusiasts alike.
The exploration of gyroscopic systems often fascinates engineers and enthusiasts alike. In this article, we delve into an intriguing demonstration involving a 32-inch diameter gyro wheel and the concepts of torque, energy conservation, and mechanical output.
The Setup
Our starting point is a gyro wheel that has a considerable weight of close to 50 pounds. This mass provides a solid foundation for our exploration of gyroscopic principles. Central to this setup is a motor connected to the wheel, which is rated at 2.5 inch-pounds of torque when operating at 12 volts.
At the outset, the gyro wheel is powered using six volts, a voltage that's notably less than the motor's maximum rating. When activated, the motor struggles to impart significant motion to the wheel. The comparison indicates that, despite the wheel being powered, there is minimal visible torque produced. This initial observation emphasizes the challenges associated with spinning large, heavy objects with low-torque motors.
Torque and Power Calculations
Digging deeper into the discussion of power and torque, it's noted that under certain conditions, the gyro wheel can sustain a theoretical output of around 1,200 horsepower. The motor, while seemingly underpowered at 2.5 inch-pounds, is effectively working within the constraints of the system’s physical laws.
This scenario invites contemplation of energy conservation principles. The concept illustrates that while the motor generates limited torque when powered, the spinning wheel possesses stored energy that enables it to sustain motion even when power is disconnected. This phenomenon illustrates the balance of energy inputs and outputs within a mechanical system.
In summary, the demonstration highlights the intricate relationship between torque, energy conservation, and mechanical potential in a gyroscopic system. With a relatively low-output motor, the gyro wheel manages to perform substantial work, effectively bridging the gap between theoretical concepts and practical applications in mechanics. This experiment serves not only as an insightful exploration of physics but also as inspiration for those interested in the efficiency and capabilities of gyroscopic motion.
I think we are too early for this. Low rewards can send many users to post less. We are past the most inflationary years. $LEO should be fine as it is.
That's a hard decision... if there was enough coming from leodex Then I would say yes. Though to tell you the truth I don't have me mind completely wrapped around the mechanics of it so, I wouldn't be able to say yes or no with confidence.
The Miami Heat are finalizing a trade to send Jimmy Butler to the Warriors for Andrew Wiggins, Dennis Schröder, Kyle Anderson and a protected first-round pick, per @ Shams Charania
With the recent price drop, we as a team have bought and burned 100k Gifu tokens on the BSC side, which goes on to further solidify our stance as a deflationary token. Now is the best time to buy if you've not loaded up on some Gifu tokens.
The INLEO Referral Program. I got my 20th referral today. 🦁
One good thing about the referral rewards is that, no matter how much $LEO is, your total LEO earned remains the same and when the price goes up, you already know what happens. 😊
Are you referring your friends and followers on Web 2 platforms to INLEO?
Brilliant quote! Definitely holds true, with these few methods it has helped me accumulate so much more Hive in the long run, I shared the LEO post in the thread :D
of all the times I see yaga pictures in your threads I think this is the one I'm seeing yaga in cool mood. IV seen yaga when she's not feeling the day, it's so funny
Had a great lunch with my financial mentor (also a cousin) and looks like things are all on the right path with all the things I am doing!
He even bought a couple of DG Home 1 $DOGE miners that he is going to set up in his house and want to invest with me in the solar mining infrastructure after our last lunch!
So now it's time to do all the numbers and figure out what makes sense for both of us! Who knows, we could scale up to be the next RIOT or MARA, lol. I wish, but hey, who knows? LOL.
Yes, the Dogecoin ecosystem has been cooking a couple of significant improvements, among which the ZKP layer 2 they'll launch and the "Doge OS". Seems to be a reasonable bet 🙃.
I know. I thought the reintegration would be the cliffhanger for the next season. But, it is not and that means the next seven episodes will have more answers or more questions.
This just doesn't seem right to me. If there is corruption in the CIA, just changing sides and going with #Trump isn't going to fix it. #news #politics
Just had one of those moments where it all came together and makes sense...
The modular solar mining design is all coming together!
Love hearing that! Sometimes pushing onwards is tough but these moments make it worthwhile every time!
For sure! Dreams will be coming true this year!
Would love to see your set up... ae you on batteries too or on the grid?
I’ll show it when it’s built. Waiting on the last panel.
👍
yes. 2-12V 300ah 🔋
Ypu might need more battery storage. I mean it still depends on the amount of Sun you have where your solar panels are. To optimize my solar panels (1420 watts) I had 2-24V 450ah. But what you have works too
Nah, it'll be enough, I should even have some left over. I lived on solar only for 4 years.
It is enough for sure, what I'm saying is that your solar array can produce more... you could have more battery storage, that's all. And therefore more mining rig!
Oh, yeah, that's what this test is all about. Honestly I am at the end of the budget for this project, but yeah, if I had more storage, that would be cool. The numbers I ran were also based on using the low power mode on the miner all day. I will be able to jack up the hashrate during the day then throttle it after the sun goes down. But yeah. I hear you. I think I am going a bit overkill on this one as far as solar, but I also have the automatic transfer switch on this rig, so I am going to be testing the limits. I can do it with 900W on 12V though easily too.
!BBH
Having a break… #hive
Such a nice view.
I'm finding out that Windows users have to log in through a Microsoft owned account, every time they initialize their pc... It blows my mind, cause it means that Microsoft (i.e., indirectly OpenAI and all their products) knows at every moment who's browsing the web and using that particular pc.
Nowadays there are several Linux OS that are even easier to handle than Windows (for example, Mint and Pop OS), to avoid exposing ourselves to such a daily rape.
#privacy #surveillancesociety #linux #windows
Windows 10 at least still gives the option to create an offline account but it nags you about it. Not sure about Windows 11. I use Linux as much as possible anyway.
Ok, interesting!
According to "Switched to Linux", Microsoft is taking steps to oblige all Windows users to run the OS on a TPM 2.0 chip equipped computer, a decision that concretely discards many machines that work perfectly well, and would go on working for several years.
So it seems there'll be more "healthy" pc's for sale in the coming months, ready for Linux distros to be installed on them 😀.
Hey industriousliv, thanks for your comment! Yes, it's kind of a life changing switch. Most Linux distributions also allow us to use machines that are 10 or 15 years old, without a glitch. I'd suggest you find an old (second hand) pc and install only "Linux Mint" on it, as choosing "dual boot" (having Windows & Linux on the same pc) often makes users come back to Windows for many tasks, due to their habits.
For sure!
In the case of Linux Mint 21, its minimum specs are:
2 GB of RAM (4 GB recommended for comfortable usage)
20 GB of disk space (100 GB recommended)
1024×768 resolution
64-bit CPU (single core) with 2 GHz speed or better
If that laptop has a 64-bit CPU, you're good to go! If it's a 32-bit one, you'll have to stick with Mint 19.3, or - preferably - look for a lighter distribution (there are several of them).
#gmfrens, I'm using the tag, even if I don't know if it is obsolete or not. Today will continue to accumulate and stake some coins. How about you?
Always stackin!
I know you do, sometimes I take profits, as this shall be the purpose of all, yes skin in the game is important, but also to know, when to take profits, and use them wisely. I see some folks in here, use what they gain on survival, and this is a vicious cycle.
GM! I am grinding hard on getting INLEO’s prop approved so we can continue on with onboarding solana, Arbitrum and other major crypto ecosystems like Dash
I know, maybe it is not a secret, but I do the same, with some friends that did not vote for it. My friend from real life, Uwe voted already, so we try to push some others.
You’re awesome for this. Thank you!
I won’t forget it 🦁
Next Hivefest we sit and talk a little more, if we attend. Last year, I couldn't attend.
Well yeah... how will you be stacking coins today?
Well, I have some $SOL to stake, some $ETH, and now that L2 is back online, will do some internal $HIVE tokens stacking.
My $LEO upvote is now worth $0.01. How did that happen so fast?
#curation #leo
It happens because you are engaged.
75 #spanish #bbh #hive #cent #inleo ja, ja, ja
It was a busy day for me but the good thing is that it was a productive day and I am quite satisfied with how I ended my day. It's almost time of dinner, and right now, I am waiting for my father to return home to finish dinner together.
#day #activity #productive #plan #dinner #wait #cent
The important thing about ending a busy day is that it has been productive and that at the end you feel satisfied with what you have done.
WELCOME TO THE FOOD TALK ON LEO SEASON 3
Hello foodie Lions 🦁! Happy Wednesday. Welcome to today's show. 🥗🍲🫕
Day 226 of the #foodtalk on LeoThis is the #threadcast for , 5/2/2025. It's time for some meal inspirations and food conversation. Don't forget to use #foodtalk in your comments.
Discussion
More about food with tips and tricks will be dropped in the threadcast. Upvote the comments you find interesting & connect with others. Let's have fun.
#foodie
Day 226. Feel free to share your food experiences and your meals.
Welcome friends to the #foodtalk on Leo,
Preppy Kitchen- Easy Banana Waffles Recipe.
#foodtalk #bananawaffles #waffles #recipes!summarize
Part 1/7:
Delicious Easy Banana Waffles Recipe
Are you looking for a quick and delightful breakfast option that your family will love? Look no further! In this article, we’ll guide you through the simple steps to create delicious banana waffles that are crispy on the outside and fluffy on the inside. Perfect for those overripe bananas too!
Getting Started: Preheat and Prepare
Begin by preheating your waffle iron, adjusting it to medium-high heat if possible. This ensures your waffles cook evenly and achieve that perfect golden color.
Whisking Together the Dry Ingredients
Part 2/7:
In a large bowl, combine 1 and ½ cups (or 180 grams) of all-purpose flour with 1 tablespoon of granulated sugar to sweeten your waffles slightly. Add 1 tablespoon of baking powder to help them rise, along with half a teaspoon of salt and 1 teaspoon of cinnamon to enhance the flavor profile. If you love spices, consider adding a touch of cardamom, allspice, or nutmeg for an extra kick.
Using a whisk, mix all these dry ingredients thoroughly to ensure an even distribution of flavors throughout the batter.
Preparing the Bananas: The Star Ingredient
Part 3/7:
The key ingredient for these banana waffles is ripe bananas. You will need about 2 medium-sized bananas, which is approximately 1 cup when mashed (or 245 grams). If your bananas aren’t ripe enough, a quick hack is to bake them. Preheat your oven to 350°F (175°C), place the bananas on a baking sheet (still in their peel), and bake for about 10 minutes until they turn blackened. This process softens the texture and makes the bananas sweeter.
Mixing Wet Ingredients
In a separate medium bowl, mash the bananas and add half a cup (120 milliliters) of milk, 1 large egg, and 2 teaspoons of vanilla extract. Whisk these together until fully combined.
Combining the Mixtures
Part 4/7:
Now, it's time to combine the wet and dry ingredients. Pour the banana mixture into the bowl with the dry ingredients. Use a spatula to gently fold the mixture together. Be careful not to overmix, as this can lead to dense waffles. The goal is to have just combined elements with a lumpy batter, resembling that of a banana cake.
For added richness, incorporate a quarter cup of melted unsalted butter at this stage and mix until evenly distributed.
Cooking the Waffles
Part 5/7:
With your batter ready, scoop about one-third to half a cup of the mixture into your preheated waffle iron, depending on its size. Close the lid and cook for 3 to 4 minutes, or until the waffles are golden brown. Pay attention as the first waffle might take a bit less time, but subsequent batches will require a consistent cooking time.
To ensure crispy waffles, transfer them to a cooling rack immediately after they’re done. This allows steam to escape, preventing sogginess.
Storing and Serving Your Waffles
Part 6/7:
These banana waffles can be frozen for later enjoyment. Simply place them in a freezer bag, and they can last up to three months. Whenever you're craving waffles, pop them in the toaster or air fryer at 350°F (175°C) for a few minutes; they’ll come out just as delicious as when they were freshly made.
When serving, garnish your waffles with additional banana slices and plenty of maple syrup. The warm spices and banana flavor paired with sweet maple syrup create a delightful breakfast experience that’s hard to resist!
Conclusion
Part 7/7:
This easy banana waffle recipe is perfect for busy mornings, special brunches, or even a quiet weekend treat. Not only does it help reduce food waste by using ripe bananas, but it also fills your kitchen with delightful aromas and brings a smile to everyone’s face. Enjoy making these delicious waffles and share them with family and friends! If you love discovering new recipes, don’t forget to subscribe for more delightful culinary adventures!
Preppy Kitchen- Easy Raspberry Bars Recipe.
#foodtalk #raspberrybars #recipes #baking #sweettreat!summarize
Part 1/5:
Easy and Delicious Raspberry Bars Recipe
If you're looking for a simple yet delightful snack that you can whip up quickly, look no further! John Canel from Preppy Kitchen shares a fantastic recipe for raspberry bars that are not only easy to make but also incredibly satisfying. This treat is perfect for grabbing on the go, and it has a lovely chewy texture with a balanced sweetness. Here’s how to prepare them.
Preparing for Baking
To start off, preheat your oven to 350°F (180°C). This temperature is ideal for baking your raspberry bars to golden perfection.
Ingredients You'll Need
The ingredients required for this recipe are:
1.5 cups (180g) of all-purpose flour
1/2 teaspoon of baking soda
1/2 teaspoon of salt
1.5 cups (178g) of rolled oats
Part 2/5:
3/4 cup (165g) of light brown sugar
3/4 cup (170g) of room temperature unsalted butter
1 cup (240g) of seedless raspberry jam
The rolled oats give the bars their wonderful chewy texture. Make sure to use old-fashioned rolled oats, as quick oats are too small, and steel-cut oats are too thick for this recipe.
Mixing the Dry Ingredients
In a large bowl, combine the flour, baking soda, salt, and rolled oats. After mixing these dry ingredients together, add the brown sugar. It's helpful to crush any large clumps of brown sugar to ensure even mixing.
Give everything a good stir until all the ingredients are well combined. The mixture will form a crumbly texture.
Incorporating the Butter
Part 3/5:
Now, let’s add the room temperature unsalted butter. You want the butter to be soft enough that you can press it with your finger but not melting. To mix in the butter, use a fork or pastry blender to cut it into the dry ingredients until you achieve a crumbly texture. This step can be a fun activity for kids to help with as well!
Once everything is combined well, you’ll know it's ready when it holds its shape when pressed together.
Preparing the Baking Dish
Next, prepare an 8x8 inch square baking dish. Line the dish with foil, leaving about a 2-inch overhang on the sides, which allows for easy removal later. A quick spray with non-stick cooking spray will ensure nothing sticks to the dish.
Assembling the Bars
Part 4/5:
Now, take 2/3 of the crumble mixture and evenly distribute it as your base layer in the baking dish, pressing it down firmly with clean hands.
Spread 1 cup of seedless raspberry jam over this base, making sure to leave a half-inch border around the edges. This helps prevent the jam from bubbling out while baking.
Use the remaining crumble mixture, pressing it together into larger clumps and then breaking them up before scattering it evenly over the jam layer. This technique is key to achieving a delightful crumbly texture.
Baking Time
Now it’s time to pop the bars into the oven! Bake at 350°F for about 35 minutes, or until the top is golden brown and the edges are bubbling.
Allow the bars to cool completely in the dish before using the foil to lift them out.
Part 5/5:
Cutting and Serving
Once cooled, use a serrated knife to cut the bars into your preferred size. For generously sized pieces, aim for about 9 squares; the recipe on the blog suggests cutting them into 16 smaller squares if you prefer bite-sized treats.
Your raspberry bars are now ready to enjoy—chewy, crunchy, gooey, and perfectly sweet. Not only do they serve as a delicious snack, but they also keep well at room temperature for up to a week and can be frozen for up to three months.
Make sure to subscribe to John Canel’s Preppy Kitchen for more delightful recipes, and enjoy these gorgeous raspberry bars as a tasty treat anytime!
Preppy Kitchen- Easy White Bread Recipe | So Soft!
#foodtalk #whitebread #breadmaking #baking #bread!summarize
Part 1/6:
Homemade Fluffy White Bread: A Step-By-Step Guide
Making your own bread can be one of the most rewarding kitchen experiences. Not only do you get to enjoy a warm, fluffy loaf fresh from the oven, but you also control the ingredients, ensuring there are no preservatives or unwanted additives. In this article, we’ll explore how to make delicious, fluffy white bread from scratch, which promises to be a delightful addition to your table.
Gathering Ingredients
To start, you’ll need the following ingredients:
Warm Water: 2 cups (110 to 120°F)
Sugar: 2 tablespoons
Active Dry Yeast: 2 packets
All-Purpose Flour: 6 cups (720g)
Salt: 2 teaspoons
Melted Butter: 4 tablespoons
Part 2/6:
Warm water is crucial for activating the yeast; if it’s too cold, the yeast won’t foam, and if it’s too hot, it can kill the yeast. A good tip is to warm your mixing bowl beforehand to maintain the water temperature if you’re working in a chilly kitchen.
Activating the Yeast
In the bowl of a stand mixer, combine the warm water and sugar. Stir in the active dry yeast and let it sit for about five minutes until it becomes foamy. If your yeast doesn’t foam, that’s a sign it’s expired, and you’ll need to start over with fresh yeast.
Measuring the Flour
Part 3/6:
While waiting for the yeast to activate, it's time to measure the flour. It’s crucial to get the correct measurement for optimal texture. If you have a scale, go for it; otherwise, fluff up the flour in the container, sprinkle it into your measuring cup, and level it off for accuracy.
Once you’ve got your flour, add the 2 teaspoons of salt and mix it in.
Mixing the Dough
After the yeast has foamed, it’s time to combine everything. Pour the flour and salt mixture into the yeast mixture along with the melted butter (make sure it’s not too hot). Attach the dough hook and mix on low speed until the dough comes together in a shaggy ball, then scrape down any bits stuck to the bowl.
Part 4/6:
Increase the mixer speed to medium-low and continue mixing for about 5 to 7 minutes until the dough is smooth and springs back when pressed lightly. The dough should feel wet but not overly sticky and should cling to the dough hook without sticking to your fingers.
If mixing by hand, flour a clean countertop and knead the dough until it gains elasticity.
First Rise
Transfer the dough to a lightly greased bowl, turning it to coat it in oil to prevent drying out. Cover the bowl and leave it in a warm place to rise for about 40 to 50 minutes, or until nearly doubled in size.
A nice trick is to preheat your oven to 100°F for a short time, then turn it off. Place your bowl inside for a cozy environment conducive to dough rising.
Shaping the Loaves
Part 5/6:
Once the dough has risen, punch it down to release the air, then transfer it to a lightly floured counter. Divide the dough into two equal parts.
Shape each piece into a rectangular form (9 by 12 inches is a good target), rolling it tightly from the short end to create a log. Pinch the seams tightly and tuck the ends under to form a loaf. Place the loaf seam side down in a greased loaf pan.
Second Rise
Cover the loaves lightly with plastic wrap and allow them to rise again for about 25 to 30 minutes until they poke above the edge of the pan.
Preheat the Oven
During the second rise, preheat your oven to 350°F so it’s ready when the bread is.
Baking
Part 6/6:
After the second rise, you can brush the loaves with melted butter for extra richness. Bake the loaves in the preheated oven for 30 to 35 minutes, until they turn a lovely golden brown.
Cooling and Slicing
Once baked, allow the bread to cool in the pan for a few minutes, then transfer it to a wire rack to cool completely. Slicing into the finished loaf reveals a soft, pillowy texture that is simply irresistible.
Conclusion
Homemade white bread is a comforting, satisfying endeavor that fills the kitchen with a delightful aroma. With this easy-to-follow recipe, you can now enjoy bakery-quality bread right from your own oven. Don’t forget to share with friends and family, and if you loved this recipe, be sure to check out more amazing recipes for future baking adventures!
What food would you love to try out that you have been willing to? #foodtalk #food
Download the update on PC, Android, or iOS! Link is in the first reply!#KOMPETE Version 53 is live!
LFK! #KOMPETE
DOWNLOAD HERE: https://kompete.game/
Read the patch notes here:
https://kompete.game/news/version-53-release-and-patch-notes
One click hive swaps are the future, have you tried them yet?
https://inleo.io/threads/view/neopch/re-leothreads-217krwd3u
Desperately need HIVE to send
we’ll make this happen 🫡
Send to who?
11 years later and still building, still innovating, still the king of digital cash.
We're proud to have partners like NOW Wallet with us every step of the way! 🤝
#dash #crypto
never stop building 🦁
The one guy around here who truly understands the power of buying your own token on the market and thickening up LP’s while compounding the fees
I wish I was ready to load up on hive and push those proposals through faster
That is very good partnership
Keep up the good work
when I think of OG’s coins, I always think of
Bitcoin
Ethereum
Dash
Steem
Litecoin
Monero
Dogecoin
Bitcoin is doing its think
Ethereum has changed but thriving
Dash is killing it like always
Steem started off bad but was reborn has Hive
Litecoin founder promised everyone privacy features then dumped on everyone’s head at the top, price never recovered
Monero is actually the closest thing I can think of as Digital Cash if we are speaking honestly however it has a lot of risks no one talks about and the Law hasn’t been very easy on it
And of course none of us expected Doge to be doing what its doing now
I wonder how many people got a couple of Dash masternodes and kept them for the past 10 years :)
We know plenty. And we're constantly innovating: launched a whole new revolutionary blockchain last year.
Who's on X? Who wants to try to get @NOW_Wallet on INLEO?
Long time hiver, first time LEO threader
Welcome @tattoodjay !
https://inleo.io/threads/view/tattoodjay/re-leothreads-jxhhtkd7
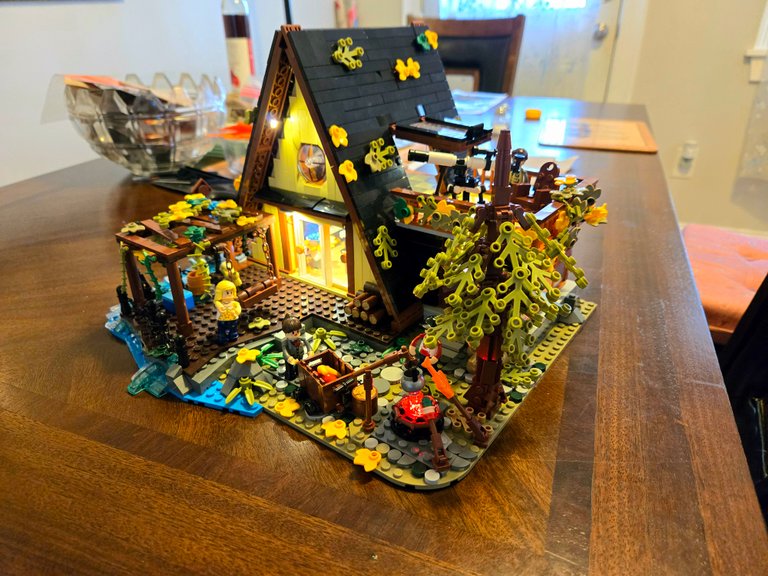
Havent used Inleo yet thought I should take a look and try a post here is a recent project I have been working on
Hey!! Welcome to INLEO
So excited to see you posting here
Photo looks super high quality too
Thanks, that was a quick shot with my phone, I took some photos with my camera yesterday but havent edited them yet
Super cool! :)
Do you do lots of those?
Welcome to Inleo!
Thanks I will try and look around inLeo and use it more
I just started these recently to keep me busy over winter when I do not get out for photo walks, but this was my fourth one i have done and 7 more to do :)
Collaboration is key
collaboration in itself is an economy and becomes a basic threshold for survival in odd times.
https://inleo.io/threads/view/dashpay/re-leothreads-im4z5w82
wireless meat thermometer is a game changer. no more guessing and running to check temp. #food
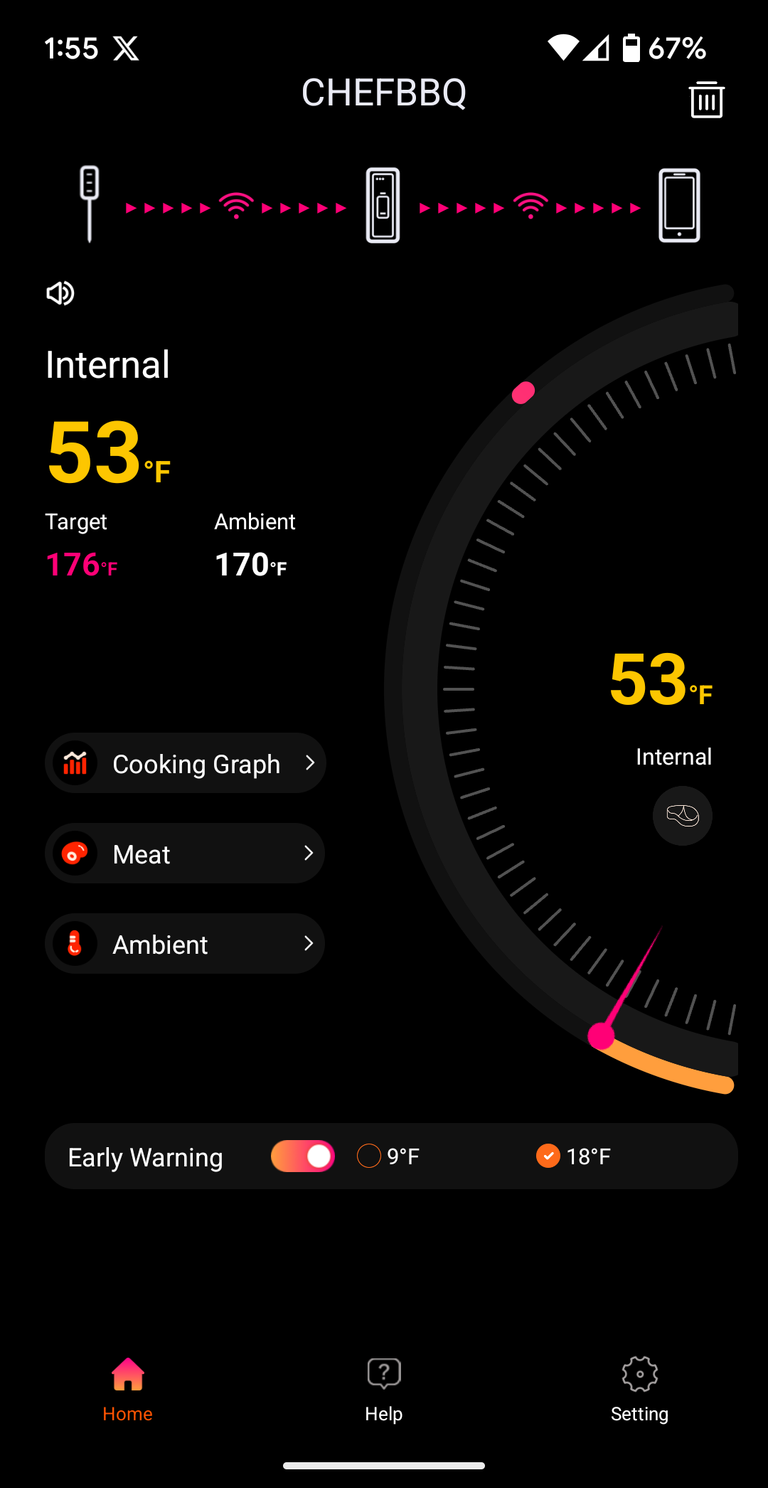
so many of my friends have told me this, I still haven’t tried it
it's like cheating. perfect cook every single time.
Since when is using tools cheating?
it isn't. It just feels like it lol
That's pretty awesome
highly recommend
o.o This is the kind of tech development I like xD
i didn't realize how useful it would be til i got it
wow and this is an app on Playstore? Can I get the name bro?
yeah but it requires to be paired with a bluetooth thermometer. it's chefbbq
Oh, that's awesome. A good kitchen tool for cooking.
My brain just went totally in the gutter ;)
Hi, @l337m45732,
This post has been voted on by @darkcloaks because you are an active member of the Darkcloaks gaming community.
Get started with Darkcloaks today, and follow us on Inleo for the latest updates.
If you are a new account with a reputation of lower than 40 tag me in a thread. I'm tired of reading quotes from 25s all day lol.
Those 25s post once or twice.
!BBH
yes. that happens on other places on hive. I don't mind them because the fade away and it doesn't cost us much in the long run. But, I want to identify those that want to be real lions. Thats where i want my votes to go
AMEN!!!!!!!
#facts
Good Morning Sir.
Let's stay focused.
100%
💯
Sure
Splinterlands: My Latest Guild Brawl and Cards Upgrade
link to post in comments
#splinterlands #cent #ai #aiart
https://peakd.com/hive-13323/@logen9f/splinterlands-my-latest-guild-brawl
Khal — Today at 6:46 PM
@everyone We’re aware of some missing delegation payouts to @leo.voter HIVE POWER delegators the past week or so. Hive Engine has been facing some intermittent outages / DDoS attacks that have slowed blocks and caused some missed delegator payouts of LEO on our end.
We will remedy these when HE is fully back online. You may see a missed payment today and a random few from the past few days. We are tracking which ones have been missed and all will be remedied once everything has stabilized.
Thanks for your patience 🦁
INLEO UI
#inleoui #motivation #quotesonleo #quotes
i need a sewing machine and thick thread :D
Lol, this got me, I wasn't expecting this.
lol that thread got me too
me three 👉🏽🤪👈🏽
Four all of us :D
four all of us five friends 😁
🧶👍🏽
Indeed, it is and let's strom #threads
Link below ⏬Here is a #summary of yesterday's INLEO AMA
https://inleo.io/@ai-summaries/summary-inleo-ama-february-4-2025-fjw
When InLeo meme coin?
Yes, a lion meme coin!
!BBH
now that would be super awesome. But I think a Leo meme coin should come when Leo is about to hit huge user base milestones so it can pick up otherwise the Leo itself has dipped too much
i though the lions are already a form of meme , lol
The lions here are the meme and the coin is the LEO.......
!summarize
Part 1/7:
Exploring the Mechanics of Overunity Devices
The fascinating world of overunity devices has intrigued inventors and enthusiasts for decades. In a recent video response, the creator demonstrates a simple yet effective mechanical device, showcasing the mechanisms behind its operation and the principles that might lead to overunity conditions.
The Simple Design Behind Success
Part 2/7:
At the heart of this demonstration lies a modestly designed spinning rotor device. Crafted some time ago, it relies on basic mechanical components instead of complex solid-state electronics. The rotor is equipped with two sets of neodymium magnets, pivotal for its functionality. A notable feature is the 10-pound steel weight placed atop the rotor, which serves to illustrate the machine's ability to handle substantial loads.
The creator highlights that the rotor operates on inexpensive lazy Susan bearings, demonstrating that intricate designs are not always necessary for successful operation. At its core, the device employs a solenoid powered by standard batteries, with AA-batteries typically preferred due to their manageable heat output when using this particular solenoid.
Part 3/7:
Mechanical Versus Electronic Systems
One insight the creator shares is the potential vulnerability of solid-state devices during events like an EMP (electromagnetic pulse). By sticking with a largely mechanical system, the creator emphasizes longevity and operational stability—qualities that can be compromised in high-tech electrical systems. This philosophy results in a design that is both robust and reliable, capable of functioning under various conditions.
Part 4/7:
The construction of the rotor features a micro switch that activates the solenoid periodically. The mechanism engages and disengages as the rotor turns, effectively harnessing the power of the neodymium magnets. This design is reminiscent of Rube Goldberg machines—complex assemblies where each action leads to another—showcasing a whimsical and ingenious approach to operational engineering.
The Power of Repulsion
During the demonstration, the creator spins the rotor manually to get it started, and once engaged, the device continues to rotate smoothly. While he mentions the capability to handle weights of up to 30 pounds, it is evident that the current setup with a 10-pound weight is already pushing the boundaries of the device's mechanical prowess.
Part 5/7:
The demonstration vividly illustrates the fundamental principle that underlies the operation of many overunity devices: the interaction between the force fields of permanent magnets. By leveraging these natural properties, the creator effectively demonstrates that such a device can sustain motion with minimal energy expenditure.
High Frequency Resonance and Replication
For those interested in replicating such devices, the creator suggests that methods relying on high-frequency resonance or simple mechanical rotary designs utilizing neodymium magnets are the most promising pathways to explore. The simplicity of the mechanical design may appeal to those without extensive training in electronics, making it potentially accessible for a broader audience.
Part 6/7:
The creator expresses confidence in the capabilities of the device, suggesting that it can run for extended periods without significant power draw. This assertion challenges conventional perceptions of energy use and efficiency, hinting at exciting possibilities in the field of energy generation and mechanical devices.
Conclusion: A Step Towards Understanding
Ultimately, the video serves as an intriguing glimpse into the mechanics and potential of overunity devices. By demonstrating a simple rotor device that operates on basic mechanical principles, the creator provides valuable insights into a domain often shrouded in complexity and skepticism.
Part 7/7:
With a focus on mechanical reliability and the principles of magnetism, the exploration of these devices opens doors for further inquiry and innovation in the realm of energy production—offering hope for a future where efficiency and sustainability can be seamlessly integrated into design.
As the creator wraps up the demonstration, the message is clear: understanding and exploration are key to unlocking the vast potentials of energy systems, making it a captivating topic for inventors and enthusiasts alike.
Leo is down in price right now but with a finite amount of the token. This is bound to change in the next few months.
So you predict a price action before the End of the year?
before the end of 2025???
yes.
So it's wise to by now or you think it will dumb further?
Not financial advice of course
i can't advise on that.
i can just state my views
Few
Sir, max total supply than can ever be produced is finite or not?
!summarize
Part 1/4:
Understanding Gyro Wheel Dynamics
The exploration of gyroscopic systems often fascinates engineers and enthusiasts alike. In this article, we delve into an intriguing demonstration involving a 32-inch diameter gyro wheel and the concepts of torque, energy conservation, and mechanical output.
The Setup
Our starting point is a gyro wheel that has a considerable weight of close to 50 pounds. This mass provides a solid foundation for our exploration of gyroscopic principles. Central to this setup is a motor connected to the wheel, which is rated at 2.5 inch-pounds of torque when operating at 12 volts.
Initial Observations
Part 2/4:
At the outset, the gyro wheel is powered using six volts, a voltage that's notably less than the motor's maximum rating. When activated, the motor struggles to impart significant motion to the wheel. The comparison indicates that, despite the wheel being powered, there is minimal visible torque produced. This initial observation emphasizes the challenges associated with spinning large, heavy objects with low-torque motors.
Torque and Power Calculations
Digging deeper into the discussion of power and torque, it's noted that under certain conditions, the gyro wheel can sustain a theoretical output of around 1,200 horsepower. The motor, while seemingly underpowered at 2.5 inch-pounds, is effectively working within the constraints of the system’s physical laws.
Energy Dynamics
Part 3/4:
This scenario invites contemplation of energy conservation principles. The concept illustrates that while the motor generates limited torque when powered, the spinning wheel possesses stored energy that enables it to sustain motion even when power is disconnected. This phenomenon illustrates the balance of energy inputs and outputs within a mechanical system.
Conclusion
Part 4/4:
In summary, the demonstration highlights the intricate relationship between torque, energy conservation, and mechanical potential in a gyroscopic system. With a relatively low-output motor, the gyro wheel manages to perform substantial work, effectively bridging the gap between theoretical concepts and practical applications in mechanics. This experiment serves not only as an insightful exploration of physics but also as inspiration for those interested in the efficiency and capabilities of gyroscopic motion.
A #summary of today's Chain Chatter episode ⬇️
https://inleo.io/@ai-summaries/summary-chain-chatter-february-5-2025-3q8
what's so interesting about your tool is how it can summarize long content. So is there a limit to the length of the video
On today‘a call, I floated the idea of accelerating the timeline of switching off LEO inflation and turning on the System Income Rewards Pool
TLDR; in the docs it is written that when LEO reaches 50M there is the max possible supply. More coins can exist beyond 50M.
When said time is reached, SIRP replaces the inflationary rewards pool
What if that time came sooner? It would mean that the inflation of LEO would cease immediately and all rewards would be paid via system income.
This is not an official poll, just for my curiosity. Would you vote yes or no to accelerate this?
LeoDex revenue would need to grow immensely in the near future to make it feasible
I think we are too early for this. Low rewards can send many users to post less. We are past the most inflationary years. $LEO should be fine as it is.
That's a hard decision... if there was enough coming from leodex Then I would say yes. Though to tell you the truth I don't have me mind completely wrapped around the mechanics of it so, I wouldn't be able to say yes or no with confidence.
The Miami Heat are finalizing a trade to send Jimmy Butler to the Warriors for Andrew Wiggins, Dennis Schröder, Kyle Anderson and a protected first-round pick, per @ Shams Charania
#nba
Incase you ain't on discord
thanks for sharing this here!
you're welcome Lion King 👑
With the recent price drop, we as a team have bought and burned 100k Gifu tokens on the BSC side, which goes on to further solidify our stance as a deflationary token. Now is the best time to buy if you've not loaded up on some Gifu tokens.
#gifu #burn
For more details about this, check the link below.
#gifu
https://inleo.io/@gifu/sells-burn-gifu-too--knt?referral=gifu
off to physical therapy. Hopefully they can get my back working again.
get better bro
I wish you a great recovery , stay strong
It will work out , just be positive about it
Goodluck
Hi, @dkid14,
This post has been voted on by @darkcloaks because you are an active member of the Darkcloaks gaming community.
Get started with Darkcloaks today, and follow us on Inleo for the latest updates.
I hope the therapy was successful , goodluck
Wish you the best of luck bro. Come back stronger.
The INLEO Referral Program. I got my 20th referral today. 🦁
One good thing about the referral rewards is that, no matter how much $LEO is, your total LEO earned remains the same and when the price goes up, you already know what happens. 😊
Are you referring your friends and followers on Web 2 platforms to INLEO?
#referralprogram #cent https://img.inleo.io/DQmcR1J3sLVt8HH7uZsiviMtvPsRG4MzBkFN69VvEA4PUhp/Screenshot%20(343).png
every time i try to claim mr reward and then open my wallet didnot see the balanc change
Do you earn #crypto any other way online? I have a few methods some may benefit from
please share
Any little drop will turn to river.
#crypto.
Brilliant quote! Definitely holds true, with these few methods it has helped me accumulate so much more Hive in the long run, I shared the LEO post in the thread :D
Check it out here if you are curious!
https://inleo.io/@dubble/online-ways-i-earn-more-cryptocurrency-jea
Yaga looks most regal this morning, me, my hair is currently channeling Albert Einstein during an electrical storm.
G’day lions!
#bbh #inleo
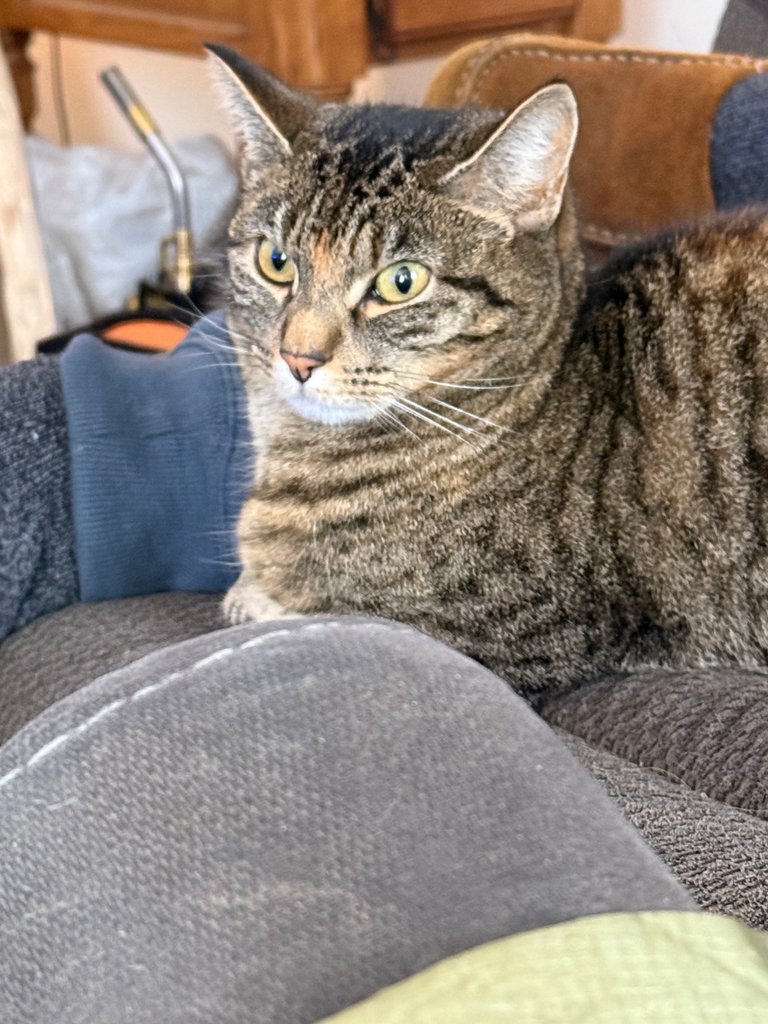
It's like he knows you're going to take his picture and he strikes his best pose. Cute kitty.😺
I can imagine, I hope you didn't sustain any injuries or damages during the storm
of all the times I see yaga pictures in your threads I think this is the one I'm seeing yaga in cool mood. IV seen yaga when she's not feeling the day, it's so funny
Is the cat planning the retirement 🤔 because that's my fave whenever I'm thinking about it. Cool cool cat bro
Had a great lunch with my financial mentor (also a cousin) and looks like things are all on the right path with all the things I am doing!
He even bought a couple of DG Home 1 $DOGE miners that he is going to set up in his house and want to invest with me in the solar mining infrastructure after our last lunch!
So now it's time to do all the numbers and figure out what makes sense for both of us! Who knows, we could scale up to be the next RIOT or MARA, lol. I wish, but hey, who knows? LOL.
Yes, the Dogecoin ecosystem has been cooking a couple of significant improvements, among which the ZKP layer 2 they'll launch and the "Doge OS". Seems to be a reasonable bet 🙃.
I haven't seen that, but will look into it for sure. Anything to drive more fundamental value.
Now waiting for the fourth episode of #severance this Friday. This show got me hooked
I guess I have to give it a shot…ur like the 4th I’ve seen raving about it just here on threads lol. Must be pretty damn good
It is unique and really well made.
It's like they answer questions by creating more questions about wtf is going on.
I know. I thought the reintegration would be the cliffhanger for the next season. But, it is not and that means the next seven episodes will have more answers or more questions.
Best onboarding tool in a while! 👀
Thousands of new users are earning Dash with the same social media posts you're doing here.
What are you waiting for?!
#dash #inleo
https://inleo.io/threads/view/khaleelkazi/re-dashpay-13jo46ux
waw that's awesome
I love America.
I loved every bit of jingoistic propaganda.
I believed it hook, line and sinker.
Now, let’s make it all real.
#elonmusk #cent #doge #pepe #kekiusmaximus
Como reutilizar garrafones de agua que ya no utilices #spanish #bbh #hive #cent #inleo
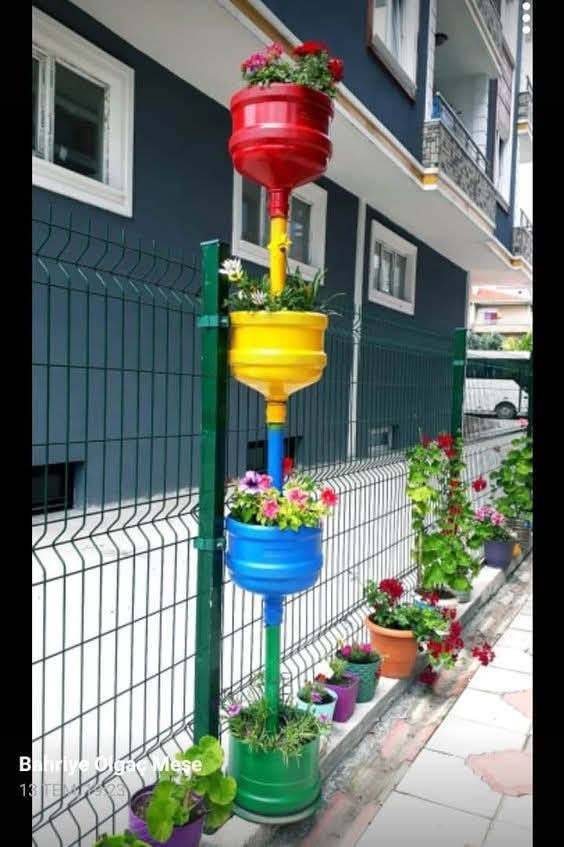
Super bueno!!!
Can we get a dashboard update that shows me how much LEO I'm earning and from what locations like author and curation? Maybe a think when VSC releases
If it is available, this would be nice
Hi, @bitcoinflood,
This post has been voted on by @darkcloaks because you are an active member of the Darkcloaks gaming community.
Get started with Darkcloaks today, and follow us on Inleo for the latest updates.
watching the live “smartless” podcast tour.
This is my type of humor.
Did have the skip the AOC appearance
Sir H-E is down for mor than 24 hrs; any idea when will it be back and running?
no idea. I don’t do anything with HE
ok sir
🚨 One-Click #Hive Swaps on LeoDEX | #InLeo Shorts 😇
👇 Link #linkincomments #crypto
https://img.inleo.io/DQmeRcekQdNGNwDpkGV9Kr7yGmuDmqAaKwnRTA9H3NPCnCN/Hive-Echo%20(1).png
https://inleo.io/@neopch/xiqiaxvh
This just doesn't seem right to me. If there is corruption in the CIA, just changing sides and going with #Trump isn't going to fix it. #news #politics
But what do I know, I'm not a politician, but I think if an agency is corrupt at its core, you need to strip it down and remove all the bad players
Seems bullish
That is good
There is something wrong with Hive Engine..
Is it working for anyone?
#askleo
they got DDOS'd
working on getting it back up according to their discord
Oh my! That's bad! I had no idea.
Will be waiting till they get back online then..
$RUNE LFG
Swapkit.dev is on charge again. Nice.
This is good news
ye, it is.
Hi, @shebe,
This post has been voted on by @darkcloaks because you are an active member of the Darkcloaks gaming community.
Get started with Darkcloaks today, and follow us on Inleo for the latest updates.
Hi, @shebe,
This post has been voted on by @darkcloaks because you are an active member of the Darkcloaks gaming community.
Get started with Darkcloaks today, and follow us on Inleo for the latest updates.